Guided Tutorial GNU Radio in Python
Obsolescence
 NOTE: This tutorial has been deprecated in GR 3.8. It is kept around for documentation, but the code within will mostly not work for any GNU Radio version that is still supported. GNU Radio 3.7 is end-of-life.
You should instead read the section on writing Python blocks in the official Tutorials.
Objectives
- Python Blocks
- OOT modules make the actual apps / functionality (GR is the API!)
- How to add OOTs
- How to add Python blocks with gr_modtool and how to code them
- QPSK mapping
- How to add GRC bindings for block
Prerequisites
- Working Installation of GNU Radio 3.7
- GRC Tutorial (Recommended)
- Familiar with Python
3.1. Intro to Using GNU Radio with Python
This tutorial goes through three parts. The first is how to modify, create, or simply understand the Python generated files GRC produces for us. The second is how to create our own custom out-of-tree (OOT) modules from the ground up. Lastly we go through an actual project to get more practice and build intuition on how we can use GNU Radio in our own project. As with the last tutorial, all the content - pictures, source code, and grc files - is included in the gr-tutorial repository which we should have a local copy if we followed the directions from the GRC Tutorial
Again we should have a directory with the solutions and a directory with our work as below:
/home/user/gnuradio/tutorials/solutions
/home/user/gnuradio/tutorials/work
As a rule, if we hover over the GRC flowgraph images, we will be able to see the corresponding filename. Same applies for other images. Full code files are collapsed with the filename in the collapsed handle.
3.1.1. GRC Generated Python Files
Let us look at a dial-tone example on the GRC:
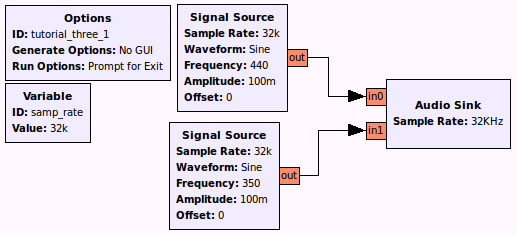
When we click the Generate button, the terminal tells us it produced a .py file so let's open that to examine its code which is reproduced below:
#!/usr/bin/env python3
# -*- coding: utf-8 -*-

#
# SPDX-License-Identifier: GPL-3.0
#
# GNU Radio Python Flow Graph
# Title: tutorial_three_1
# GNU Radio version: 3.8.0.0

from distutils.version import StrictVersion

if __name__ == '__main__':
    import ctypes
    import sys
    if sys.platform.startswith('linux'):
        try:
            x11 = ctypes.cdll.LoadLibrary('libX11.so')
            x11.XInitThreads()
        except:
            print("Warning: failed to XInitThreads()")

from gnuradio import analog
from gnuradio import audio
from gnuradio import gr
from gnuradio.filter import firdes
import sys
import signal
from PyQt5 import Qt
from argparse import ArgumentParser
from gnuradio.eng_arg import eng_float, intx
from gnuradio import eng_notation
from gnuradio import qtgui

class tutorial_three_1(gr.top_block, Qt.QWidget):

    def __init__(self):
        gr.top_block.__init__(self, "tutorial_three_1")
        Qt.QWidget.__init__(self)
        self.setWindowTitle("tutorial_three_1")
        qtgui.util.check_set_qss()
        try:
            self.setWindowIcon(Qt.QIcon.fromTheme('gnuradio-grc'))
        except:
            pass
        self.top_scroll_layout = Qt.QVBoxLayout()
        self.setLayout(self.top_scroll_layout)
        self.top_scroll = Qt.QScrollArea()
        self.top_scroll.setFrameStyle(Qt.QFrame.NoFrame)
        self.top_scroll_layout.addWidget(self.top_scroll)
        self.top_scroll.setWidgetResizable(True)
        self.top_widget = Qt.QWidget()
        self.top_scroll.setWidget(self.top_widget)
        self.top_layout = Qt.QVBoxLayout(self.top_widget)
        self.top_grid_layout = Qt.QGridLayout()
        self.top_layout.addLayout(self.top_grid_layout)

        self.settings = Qt.QSettings("GNU Radio", "tutorial_three_1")

        try:
            if StrictVersion(Qt.qVersion()) < StrictVersion("5.0.0"):
                self.restoreGeometry(self.settings.value("geometry").toByteArray())
            else:
                self.restoreGeometry(self.settings.value("geometry"))
        except:
            pass

        ##################################################
        # Variables
        ##################################################
        self.samp_rate = samp_rate = 32000

        ##################################################
        # Blocks
        ##################################################
        self.audio_sink_0 = audio.sink(samp_rate, '', True)
        self.analog_sig_source_x_1 = analog.sig_source_f(samp_rate, analog.GR_COS_WAVE, 350, 0.1, 0, 0)
        self.analog_sig_source_x_0 = analog.sig_source_f(samp_rate, analog.GR_COS_WAVE, 440, 0.1, 0, 0)


        ##################################################
        # Connections
        ##################################################
        self.connect((self.analog_sig_source_x_0, 0), (self.audio_sink_0, 0))
        self.connect((self.analog_sig_source_x_1, 0), (self.audio_sink_0, 1))

    def closeEvent(self, event):
        self.settings = Qt.QSettings("GNU Radio", "tutorial_three_1")
        self.settings.setValue("geometry", self.saveGeometry())
        event.accept()

    def get_samp_rate(self):
        return self.samp_rate

    def set_samp_rate(self, samp_rate):
        self.samp_rate = samp_rate
        self.analog_sig_source_x_0.set_sampling_freq(self.samp_rate)
        self.analog_sig_source_x_1.set_sampling_freq(self.samp_rate)


def main(top_block_cls=tutorial_three_1, options=None):

    if StrictVersion("4.5.0") <= StrictVersion(Qt.qVersion()) < StrictVersion("5.0.0"):
        style = gr.prefs().get_string('qtgui', 'style', 'raster')
        Qt.QApplication.setGraphicsSystem(style)
    qapp = Qt.QApplication(sys.argv)

    tb = top_block_cls()
    tb.start()
    tb.show()

    def sig_handler(sig=None, frame=None):
        Qt.QApplication.quit()

    signal.signal(signal.SIGINT, sig_handler)
    signal.signal(signal.SIGTERM, sig_handler)

    timer = Qt.QTimer()
    timer.start(500)
    timer.timeout.connect(lambda: None)

    def quitting():
        tb.stop()
        tb.wait()
    qapp.aboutToQuit.connect(quitting)
    qapp.exec_()


if __name__ == '__main__':
    main()
The first thing for us to realize is that the GRC can generate Python files that we can then modify to do things we wouldn't be able to do in GNU Radio Companion such as perform simulations. The libraries available in Python open up a whole new realm of possibilities! For now, we will explore the structure of the GRC Python files so we are comfortable creating more interesting applications.
3.1.2. Hello World Dissected
While examining the code, we need to get familiar with documentation. GNU Radio uses Doxygen (the software) for the GNU Radio Manual. The easiest way to go through the documentation is to go through the functions that we use so let us simplify our code by only including the bare bones needed to run the dial-tone example.
#!/usr/bin/env Python3
from gnuradio import gr
from gnuradio import audio
from gnuradio import analog

class my_top_block(gr.top_block):
    def __init__(self):
        gr.top_block.__init__(self)

        sample_rate = 32000
        ampl = 0.1

        src0 = analog.sig_source_f(sample_rate, analog.GR_SIN_WAVE, 350, ampl)
        src1 = analog.sig_source_f(sample_rate, analog.GR_SIN_WAVE, 440, ampl)
        dst = audio.sink(sample_rate, "")
        self.connect(src0, (dst, 0))
        self.connect(src1, (dst, 1))

if __name__ == '__main__':
    try:
        my_top_block().run()
    except [[KeyboardInterrupt]]:
        pass
Let us examine this line by line:
#!/usr/bin/env python3
Tells the shell that this file is a Python file and to use the Python interpreter to run this file. Should always be included at the top to run from the terminal.
from gnuradio import gr
from gnuradio import audio
from gnuradio import analog
Tells Python the modules to include. We must always have gr to run GNU Radio applications. The audio sink is included in the audio module and the signal_source_f is included in the analog module which is why we include them. PEP8 tells us we should import every module on its own line.
class my_top_block(gr.top_block):
Define a class called "my_top_block" which is derived from another class, gr.top_block. This class is basically a container for the flow graph. By deriving from gr.top_block, we get all the hooks and functions we need to add blocks and interconnect them.
def __init__(self):
Only one member function is defined for this class: the function "init()", which is the constructor of this class.
gr.top_block.__init__(self)
The parent constructor is called (in Python, this needs to be done explicitly. Most things in Python need to be done explicitly; in fact, this is one main Python principle).
sample_rate = 32000
ampl = 0.1
Variable declarations for sampling rate and amplitude that we will later use.
3.1.3. A Look at Documentation
src0 = analog.sig_source_f(sample_rate, analog.GR_SIN_WAVE, 350, ampl)
src1 = analog.sig_source_f(sample_rate, analog.GR_SIN_WAVE, 440, ampl)
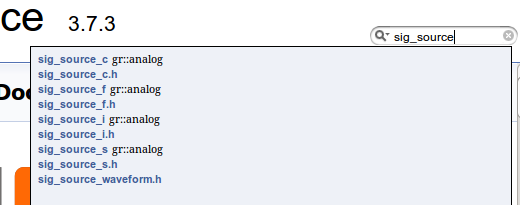
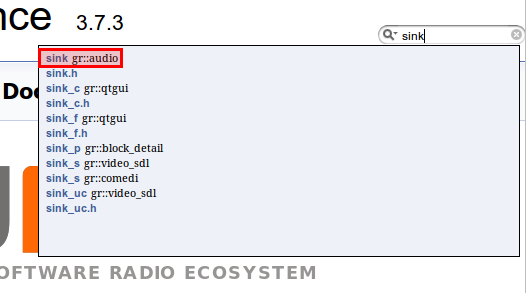
Here we are using functions from GNU Radio so let's have a look at the documentation for analog.sig_source_f which is available in the GNU Radio manual. We can find it easily by using the search function as below:
We can then scroll down to Member Function Documentation to see how the function is used and the parameters it accepts as below:
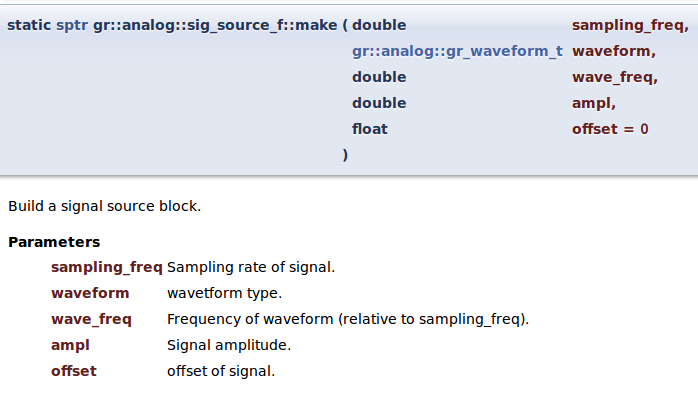
We can see that our function analog.sig_source_f takes in 5 parameters but in our code we are only using 4. There is no error because the last input offset is set to "0" by default as shown in the documentation. The first input is the sampling_freq which we defined as sample_rate in our code. The second input is asking for a gr::analog::gr_waveform_t waveform so let's click that link to find out more.
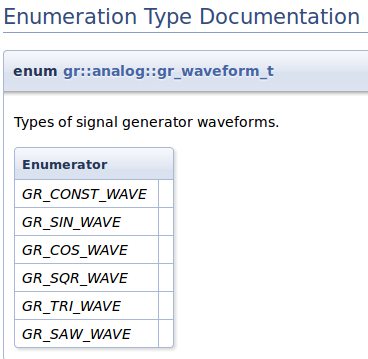
We can see that there are a couple of options to choose from. In this case we chose analog.GR_SIN_WAVE. The third input is wave_freq which we input "350" or "440". The fourth input is ampl which we defined as ampl.
dst = audio.sink(sample_rate, "")
Because documentation is so important, let's look at another example. Again, we can look at the documentation for audio.sink which is available on the GNU Radio Manual through the search function:
We can then as before scroll down to the Member Function Documentation to see the parameters it accepts:
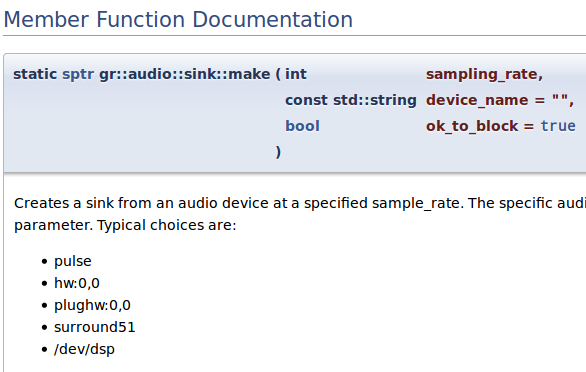
This time we have 3 inputs with the last being optional. In our code, for the first input sampling_rate we used are sample_rate variable. In the second input, we have a choice for what device to use for audio output. If we leave it alone as "" then it'll choose the default on our machine.
3.1.4. Connecting the Block Together
self.connect(src0, (dst, 0))
self.connect(src1, (dst, 1))
The general syntax for connecting blocks is self.connect(block1, block2, block3, ...) which would connect the output of block1 with the input of block2, the output of block2 with the input of block3 and so on. We can connect as many blocks as we wish with one connect() call. However this only work when there is a one-to-one correspondence. If we go back to our initial flowgraph, there are 2 inputs to the Audio Sink block. The way to connect them is by using the syntax above. The first line connects the only output of src0 (350 Hz waveform) to the first input of dst (Audio Sink). The second line connects the only output of src1 (440 Hz waveform) to the second input of dst (Audio Sink). The code so far is equivalent to the flowgraph we have created in the beginning; the rest of the lines simply start the flowgraph and provide a keyboard interrupt.
if __name__ == '__main__':
    try:
        my_top_block().run()
    except KeyboardInterrupt:
        pass
Luckily we are past the early years of GNU Radio when there was no GRC to make the Python files for us. Nowadays we can simply click things together in GRC instead of having to write code in Python to build flowgraphs. Still, a good understanding of what is going on every time we run GRC is good to know as it gives us more control of what we want the program to do.
3.1.5. Modifying the GRC-Generated Python File
For instance, what if we wanted to change variables such as frequency and amplitude when a certain event occurs? How do we implement if statements, state machines, etc in GNU Radio? One way is to create our own blocks which we will delve into at length later. Another is to modify our GRC-generated python file.
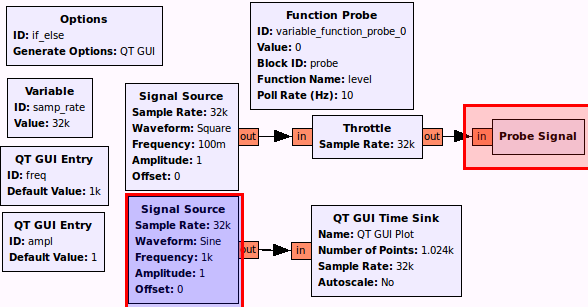
Our friend heard we were into RF so being cheap he has asked us to power his house using RF. He wants us to give him high power during the day so he can watch TV and play video games while at night give him low power so he can power his alarm clock to wake up for work in the morning. We first need to set up the clock which keeps track of the day and gives us 1 for day or 0 for the night. Once we get the time we can send him power through a sine wave using our massive terawatt amplifier and massive dish in our backyard. We did the calculations and we want to pulse at 1kHz, 1 amplitude during the day, and 100Hz, 0.3 amplitude at night. Here's what we came up with in GRC:
- Frequency to "freq", Amplitude to "ampl"
- ID to "probe"
- Everything else is visible
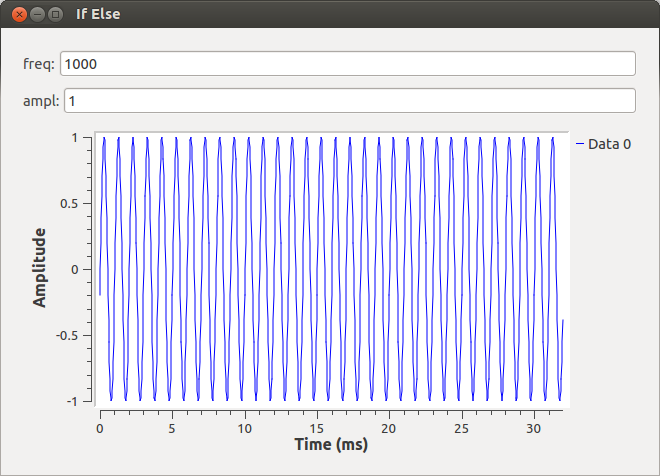
The top section keeps track of time and will switch from 0 to 1 while the bottom section sends the pulse. The problem we encounter however is that there is no if-statement block. Sure we can tie the probe to the frequency as we did in tutorial2 for the singing sine wave but that only allows changing by a factor. What if we wanted to change multiple things and not by a linear factor? Let's start by running the flowgraph to make sure we get the output as below:
Now we can open up the GRC generated python file if_else.py which is copied below:
#!/usr/bin/env python3
# -*- coding: utf-8 -*-

#
# SPDX-License-Identifier: GPL-3.0
#
# GNU Radio Python Flow Graph
# Title: if_else
# GNU Radio version: 3.8.0.0

from distutils.version import StrictVersion

if __name__ == '__main__':
    import ctypes
    import sys
    if sys.platform.startswith('linux'):
        try:
            x11 = ctypes.cdll.LoadLibrary('libX11.so')
            x11.XInitThreads()
        except:
            print("Warning: failed to XInitThreads()")

from PyQt5 import Qt
from gnuradio import eng_notation
from gnuradio import qtgui
from gnuradio.filter import firdes
import sip
from gnuradio import analog
from gnuradio import blocks
from gnuradio import gr
import sys
import signal
from argparse import ArgumentParser
from gnuradio.eng_arg import eng_float, intx
import time
import threading
from gnuradio import qtgui

class if_else(gr.top_block, Qt.QWidget):

    def __init__(self):
        gr.top_block.__init__(self, "if_else")
        Qt.QWidget.__init__(self)
        self.setWindowTitle("if_else")
        qtgui.util.check_set_qss()
        try:
            self.setWindowIcon(Qt.QIcon.fromTheme('gnuradio-grc'))
        except:
            pass
        self.top_scroll_layout = Qt.QVBoxLayout()
        self.setLayout(self.top_scroll_layout)
        self.top_scroll = Qt.QScrollArea()
        self.top_scroll.setFrameStyle(Qt.QFrame.NoFrame)
        self.top_scroll_layout.addWidget(self.top_scroll)
        self.top_scroll.setWidgetResizable(True)
        self.top_widget = Qt.QWidget()
        self.top_scroll.setWidget(self.top_widget)
        self.top_layout = Qt.QVBoxLayout(self.top_widget)
        self.top_grid_layout = Qt.QGridLayout()
        self.top_layout.addLayout(self.top_grid_layout)

        self.settings = Qt.QSettings("GNU Radio", "if_else")

        try:
            if StrictVersion(Qt.qVersion()) < StrictVersion("5.0.0"):
                self.restoreGeometry(self.settings.value("geometry").toByteArray())
            else:
                self.restoreGeometry(self.settings.value("geometry"))
        except:
            pass

        ##################################################
        # Variables
        ##################################################
        self.variable_function_probe_0 = variable_function_probe_0 = 0
        self.samp_rate = samp_rate = 32000
        self.freq = freq = 1000
        self.ampl = ampl = 1

        ##################################################
        # Blocks
        ##################################################
        self.probe = blocks.probe_signal_f()
        self._freq_tool_bar = Qt.QToolBar(self)
        self._freq_tool_bar.addWidget(Qt.QLabel('freq' + ": "))
        self._freq_line_edit = Qt.QLineEdit(str(self.freq))
        self._freq_tool_bar.addWidget(self._freq_line_edit)
        self._freq_line_edit.returnPressed.connect(
            lambda: self.set_freq(int(str(self._freq_line_edit.text()))))
        self.top_grid_layout.addWidget(self._freq_tool_bar)
        self._ampl_tool_bar = Qt.QToolBar(self)
        self._ampl_tool_bar.addWidget(Qt.QLabel('ampl' + ": "))
        self._ampl_line_edit = Qt.QLineEdit(str(self.ampl))
        self._ampl_tool_bar.addWidget(self._ampl_line_edit)
        self._ampl_line_edit.returnPressed.connect(
            lambda: self.set_ampl(int(str(self._ampl_line_edit.text()))))
        self.top_grid_layout.addWidget(self._ampl_tool_bar)
        def _variable_function_probe_0_probe():
            while True:

                val = self.probe.get_number()
                try:
                    self.set_variable_function_probe_0(val)
                except AttributeError:
                    pass
                time.sleep(1.0 / (10))
        _variable_function_probe_0_thread = threading.Thread(target=_variable_function_probe_0_probe)
        _variable_function_probe_0_thread.daemon = True
        _variable_function_probe_0_thread.start()

        self.qtgui_time_sink_x_0 = qtgui.time_sink_f(
            1024, #size
            samp_rate, #samp_rate
            "", #name
            1 #number of inputs
        )
        self.qtgui_time_sink_x_0.set_update_time(0.10)
        self.qtgui_time_sink_x_0.set_y_axis(-1, 1)

        self.qtgui_time_sink_x_0.set_y_label('Amplitude', "")

        self.qtgui_time_sink_x_0.enable_tags(True)
        self.qtgui_time_sink_x_0.set_trigger_mode(qtgui.TRIG_MODE_FREE, qtgui.TRIG_SLOPE_POS, 0.0, 0, 0, "")
        self.qtgui_time_sink_x_0.enable_autoscale(False)
        self.qtgui_time_sink_x_0.enable_grid(False)
        self.qtgui_time_sink_x_0.enable_axis_labels(True)
        self.qtgui_time_sink_x_0.enable_control_panel(False)
        self.qtgui_time_sink_x_0.enable_stem_plot(False)


        labels = ['Signal 1', 'Signal 2', 'Signal 3', 'Signal 4', 'Signal 5',
            'Signal 6', 'Signal 7', 'Signal 8', 'Signal 9', 'Signal 10']
        widths = [1, 1, 1, 1, 1,
            1, 1, 1, 1, 1]
        colors = ['blue', 'red', 'green', 'black', 'cyan',
            'magenta', 'yellow', 'dark red', 'dark green', 'dark blue']
        alphas = [1.0, 1.0, 1.0, 1.0, 1.0,
            1.0, 1.0, 1.0, 1.0, 1.0]
        styles = [1, 1, 1, 1, 1,
            1, 1, 1, 1, 1]
        markers = [-1, -1, -1, -1, -1,
            -1, -1, -1, -1, -1]


        for i in range(1):
            if len(labels[i]) == 0:
                self.qtgui_time_sink_x_0.set_line_label(i, "Data {0}".format(i))
            else:
                self.qtgui_time_sink_x_0.set_line_label(i, labels[i])
            self.qtgui_time_sink_x_0.set_line_width(i, widths[i])
            self.qtgui_time_sink_x_0.set_line_color(i, colors[i])
            self.qtgui_time_sink_x_0.set_line_style(i, styles[i])
            self.qtgui_time_sink_x_0.set_line_marker(i, markers[i])
            self.qtgui_time_sink_x_0.set_line_alpha(i, alphas[i])

        self._qtgui_time_sink_x_0_win = sip.wrapinstance(self.qtgui_time_sink_x_0.pyqwidget(), Qt.QWidget)
        self.top_grid_layout.addWidget(self._qtgui_time_sink_x_0_win)
        self.blocks_throttle_0 = blocks.throttle(gr.sizeof_float*1, samp_rate,True)
        self.analog_sig_source_x_0_0 = analog.sig_source_f(samp_rate, analog.GR_COS_WAVE, freq, ampl, 0, 0)
        self.analog_sig_source_x_0 = analog.sig_source_f(samp_rate, analog.GR_SQR_WAVE, 0.1, 1, 0, 0)


        ##################################################
        # Connections
        ##################################################
        self.connect((self.analog_sig_source_x_0, 0), (self.blocks_throttle_0, 0))
        self.connect((self.analog_sig_source_x_0_0, 0), (self.qtgui_time_sink_x_0, 0))
        self.connect((self.blocks_throttle_0, 0), (self.probe, 0))

    def closeEvent(self, event):
        self.settings = Qt.QSettings("GNU Radio", "if_else")
        self.settings.setValue("geometry", self.saveGeometry())
        event.accept()

    def get_variable_function_probe_0(self):
        return self.variable_function_probe_0

    def set_variable_function_probe_0(self, variable_function_probe_0):
        self.variable_function_probe_0 = variable_function_probe_0

    def get_samp_rate(self):
        return self.samp_rate

    def set_samp_rate(self, samp_rate):
        self.samp_rate = samp_rate
        self.analog_sig_source_x_0.set_sampling_freq(self.samp_rate)
        self.analog_sig_source_x_0_0.set_sampling_freq(self.samp_rate)
        self.blocks_throttle_0.set_sample_rate(self.samp_rate)
        self.qtgui_time_sink_x_0.set_samp_rate(self.samp_rate)

    def get_freq(self):
        return self.freq

    def set_freq(self, freq):
        self.freq = freq
        Qt.QMetaObject.invokeMethod(self._freq_line_edit, "setText", Qt.Q_ARG("QString", str(self.freq)))
        self.analog_sig_source_x_0_0.set_frequency(self.freq)

    def get_ampl(self):
        return self.ampl

    def set_ampl(self, ampl):
        self.ampl = ampl
        Qt.QMetaObject.invokeMethod(self._ampl_line_edit, "setText", Qt.Q_ARG("QString", str(self.ampl)))
        self.analog_sig_source_x_0_0.set_amplitude(self.ampl)


def main(top_block_cls=if_else, options=None):

    if StrictVersion("4.5.0") <= StrictVersion(Qt.qVersion()) < StrictVersion("5.0.0"):
        style = gr.prefs().get_string('qtgui', 'style', 'raster')
        Qt.QApplication.setGraphicsSystem(style)
    qapp = Qt.QApplication(sys.argv)

    tb = top_block_cls()
    tb.start()
    tb.show()

    def sig_handler(sig=None, frame=None):
        Qt.QApplication.quit()

    signal.signal(signal.SIGINT, sig_handler)
    signal.signal(signal.SIGTERM, sig_handler)

    timer = Qt.QTimer()
    timer.start(500)
    timer.timeout.connect(lambda: None)

    def quitting():
        tb.stop()
        tb.wait()
    qapp.aboutToQuit.connect(quitting)
    qapp.exec_()


if __name__ == '__main__':
    main()
We are only concerned about a couple of parts namely the part where the probe is being read:
        def _variable_function_probe_0_probe():
            while True:

                val = self.probe.level()
                try:
                    self.set_variable_function_probe_0(val)
                except AttributeError:
                    pass
                time.sleep(1.0 / (10))
We can see that the variable val is obtaining the value of the probe block. We can write our if-else statement here based on the value of val to change the amplitude and frequency of our sine wave. But how do we change the frequency and amplitude? We can use the part where the QT GUI Entry updates the flowgraph. For the variable freq:
    def set_freq(self, freq):
        self.freq = freq
        Qt.QMetaObject.invokeMethod(self._freq_line_edit, "setText", Qt.Q_ARG("QString", str(self.freq)))
        self.analog_sig_source_x_0_0.set_frequency(self.freq)
and for the variable ampl:
    def set_ampl(self, ampl):
        self.ampl = ampl
        Qt.QMetaObject.invokeMethod(self._ampl_line_edit, "setText", Qt.Q_ARG("QString", str(self.ampl)))
        self.analog_sig_source_x_0_0.set_amplitude(self.ampl)
We can see that the functions set_ampl and set_freq can be used for just that - setting the amplitude and the frequency. Thus we can go back and modify our probe function with the if-else statement to give power to our friend.
        def _variable_funct ion_probe_0_probe():
            while True:

                val = self.probe.level()
                print val
                if val == 1:
                    self.set_ampl(1)
                    self.set_freq(1000)
                else:
                    self.set_ampl(.3)
                    self.set_freq(100)
                try:
                    self.set_variable_function_probe_0(val)
                except AttributeError:
                    pass
                time.sleep(1.0 / (10))
Now there is one more thing we need to take care of. GRC has compiled the python file in the order of creation of the elements, which was okay as long as there were no crossreferences. With the introduced adaptation (calling set_ampl and set_freq inside the _variable_function_probe_0_probe()) we need to fix the order of declarations. As set_ampl and set_freq both modify parameters of analog_sig_source_x_0_0 but analog_sig_source_x_0_0 is not instantiated before line 150, we have to move the declaration of the _variable_function_probe_0_probe() and everything related below that.
        self._qtgui_time_sink_x_0_win = sip.wrapinstance(self.qtgui_time_sink_x_0.pyqwidget(), Qt.QWidget)
        self.top_grid_layout.addWidget(self._qtgui_time_sink_x_0_win)
        self.blocks_throttle_0 = blocks.throttle(gr.sizeof_float*1, samp_rate,True)
        self.analog_sig_source_x_1 = analog.sig_source_f(samp_rate, analog.GR_SIN_WAVE, freq, ampl, 0)
        self.analog_sig_source_x_0 = analog.sig_source_f(samp_rate, analog.GR_SQR_WAVE, 0.1, 1, 0)
Full code copied below:
#!/usr/bin/env python3
# -*- coding: utf-8 -*-

#
# SPDX-License-Identifier: GPL-3.0
#
# GNU Radio Python Flow Graph
# Title: if_else
# GNU Radio version: 3.8.0.0

from distutils.version import StrictVersion

if __name__ == '__main__':
    import ctypes
    import sys
    if sys.platform.startswith('linux'):
        try:
            x11 = ctypes.cdll.LoadLibrary('libX11.so')
            x11.XInitThreads()
        except:
            print("Warning: failed to XInitThreads()")

from PyQt5 import Qt
from gnuradio import eng_notation
from gnuradio import qtgui
from gnuradio.filter import firdes
import sip
from gnuradio import analog
from gnuradio import blocks
from gnuradio import gr
import sys
import signal
from argparse import ArgumentParser
from gnuradio.eng_arg import eng_float, intx
import time
import threading
from gnuradio import qtgui

class if_else(gr.top_block, Qt.QWidget):

    def __init__(self):
        gr.top_block.__init__(self, "if_else")
        Qt.QWidget.__init__(self)
        self.setWindowTitle("if_else")
        qtgui.util.check_set_qss()
        try:
            self.setWindowIcon(Qt.QIcon.fromTheme('gnuradio-grc'))
        except:
            pass
        self.top_scroll_layout = Qt.QVBoxLayout()
        self.setLayout(self.top_scroll_layout)
        self.top_scroll = Qt.QScrollArea()
        self.top_scroll.setFrameStyle(Qt.QFrame.NoFrame)
        self.top_scroll_layout.addWidget(self.top_scroll)
        self.top_scroll.setWidgetResizable(True)
        self.top_widget = Qt.QWidget()
        self.top_scroll.setWidget(self.top_widget)
        self.top_layout = Qt.QVBoxLayout(self.top_widget)
        self.top_grid_layout = Qt.QGridLayout()
        self.top_layout.addLayout(self.top_grid_layout)

        self.settings = Qt.QSettings("GNU Radio", "if_else")

        try:
            if StrictVersion(Qt.qVersion()) < StrictVersion("5.0.0"):
                self.restoreGeometry(self.settings.value("geometry").toByteArray())
            else:
                self.restoreGeometry(self.settings.value("geometry"))
        except:
            pass

        ##################################################
        # Variables
        ##################################################
        self.variable_function_probe_0 = variable_function_probe_0 = 0
        self.samp_rate = samp_rate = 32000
        self.freq = freq = 1000
        self.ampl = ampl = 1

        ##################################################
        # Blocks
        ##################################################
        self.probe = blocks.probe_signal_f()
        self._freq_tool_bar = Qt.QToolBar(self)
        self._freq_tool_bar.addWidget(Qt.QLabel('freq' + ": "))
        self._freq_line_edit = Qt.QLineEdit(str(self.freq))
        self._freq_tool_bar.addWidget(self._freq_line_edit)
        self._freq_line_edit.returnPressed.connect(
            lambda: self.set_freq(int(str(self._freq_line_edit.text()))))
        self.top_grid_layout.addWidget(self._freq_tool_bar)
        self._ampl_tool_bar = Qt.QToolBar(self)
        self._ampl_tool_bar.addWidget(Qt.QLabel('ampl' + ": "))
        self._ampl_line_edit = Qt.QLineEdit(str(self.ampl))
        self._ampl_tool_bar.addWidget(self._ampl_line_edit)
        self._ampl_line_edit.returnPressed.connect(
            lambda: self.set_ampl(int(str(self._ampl_line_edit.text()))))
        self.top_grid_layout.addWidget(self._ampl_tool_bar)

        self.qtgui_time_sink_x_0 = qtgui.time_sink_f(
            1024, #size
            samp_rate, #samp_rate
            "", #name
            1 #number of inputs
        )
        self.qtgui_time_sink_x_0.set_update_time(0.10)
        self.qtgui_time_sink_x_0.set_y_axis(-1, 1)

        self.qtgui_time_sink_x_0.set_y_label('Amplitude', "")

        self.qtgui_time_sink_x_0.enable_tags(True)
        self.qtgui_time_sink_x_0.set_trigger_mode(qtgui.TRIG_MODE_FREE, qtgui.TRIG_SLOPE_POS, 0.0, 0, 0, "")
        self.qtgui_time_sink_x_0.enable_autoscale(False)
        self.qtgui_time_sink_x_0.enable_grid(False)
        self.qtgui_time_sink_x_0.enable_axis_labels(True)
        self.qtgui_time_sink_x_0.enable_control_panel(False)
        self.qtgui_time_sink_x_0.enable_stem_plot(False)


        labels = ['Signal 1', 'Signal 2', 'Signal 3', 'Signal 4', 'Signal 5',
            'Signal 6', 'Signal 7', 'Signal 8', 'Signal 9', 'Signal 10']
        widths = [1, 1, 1, 1, 1,
            1, 1, 1, 1, 1]
        colors = ['blue', 'red', 'green', 'black', 'cyan',
            'magenta', 'yellow', 'dark red', 'dark green', 'dark blue']
        alphas = [1.0, 1.0, 1.0, 1.0, 1.0,
            1.0, 1.0, 1.0, 1.0, 1.0]
        styles = [1, 1, 1, 1, 1,
            1, 1, 1, 1, 1]
        markers = [-1, -1, -1, -1, -1,
            -1, -1, -1, -1, -1]


        for i in range(1):
            if len(labels[i]) == 0:
                self.qtgui_time_sink_x_0.set_line_label(i, "Data {0}".format(i))
            else:
                self.qtgui_time_sink_x_0.set_line_label(i, labels[i])
            self.qtgui_time_sink_x_0.set_line_width(i, widths[i])
            self.qtgui_time_sink_x_0.set_line_color(i, colors[i])
            self.qtgui_time_sink_x_0.set_line_style(i, styles[i])
            self.qtgui_time_sink_x_0.set_line_marker(i, markers[i])
            self.qtgui_time_sink_x_0.set_line_alpha(i, alphas[i])

        self._qtgui_time_sink_x_0_win = sip.wrapinstance(self.qtgui_time_sink_x_0.pyqwidget(), Qt.QWidget)
        self.top_grid_layout.addWidget(self._qtgui_time_sink_x_0_win)
        self.blocks_throttle_0 = blocks.throttle(gr.sizeof_float*1, samp_rate,True)
        self.analog_sig_source_x_0_0 = analog.sig_source_f(samp_rate, analog.GR_COS_WAVE, freq, ampl, 0, 0)
        self.analog_sig_source_x_0 = analog.sig_source_f(samp_rate, analog.GR_SQR_WAVE, 0.1, 1, 0, 0)

        def _variable_function_probe_0_probe():
            while True:

                val = self.probe.level()
                print (val)
                if val == 1:
                    self.set_ampl(1)
                    self.set_freq(1000)
                else:
                    self.set_ampl(.3)
                    self.set_freq(100)
                try:
                    self.set_variable_function_probe_0(val)
                except AttributeError:
                    pass
                time.sleep(1.0 / (10))
        _variable_function_probe_0_thread = threading.Thread(target=_variable_function_probe_0_probe)
        _variable_function_probe_0_thread.daemon = True
        _variable_function_probe_0_thread.start()

        ##################################################
        # Connections
        ##################################################
        self.connect((self.analog_sig_source_x_0, 0), (self.blocks_throttle_0, 0))
        self.connect((self.analog_sig_source_x_0_0, 0), (self.qtgui_time_sink_x_0, 0))
        self.connect((self.blocks_throttle_0, 0), (self.probe, 0))

    def closeEvent(self, event):
        self.settings = Qt.QSettings("GNU Radio", "if_else")
        self.settings.setValue("geometry", self.saveGeometry())
        event.accept()

    def get_variable_function_probe_0(self):
        return self.variable_function_probe_0

    def set_variable_function_probe_0(self, variable_function_probe_0):
        self.variable_function_probe_0 = variable_function_probe_0

    def get_samp_rate(self):
        return self.samp_rate

    def set_samp_rate(self, samp_rate):
        self.samp_rate = samp_rate
        self.analog_sig_source_x_0.set_sampling_freq(self.samp_rate)
        self.analog_sig_source_x_0_0.set_sampling_freq(self.samp_rate)
        self.blocks_throttle_0.set_sample_rate(self.samp_rate)
        self.qtgui_time_sink_x_0.set_samp_rate(self.samp_rate)

    def get_freq(self):
        return self.freq

    def set_freq(self, freq):
        self.freq = freq
        Qt.QMetaObject.invokeMethod(self._freq_line_edit, "setText", Qt.Q_ARG("QString", str(self.freq)))
        self.analog_sig_source_x_0_0.set_frequency(self.freq)

    def get_ampl(self):
        return self.ampl

    def set_ampl(self, ampl):
        self.ampl = ampl
        Qt.QMetaObject.invokeMethod(self._ampl_line_edit, "setText", Qt.Q_ARG("QString", str(self.ampl)))
        self.analog_sig_source_x_0_0.set_amplitude(self.ampl)


def main(top_block_cls=if_else, options=None):

    if StrictVersion("4.5.0") <= StrictVersion(Qt.qVersion()) < StrictVersion("5.0.0"):
        style = gr.prefs().get_string('qtgui', 'style', 'raster')
        Qt.QApplication.setGraphicsSystem(style)
    qapp = Qt.QApplication(sys.argv)

    tb = top_block_cls()
    tb.start()
    tb.show()

    def sig_handler(sig=None, frame=None):
        Qt.QApplication.quit()

    signal.signal(signal.SIGINT, sig_handler)
    signal.signal(signal.SIGTERM, sig_handler)

    timer = Qt.QTimer()
    timer.start(500)
    timer.timeout.connect(lambda: None)

    def quitting():
        tb.stop()
        tb.wait()
    qapp.aboutToQuit.connect(quitting)
    qapp.exec_()


if __name__ == '__main__':
    main()
We can then simply run our flowgraph from outside of GRC using
$ python3 if_else_mod.py
We should be able to see the numbers 0 and 1 on the terminal and the sine wave changing amplitude and frequency as the numbers change.
3.2. Where Do Blocks Come From?
Now that we have covered some of the ways we can modify our GRC generated Python files, we can see how to make our own blocks to add functionality to suit our specific project needs. Let us start off simple to get a feel for the waters. We will be making a block that is able to multiply a signal by the number we specify. The first thing we need to realize is that GNU Radio comes with gr_modtool, a utility that makes creating OOT Modules easy. Let us open up a terminal and begin in a project folder for the tutorial three.
3.2.1. Using gr_modtool
Before we begin, we need to figure out what the commands for gr_modtool are so let's ask for help.
$ gr_modtool --help
Usage: gr_modtool [OPTIONS] COMMAND [ARGS]...

  A tool for editing GNU Radio out-of-tree modules.

Options:
  --help  Show this message and exit.

Commands:
  add       Adds a block to the out-of-tree module.
  disable   Disable selected block in module.
  info      Return information about a given module
  makeyaml  Generate YAML files for GRC block bindings.
  newmod    Create new empty module, use add to add blocks.
  rename    Rename a block inside a module.
  rm        Remove a block from a module.
  update    Update the grc bindings for a block

  Manipulate with GNU Radio modules source code tree. Call it without
  options to run specified command interactively
We immediately see there are many commands available. In this tutorial we will only cover newmod and add; however, the thorough explanation should enable smooth usage of the other gr_modtool commands without guidance.
First, we notice that in addition to getting help seeing the commands we can use, we can also request more information on individual commands. Let us start with newmod as that is the command to create a new out-of-tree module.
$ gr_modtool newmod --help
Usage: gr_modtool newmod [OPTIONS] MODULE-NAME

  Create a new out-of-tree module

  The argument MODULE-NAME is the name of the module to be added.

Options:
  --srcdir TEXT             Source directory for the module template.
  -d, --directory TEXT      Base directory of the module. Defaults to the cwd.
  --skip-lib                Don't do anything in the lib/ subdirectory.
  --skip-swig               Don't do anything in the swig/ subdirectory.
  --skip-python             Don't do anything in the python/ subdirectory.
  --skip-grc                Don't do anything in the grc/ subdirectory.
  --scm-mode [yes|no|auto]  Use source control management [ yes | no | auto ]).
  -y, --yes                 Answer all questions with 'yes'. This can
                            overwrite and delete your files, so be careful.
  --help                    Show this message and exit.
Now that we have read over the list of commands for newmod, we can deduce that the one we want to pick is -n which is the default so we can simply type the MODULE_NAME after newmod. It is actually advised to avoid using "-n" as for other commands it can override the auto-detected name. For now, let's ignore the other options.
3.2.2. Setting up a new block
$ gr_modtool newmod tutorial
Creating out-of-tree module in ./gr-tutorial... Done.
Use 'gr_modtool add' to add a new block to this currently empty module.
We should now see a new folder, gr-tutorial, in our current directory. Let's examine the folder to figure out what gr_modtool has done for us.
gr-tutorial$ ls
apps  cmake  CMakeLists.txt  docs  examples  grc  include  lib  Python  swig
Since we are dealing with Python in this tutorial we only need to concern ourselves with the Python folder and the grc folder. Before we can dive into code, we need to create a block from a template. There are actually four different types of Python blocks, however it's a little too soon to discuss that. We will dive into the synchronous 1:1 input to output block to make explaining things easier (this is a block that outputs as many items as it gets as input, but don't worry about this right now).
Now we know the language we want to write our block in (Python) and the type of block (synchronous block) we can now add a block to our module. Again, we should run the gr_modtool help command until we are familiar with the different commands. We see that the add command is what we are looking for. Now we need to run help on the add command in order to see what we need to enter given the information we have so far.
gr-tutorial$ gr_modtool help add
... (General Options from Last Help)
Add module options:
    -t BLOCK_TYPE, --block-type=BLOCK_TYPE
                        One of sink, source, sync, decimator, interpolator,
                        general, tagged_stream, hier, noblock.
    --license-file=LICENSE_FILE
                        File containing the license header for every source
                        code file.
    --argument-list=ARGUMENT_LIST
                        The argument list for the constructor and make
                        functions.
    --add-Python-qa     If given, Python QA code is automatically added if
                        possible.
    --add-cpp-qa        If given, C++ QA code is automatically added if
                        possible.
    --skip-cmakefiles   If given, only source files are written, but
                        CMakeLists.txt files are left unchanged.
    -l LANG, --lang=LANG
                        Language (cpp or Python)
We can see the -l LANG and the -t BLOCK_TYPE are relevant for our example. Thus when creating our new block, we know the command. When prompted for a name simply enter "multiply_py_ff", when prompted for an argument list enter "multiple", and when prompted for Python QA (Quality Assurance) code type "y", or just hit enter (the capital letter is the default value).
gr-tutorial$ gr_modtool add -t sync -l python
GNU Radio module name identified: tutorial
Language: Python
Enter name of block/code (without module name prefix): multiply_py_ff
Block/code identifier: multiply_py_ff
Enter valid argument list, including default arguments: multiple
Add Python QA code? [Y/n] y
Adding file 'Python/multiply_py_ff.py'...
Adding file 'Python/qa_multiply_py_ff.py'...
Editing Python/CMakeLists.txt...
Adding file 'grc/tutorial_multiply_py_ff.yml'...
Editing grc/CMakeLists.txt...
We notice 5 changes: Two changes to CMakeLists.txt files, one new file qa_multiply_py_ff.py which is used to test our code, one new file multiply_py_ff.py which is the functional part, and one new file tutorial_multiply_py_ff.xml, which is used to link the block to the GRC. Again all this happens in the Python and grc subfolders.
3.2.2.1. What's with the _ff?
For blocks with strict types, we use suffixes to declare the input and output types. This block operates on floats, so we give it the suffix _ff: Float in, float out. Other suffixes are _cc (complex in, complex out), or simply _f (a sink or source with no in- or outputs that uses floats). For a more detailed description, see the FAQ or the BlocksCodingGuide.
3.2.3. Modifying the Python Block File
Let's begin with the multiply_py_ff.py file found in the Python folder. Opening it without any changes gives the following:
import numpy
from gnuradio import gr

class multiply_py_ff(gr.sync_block):
    """
    docstring for block multiply_py_ff
    """
    def __init__(self, multiple):
        gr.sync_block.__init__(self,
            name="multiply_py_ff",
            in_sig=[<+numpy.float+>],
            out_sig=[<+numpy.float+>])
        self.multiple = multiple


    def work(self, input_items, output_items):
        in0 = input_items[0]
        out = output_items[0]
        # <+signal processing here+>
        out[:] = in0
        return len(output_items[0])
Let's take this one line by line as our first Python examples. We are already familiar with the imports so we will skip those lines. We are familiar with the constructor (init) of Python so can immediately see that if we want to use our variable "multiple", we need to add another line. Let us not forget to preserve those spaces as some code editors like to add tabs to new lines. How do we use the variable multiple?
How to use variable multiple...
def __init__(self, multiple):
        self.multiple = multiple
        gr.sync_block.__init__(self,
We notice that there are "<...>" scattered in many places. These placeholders are from gr_modtool and tell us where we need to alter things
in_sig=[<+numpy.float+>]
out_sig=[<+numpy.float+>]
The gr.sync_block.init takes in 4 inputs: self, name, and the size/type of the input and output vectors. First, we want to make the item size a single precision float or numpy.float32 by removing the "<" and the ">". If we wanted vectors, we could define those as in_sig=[(numpy.float32,4),numpy.float32]. This means there are two input ports, one for vectors of 4 floats and the other for scalars. It is worth noting that if in_sig contains nothing then it becomes a source block, and if out_sig contains nothing it becomes a sink block (provided we change return len(output_items[0]) to return len(input_items[0]) since output_items is empty). Our changes to the first placeholders should appear as follows:
in_sig=[numpy.float32]
out_sig=[numpy.float32]
The other piece of code that has the placeholders is in the work function but let us first get a better understanding of the work function:
def work(self, input_items, output_items)
The work function is where the actual processing happens, where we want our code to be. Because this is a sync block, the number of input items always equals the number of output items because synchronous block ensures a fixed output to input rate. There are also decimation and interpolation blocks where the number of output items are a user specified multiple of the number of input items. We will further discuss when to use what block type in the third section of this tutorial. For now we look at the placeholder:
in0 = input_items[0]
out = output_items[0]
# <+signal processing here+>
out[:] = in0
return len(output_items[0])
The "in0" and "out" simply store the input and output in a variable to make the block easier to write. The signal processing can be anything including if statements, loops, function calls but for this example we only need to modify the out[:] = in0 line so that our input signal is multiplied by our variable multiple. What do we need to add to make the in0 multiply by our multiple?
How to Multiple...
out[:] = in0*self.multiple
That's it! Our block should now be able to multiply but to be sure we have these things called Quality Assurance tests!
3.2.4. QA Tests
Now we need to test it to make sure it will run correctly when we install it unto GNU Radio. This is a very important step and we should never forget to include tests with our code! Let us open up qa_multiply_py_ff.py which is copied below:
from gnuradio import gr, gr_unittest
from gnuradio import blocks
from multiply_py_ff import multiply_py_ff

class qa_multiply_py_ff (gr_unittest.TestCase):

    def setUp (self):
        self.tb = gr.top_block ()

    def tearDown (self):
        self.tb = None

    def test_001_t (self):
        # set up fg
        self.tb.run ()
        # check data


if __name__ == '__main__':
    gr_unittest.run(qa_multiply_py_ff)
gr_unittest adds support for checking approximate equality of tuples of float and complex numbers. The only part we need to worry about is the def test_001_t function. We know we need input data so let us create data. We want it to be in the form of a vector so that we can test multiple values at once. Let us create a vector of floats
src_data = (0, 1, -2, 5.5, -0.5)
We also need output data so we can compare the input of the block to ensure that it is doing what we expect it to do. Let us multiply by 2 for simplicity.
expected_result = (0, 2, -4, 11, -1)
Now we can create a flowgraph as we have when we first introduced using Python in GNU Radio. We can use the blocks library specifically the vector_source_f function and the vector_sink_f function which are linked to the doxygen manual which we should be able to read and understand. Let us assign three variables "src", "mult", and "snk" to the blocks. The first is shown below:
src = blocks.vector_source_f(src_data)
The rest are hidden below as an exercise:
What do we assign snk and mult?
mult = multiply_py_ff(2)
snk = blocks.vector_sink_f()
Now we need to connect everything as src > mult> snk. Instead of using self.connect as we did in our other blocks we need to use self.tb.connect because of the setUp function. Below is how we would connect the src block to the mult block.
self.tb.connect (src, mult)
How would we connect the other blocks together?
self.tb.connect (mult, snk)
Then we can run the graph and store the data from the sink as below:
self.tb.run ()
result_data = snk.data ()
Lastly we can run our comparison function that will tell us whether the numbers match up to 6 decimal places. We are using the assertFloatTuplesAlmostEqual instead of the "regular assert functions"https://docs.python.org/2/library/unittest.html#assert-methods included in python's unittest because there may be situations where we cannot get a=b due to rounding in floating point numbers.
self.assertFloatTuplesAlmostEqual (expected_result, result_data, 6)
All together the new test_001_t function should appear as below:
src_data = (0, 1, -2, 5.5, -0.5)
expected_result = (0, 2, -4, 11, -1)
src = blocks.vector_source_f (src_data)
mult = multiply_py_ff (2)
snk = blocks.vector_sink_f ()
self.tb.connect (src, mult)
self.tb.connect (mult, snk)
self.tb.run ()
result_data = snk.data ()
self.assertFloatTuplesAlmostEqual (expected_result, result_data, 6)
We can then go to the python directory and run:
gr-tutorial/python$ python qa_multiply_py_ff.py
.
----------------------------------------------------------------------
Ran 1 test in 0.004s

OK
While we are here, we should take a break to change one of the numbers in the src_data to ensure that the block is actually checking the values and to simply see what an error looks like. Python allows for really quick testing of blocks without having to compile anything; simply change something and re-run the QA test.
3.2.5. YAML Files
At this point we should have written a Python block and a QA test for that block. The next thing to do is edit the YAML file in the grc folder so that we can get another step closer to using it in GRC. GRC uses the YAML files for all the options we see. We actually don't need to write any Python or C++ code to have a block display in GRC but of course if we would connect it, it wouldn't do anything but give errors. We should get out of the python folder and go to the grc folder where all the YAML files reside. There is a tool in gr_modtool called makexml but it is only available for C++ blocks. Let us open the tutorial_multiply_py_ff.xml file copied below:
id: tutorial_multiply_py_ff
label: multiply_py_ff
category: '[tutorial]'

templates:
  imports: import tutorial
  make: tutorial.multiply_py_ff(${multiple})

#  Make one 'parameters' list entry for every Parameter you want settable from the GUI.
#     Sub-entries of dictionary:
#     * id (makes the value accessible as \$keyname, e.g. in the make entry)
#     * label
#     * dtype
parameters:
- id: ...
  label: ...
  dtype: ...
- id: ...
  label: ...
  dtype: ...

#  Make one 'inputs' list entry per input. Sub-entries of dictionary:
#      * label (an identifier for the GUI)
#      * domain
#      * dtype
#      * vlen
#      * optional (set to 1 for optional inputs)
inputs:
- label: ...
  domain: ...
  dtype: ...
  vlen: ...

#  Make one 'outputs' list entry per output. Sub-entries of dictionary:
#      * label (an identifier for the GUI)
#      * dtype
#      * vlen
#      * optional (set to 1 for optional inputs)
- label: ...
  domain: ...
  dtype: ... #!-- e.g. int, float, complex, byte, short, xxx_vector, ...--

file_format: 1
We can change the name that appears and the category it will appear in GRC. The category is where the block will be found in GRC. Examples of categories tag are Audio and Waveform Generators used in previous examples. Examples of names tag are the QT GUI Time Sink or the Audio Sink. Again, we can go through the file and find the modtool place holders. The first is copied below:
#  Make one 'parameters' list entry for every Parameter you want settable from the GUI.
#     Sub-entries of dictionary:
#     * id (makes the value accessible as \$keyname, e.g. in the make entry)
#     * label
#     * dtype
This is referring to the parameter that we used in the very beginning when creating our block: the variable called "multiple". We can fill it in as below:
parameters:
- id: multiple
  label: Multiple
  dtype: float
The next placeholder can be found in the inputs and outputs tags:
inputs:
- label: in
  dtype: float

outputs:
- label: out
  dtype: float #!-- e.g. int, float, complex, byte, short, xxx_vector, ...--
We can see that it is asking for a type so we can simply erase everything in the tag and replace it with "float" for both the source and the sink blocks. That should do it for this block. The best way to get more experience writing YAML files is to look at the source code of previously made blocks such as the existing multiple block. Let's go back to this and use the documentation tag!
3.2.6. Installing Python Blocks
Now that we have edited the XML file; we are ready to install the block into the GRC. First, we need to get out of the /grc directory and create a build directory called "build". Inside the build directory, we can then run a series of commands:
cmake ../
make
sudo make install
sudo ldconfig
We should then open up the GRC and take a look at the new block.
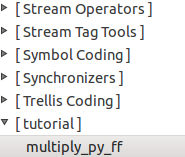
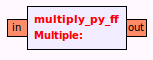
We can see the category and the block name. When we drag it into the GRC workspace, we can see the multiple variable we set in the param tag of the XML file.
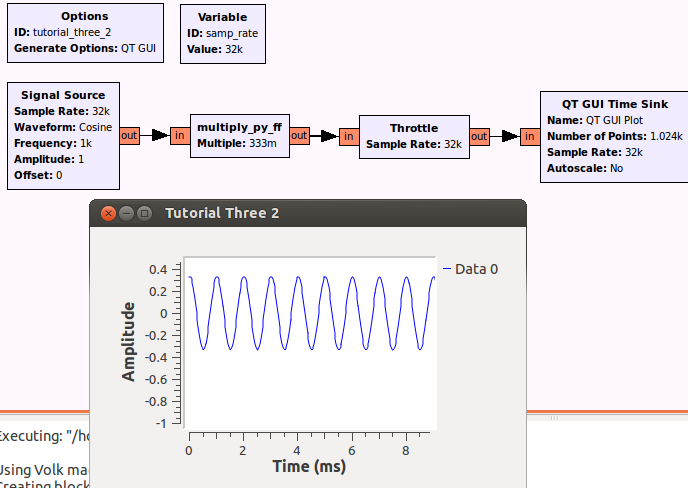
Now that we can see our block, let us test it to make sure it works. Below is an example of one of the many ways to check whether it is actually multiplying.
3.3. My QPSK Demodulator for Satellites
Now that we have a better understanding on how to add new blocks to GNU Radio for use in the GRC, we can do another example. This time we will be creating a QPSK demodulator block using the same process as before in the same module. Let's first setup the scenario. There is a "noise source" that outputs data in complex float format but let's pretend it comes from a satellite being aimed at our computer. Our secret agent insider tells us this particular satellite encodes digital data using QPSK modulation. We can decode this using a QPSK demodulator that outputs data into bytes. Our insider tells us the space manual doesn't specify whether it's gray code or not. We want to read the bytes using a time sink. What would our flowgraph look like?
Incomplete Flowgraph...

Now that we know the input type, output type, and parameters, we can ask the question we skipped with our multiply_py_ff block. What type of block do we want?
3.3.1. Choosing a Block Type
The GNU Radio scheduler optimizes for throughput (as opposed to latency). To do this it needs to know the number of samples each block is inputting and outputting thus came the creation of decimation and interpolation blocks where we specify the multiple factor. This is directly related to the sampling rate discussion we had in tutorial 2 where these special types of blocks are able to change the sampling rate to something else in order to comply with a specific piece of hardware such as our soundcard or a specific modulation/demodulation.
- Synchronous (1:1) - Number of items at input port equals the number of items at output port. An example is the multiply_py_ff block.
- Decimation (N:1) - Number of input items is a fixed multiple of the number of output items. Examples include filters such as decimating high pass and low pass filters (e.g., for sampling rate conversion).
- Interpolation (1:M) - Number of output items is a fixed multiple of the number of input items. An example is the Interpolating FIR Filter.
- General/Basic (N:M) - Provides no relation between the number of input items and the number of output items. An example is the rational resampler block which can be either a sync, decimator, or interpolator.
When we insert data into our block, do we need more samples or less samples? Or put another way, should our sample rate change?
What Type of Block Should we Use?
- Sync Block or Basic Block
3.3.2. Adding Another Block to our OOT Module
Now we know everything we need to know to create the block in gr_modtool. As a refresher, what would our gr_modtool command be?
gr_modtool command...
 gr-tutorial$ gr_modtool add -t sync -l python

 name: qpsk_demod_py_cb (c for complex input and b for byte/char/int8 output)<br />
 args: gray_code<br />
 QA Code: y
Now we have our files setup so we can begin with editing the qpsk_demod_py.py file in the /python folder
3.3.3. The QPSK Demodulator
The code here is a little more than we have done before so let's take it in steps. First what do we expect our block to do? We can start with a constellation plot which shows the four different quadrants and their mappings to bit 0 and bit 1
With Gray coding (adjacent only flips by 1). Note that the mapping we use here is different from the mapping on wikipedia:
(-1+1j) 10 | 00 (1+1j)
-----------+-----------
(-1-1j) 11 | 01 (1-1j)
Without Gray coding:
(-1+1j) 11 | 00 (1+1j)
-----------+-----------
(-1-1j) 10 | 01 (1-1j)
We can see that we will need to write an if-else statement to take into account the gray_code variable. We will also need four other if-else statements inside the main if-else so that we can pick the mapping. Our pseudocode will look as follows:
if gray_code
    if 1+1j
        binary "00" = 0
    ....
    elif -1-1j
        binary "11" = 3
else
    if 1+1j
        binary "00" = 0
    ....
    elif -1-1j
        binary "10" = 2
So we have everything we need to implement. Let's go ahead and fill in our gr_modtoool placeholders. We can begin with def init. There are three changes. How do we use the variable gray_code outside the function (similar to what we did with multiple in the last example)? What are the input and output types in numpy
Changes to def init...
    def __init__(self, gray_code):
        self.gray_code=gray_code
        gr.sync_block.__init__(self,
            name="qpsk_demod_py",
            in_sig=[numpy.complex64],
            out_sig=[numpy.uint8])
Once we have our constructor setup, we can go onto the work function. For simplicity and beauty, let us call the pseudocode we made above a function "get_minimum_distance" that takes samples as input arguments. In our multiply_py_ff example, we took all the samples and multiplied them with with out[:] = in0*self.multiple. The in0 is actually a vector so contains many samples within it. The multiply example required the same operation for each sample so it was okay to simply operate on the entire vector but now we need to have different operations per sample so what do we do?
How can we operate on samples in a vector?
- loops!
        for i in range(0, len(output_items[0])):
            sample = in0[i]
            out[i] = self.get_minimum_distances(sample)
Now we can move onto the get_minimum_distances(self, sample) function. We already have pseudo code so the next step is translating to Python. Below is a snip of what the code can look like. Again there are multiple ways to do this
    def get_minimum_distances(self, sample):
        if self.gray_code == 1:
            if (sample.imag >= 0 and sample.real >= 0):
                return 0 # 1+1j
            elif (sample.imag >= 0 and sample.real < 0):
                return 2 # -1+1j
Let us try to fill in the other cases for gray code and non-gray code. Below is what the entire file Python file can look like once complete:
qpsk_demod_py_cb.py
import numpy
from gnuradio import gr

class qpsk_demod_py(gr.sync_block):
    """
    docstring for block qpsk_demod_py
    """
    def __init__(self, gray_code):
        self.gray_code=gray_code
        gr.sync_block.__init__(self,
            name="qpsk_demod_py",
            in_sig=[numpy.complex64],
            out_sig=[numpy.uint8])

    def get_minimum_distances(self, sample):
        if self.gray_code == 1:
            if (sample.imag >= 0 and sample.real >= 0):
                return 0 # 1+1j
            elif (sample.imag >= 0 and sample.real < 0):
                return 2 # -1+1j
            elif (sample.imag < 0 and sample.real < 0):
                return 3 # -1-1j
            elif (sample.imag < 0 and sample.real >= 0):
                return 1 # 1-1j
        else:
            if (sample.imag >= 0 and sample.real >= 0):
                return 0 # 1+1j
            elif (sample.imag >= 0 and sample.real < 0):
                return 3 # -1+1j
            elif (sample.imag < 0 and sample.real < 0):
                return 2 # -1-1j
            elif (sample.imag < 0 and sample.real >= 0):
                return 1 # 1-1j

    def work(self, input_items, output_items):
        in0 = input_items[0]
        out = output_items[0]

        for i in range(0, len(in0)):
            sample = in0[i]
            out[i] = self.get_minimum_distances(sample)

        return len(output_items[0])
Now that we have code, we know what's next!
3.3.4. Multiple QA Tests
We can test our qpsk_demod_py for when it is in gray_code mode and when it's not in gray_code mode. To do that we need to setup multiple tests in our single QA file. QA tests generally follow the same setup from before. We select some inputs as tests and we check them against what we expect the outputs to be. The only difference from the multiply qa test is that this qa test requires more cases. There are four quadrants we need to map and two modes so in total there are eight test cases. We can open up our qa_qpsk_demod_py_ff.py file to change things.
We can copy the def test_001_t from the qa_multiply_py_ff code which is copied below:
    def test_001_t (self):
        src_data = (-3, 4, -5.5, 2, 3)
        expected_result = (-6, 8, -11, 4, 6)
        src = blocks.vector_source_f (src_data)
        mult = multiply_py_ff (2)
        dst = blocks.vector_sink_f ()
        self.tb.connect (src, mult)
        self.tb.connect (mult, dst)
        self.tb.run ()
        result_data = dst.data ()
        self.assertFloatTuplesAlmostEqual (expected_result, result_data, 6)
This time we are working with a complex input so our src = blocks.vector_source_f must change. If we use the search bar in the manual we can find the other options:
PIC of SEARCH
b - bytes/unsigned char/int8
c - complex
f - float
i - int
s - short
What do we change our source and sink vectors to?
src = blocks.vector_source_c (src_data)
dst = blocks.vector_sink_b ()
Before we move onto actual test cases, let us decide which mode we are testing for the test_001_t. We can create a new variable and assign it False (translates to 0) to test non-Gray code
gray_code = False
Once we know we want to test non gray_code mappings, we can refer to our chart above and start placing in the proper inputs and outputs into the src_data and the expected_results. For instance if we were testing only two cases for non gray_code, we would do:
src_data = ((-1-1j), (-1+1j))
expected_result = (2, 3)
Last thing to do is call upon our new block in the "qpsk =" line and pass it the gray_code parameter
qpsk = ?
- qpsk = qpsk_demod_py_cb (gray_code)
Now that we are done with the non gray_code test, we can simply create another test "def test_002_t (self):" and copy the contents underneath making sure that for this test we set gray_code = True and change the expected_result so it matches gray_code mapping. The full test is copied below:
Full QA QPSK Demod Code...
from gnuradio import gr, gr_unittest
from gnuradio import blocks
import numpy
from qpsk_demod_py_cb import qpsk_demod_py

class qa_qpsk_demod (gr_unittest.TestCase):

    def setUp (self):
        self.tb = gr.top_block ()

    def tearDown (self):
        self.tb = None

    def test_001_t (self):
        gray_code = False
        src_data = ((-1-1j), (-1+1j), (1+1j), (1-1j))
        expected_result = (2, 3, 0, 1)
        src = blocks.vector_source_c (src_data)
        qpsk = qpsk_demod_py (gray_code)
        dst = blocks.vector_sink_b ()
        self.tb.connect (src, qpsk)
        self.tb.connect (qpsk, dst)
        self.tb.run ()
        result_data = dst.data ()
        self.assertFloatTuplesAlmostEqual (expected_result, result_data, 6)

    def test_002_t (self):
        gray_code = True
        src_data = ((-1-1j), (-1+1j), (1+1j), (1-1j))
        expected_result = (3, 2, 0, 1)
        src = blocks.vector_source_c (src_data)
        qpsk = qpsk_demod_py (gray_code)
        dst = blocks.vector_sink_b ()
        self.tb.connect (src, qpsk)
        self.tb.connect (qpsk, dst)
        self.tb.run ()
        result_data = dst.data ()
        self.assertFloatTuplesAlmostEqual (expected_result, result_data, 6)

if __name__ == '__main__':
    gr_unittest.run(qa_qpsk_demod, "qpsk_demod_py_cb.xml")
We can then run the test in Python and all should say something similar to:
Ran 2 tests in 0.005s

OK
So once we verify it works as expected, we can then edit our XML file so that it is usable inside GRC.
3.3.5. XML Mods, Installation, and Running
This XML is very similar to the XML file for the multiply_py_ff block so all we need to do is set the gray_code parameter and pick the correct input (complex) and output (byte) types. A copy of the full XML file is below:
XML File for QPSK Demod
<?xml version="1.0"?>
<block>
  <name>qpsk_demod_py</name>
  <key>tutorial_qpsk_demod_py</key>
  <category>tutorial</category>
  <import>import tutorial</import>
  <make>tutorial.qpsk_demod_py($gray_code)</make>
  <!-- Make one 'param' node for every Parameter you want settable from the GUI.
       Sub-nodes:
       * name
       * key (makes the value accessible as $keyname, e.g. in the make node)
       * type -->
  <param>
    <name>Gray Code</name>
    <key>gray_code</key>
    <type>int</type>
  </param>

  <!-- Make one 'sink' node per input. Sub-nodes:
       * name (an identifier for the GUI)
       * type
       * vlen
       * optional (set to 1 for optional inputs) -->
  <sink>
    <name>in</name>
    <type>complex</type>
  </sink>

  <!-- Make one 'source' node per output. Sub-nodes:
       * name (an identifier for the GUI)
       * type
       * vlen
       * optional (set to 1 for optional inputs) -->
       <!-- e.g. int, float, complex, byte, short, xxx_vector, ...-->
  <source>
    <name>out</name>
    <type>byte</type>
  </source>
</block>
We can then install as we did for the multiply block however we need to rerun cmake in order to take into account the new block:
 cd build
 cmake ../
 make
 sudo make install
 sudo ldconfig
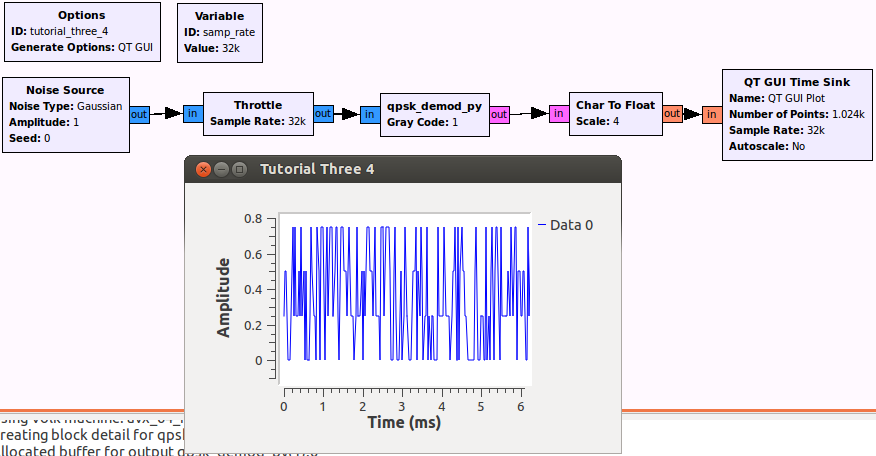
Then we can open up our GRC file from the beginning and place our missing block we just made.
What is the Expected Output?
3.4. Conclusion
And that is it for now with Python. Let us know your thoughts before going on to the C++ tutorial.
3.4.1. Questions We Should Now be Able to Answer
1. How do we set input- and output signatures in Python blocks?
2. Consider this I/O signature: (FIXME). Which input types and output types does it take?
3.5. Candidates for Future Sections
Possible topics we may want to add depending on feedback and questions on the mailing list
- How to add documentation to blocks
- Constructor arguments, History, Output Multiple