GRAndHelp
Help and hints for building GNU Radio Android Apps
Take everything below with a grain of salt. This is basically a copy-paste effort from some notes that I took without any cleanup.
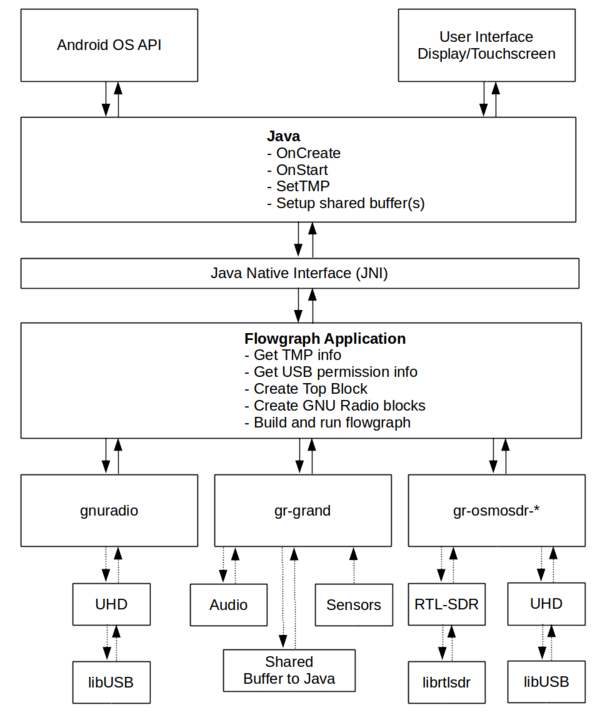
The general structure/layers of GNU Radio apps on Android. We design the user interface as a Java application that calls into the flowgraph that runs in C++ through the JNI layer.
Android Makefile
To build GNU Radio flowgraphs in the Android JNI world, we need to define a handful of libraries to link against in the Android.mk file. To simplify things, we provide a canned attachment:GrAndroid.mk that you can include in your Android.mk file. Specifically, this file defines a set of statically and dynamically linked libraries required for building our applications. Once you download attachment:GrAndroid.mk, open it up and change the GRLIBPATH variable on line 5 to point to your prefix. Remember from Setup and Building the Dependencies that we set the install prefix to /opt/grandroid, so in the default makefile here, we point to the lib directory of that prefix. If you changed the prefix during your install, change this line accordingly.
Place this file in your jni directory.
In the Android.mk file the defines the rest of your projects space, add these lines:
include GrAndroid.mk

... < the rest of the makefile definitions and setup > ...

LOCAL_STATIC_LIBRARIES += $(GR_STATIC_LIBRARIES)
LOCAL_SHARED_LIBRARIES += $(GR_SHARED_LIBRARIES)
Building an App
Ubuntu systems need the 32-bit version of libz
On Ubuntu 14.10:
sudo apt-get install zlib1g:i386
Also need OpenJDK 7
sudo apt-get install openjdk-7-jdk
And install the Android tools:
sudo apt-get install android-tools-adb
Using the JNI interface. We start with a simple project space -- I just copied their hello-jni application space over to a new directory. Normally, we'll start with a fresh application space, which I'll work on and document how to do this from scratch later (easy through the android IDE tools they provide, of course).
In the base directory of our app:
android update project -p . -s -t android-21
Follow the example Android.mk file for the jni directory. This sets up
GRLIBPATH to point to /opt/grandroid/lib, so change that to wherever
your install prefix was. This points to all of the Boost, FFTW, and
GNU Radio static libs.
We need to edit Application.mk and Android.mk. In Application.mk, we have:
APP_ABI := armeabi-v7a
APP_STL := gnustl_shared
APP_CPPFLAGS += -frtti
APP_CPPFLAGS += -fexceptions
I will provide an Android.mk file later. We will probably want to create our own GrAndroid.mk file at some point that sets up most of this stuff that we can then just include into our project's Android.mk file later.
Edit the Android.mk file as needed to add new libraries, change or add to the LOCAL_SRC_FILES, etc.
Edit the AndroidManfest.xml file in the root directory of the project to add the necessary permissions. To write/read to /sdcard for using GR file_sink/file_source blocks, you need:
- Steps to build the project:
cd jni
ndk-build
cd ..
ant debug
adb install -r bin/HelloJni-debug.apk
- The 'ndk-build' and 'ant debug' are the actual build stages and should complete successfully, or there's a bug/problem.
- The -r is for reinstalling if we've already done a previous install of this APK.
- The name of the .apk file depends on the application and build style, so alter this step as necessary.
- We are logging some output to logcat. I like to clear the log when debugging:
adb logcat -c && adb logcat
Starting a from-scratch Android Project
See the GRAndWalkthrough for building a basic GNU Radio for Android application using Android Studio.
Tricks to working with Android
When attaching a USB radio like an RTLSDR dongle, it'll be easier to use adb over Wifi than having to constantly switch USB cables between the host and the radio. To do this, first find out and note the IP address of the wifi connection on the device:
adb shell netcfg
wlan0 UP  192.168.1.200/24  0x00001043
Then setup the connection on a TCP/IP port; generally, I've seen this as port 5555:
adb tcpip 5555
Now connect to the device using the IP address we discovered in the first step.
adb connect 192.168.1.200
Now disconnect the USB between the computer and Android device and make sure we're still able to talk to it:
adb devices
192.168.1.200:5555    device
Working with USB Permission in your App
We have built a project to make it easier to work with USRP devices on Android by managing the permissions and loading of the firmware and FPGA images. This is probably the best way to keep track of the code and techniques we are using to manage these issues.
