Guided Tutorial Programming Topics
Tags, Messages and PMTs.
Objectives
- Learn about PMTs
- Understand what tags are / what they do / when to use them
- Understand difference between streaming and message passing
- Point to the manual for more advanced block manipulation
Prerequisites
- General familiarity with C++ and Python
- Tutorials:
So far, we have only discussed data streaming from one block to another. The data often consists of samples, and a streaming architecture makes a lot of sense for those. For example, a sound card driver block will constantly produce audio samples once active.
In some cases, we don't want to pipe a stream of samples, though, but rather pass individual messages to another block, such as "this is the first sample of a burst", or "change the transmit frequency to 144 MHz". Or consider a MAC layer on top of a PHY: At higher communication levels, data is usually passed around in PDUs (protocol data units) instead of streams of items.
In GNU Radio we have two mechanisms to pass these messages:
- Synchronously to a data stream, using stream tags
- Asynchronously, using the message passing interface
Before we discuss these, let's consider what such a message is from a programming perspective. It could be a string, a vector of items, a dictionary... anything, really, that can be represented as a data type. In Python, this would not be a problem, since it is weakly typed, and a message variable could simply be assigned whatever we need. C++ on the other hand is strongly typed, and it is not possible to create a variable without knowing its type. What makes things harder is that we need to be able to share the same data objects between Python and C++. To circumvent this problem, we introduce polymorphic types (PMTs).
Polymorphic Types (PMT)
<content merged with PMT page in usage manual>
OK, so now we know all about creating messages - but how do we send them from block to block?
Stream Tags
When two blocks are already communicating over a stream connection (e.g., samples are flowing from one block to another), we can use stream tags. A stream tag is a message that is connected to a specific item. This way, we can send messages synchronously to the stream.
Apart from the fixed position in the stream, stream tags have three properties:
- A key, which can be used to identify a certain tag
- A value, which can be any PMT
- (Optional) A source ID, which helps identify the origin of this specific tag.
Whether or not blocks use this information is up to them. Most blocks will propagate tags transparently, which means the tag is attached to the same item (or a corresponding item) on the output. Blocks that actually make use of tags usually search for tags with specific keys and only process those.
Let's have a look at a simple example:
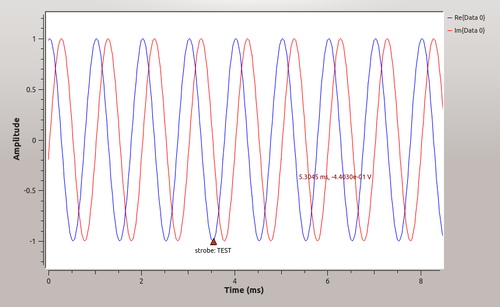
In this flow graph, we have two sources: A sinusoid and a tag strobe. A tag strobe is a block that will output a constant tag, in this case, on every 1000th item (the actual value of the items is always zero). Those sources get added up. The signal after the adder is identical to the sine wave we produced, because we are always adding zeros. However, the tags stay attached to the same position as they were coming from the tag strobe! This means every 1000th sample of the sinusoid now has a tag. The QT scope can display tags, and even trigger on them.
We now have a mechanism to randomly attach any metadata to specific items. There are several blocks that use tags. One of them is the UHD Sink block, the driver used for transmitting with USRP devices. It will react to tags with certain keys, one of them being tx_freq, which can be used to set the transmit frequency of a USRP while streaming.
Adding tags to the QPSK demodulator
Going back to our QPSK demodulation example, we might want to add a feature to tell downstream blocks that the demodulation is not going well. Remember the output of our block is always hard-decision, and we have to output something. So we could use tags to notify that the input is not well formed, and that the output is not reliable.
As a failure criterion, we discuss the case where the input amplitude is too small, say smaller than 0.01. When the amplitude drops below this value, we output one tag. Another tag is only sent when the amplitude has recovered, and falls back below the threshold. We extend our work function like this:
if (std::abs(in[i]) < 0.01 and not d_low_ampl_state) {
    add_item_tag(0, // Port number
                 nitems_written(0) + i, // Offset
                 pmt::mp("amplitude_warning"), // Key
                 pmt::from_double(std::abs(in[i])) // Value
    );
    d_low_ampl_state = true;
}
else if (std::abs(in[i]) >= 0.01 and d_low_ampl_state) {
    add_item_tag(0, // Port number
        nitems_written(0) + i, // Offset
        pmt::mp("amplitude_recovered"), // Key
        pmt::PMT_T // Value
    );
    d_low_ampl_state = false; // Reset state
}
In Python, the code would look like this (assuming we have a member of our block class called d_low_ampl_state):
# The vector 'in' is called 'in0' here because 'in' is a Python keyword
if abs(in0[i]) < 0.01 and not d_low_ampl_state:
    self.add_item_tag(0, # Port number
                 self.nitems_written(0) + i, # Offset
                 pmt.intern("amplitude_warning"), # Key
                 pmt.from_double(numpy.double(abs(in0[i]))) # Value
                 # Note: We need to explicitly create a 'double' here,
                 # because in0[i] is an explicit 32-bit float here
    )
    self.d_low_ampl_state = True
elif abs(in0[i]) >= 0.01 and d_low_ampl_state:
    self.add_item_tag(0, # Port number
                 self.nitems_written(0) + i, # Offset
                 pmt.intern("amplitude_recovered"), # Key
                 pmt.PMT_T # Value
    )
    self.d_low_ampl_state = False; // Reset state
We can also create a tag data type tag_t and directly pass this along:
if (std::abs(in[i]) < 0.01 and not d_low_ampl_state) {
    tag_t tag;
    tag.offset = nitems_written(0) + i;
    tag.key = pmt::mp("amplitude_warning");
    tag.value = pmt::from_double(std::abs(in[i]));
    add_item_tag(0, tag);
    d_low_ampl_state = true;
}
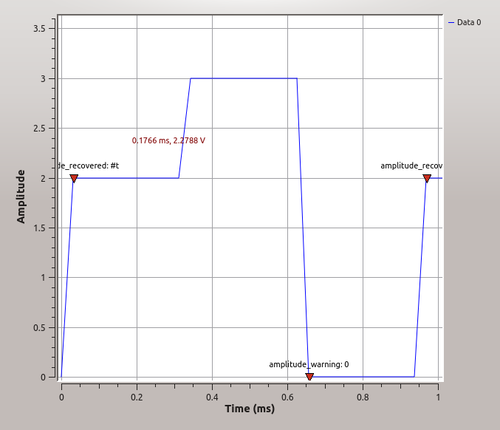
Here's a flow graph that uses the tagged version of the demodulator. We input 20 valid QPSK symbols, then 10 zeros. Since the output of this block is always either 0, 1, 2 or 3, we normally have no way to see if the input was not clearly one of these values.
Here's the output. You can see we have tags on those values which were not from a valid QPSK symbol, but from something unreliable.
Tag offsets and noutput_items
Before explaining more about tags, it is important to understand offsets. The tag offset is an absolute value, and specific to a certain port! The first item that passes through a block has the offset 0, and there will only be one sample with this offset (OK, before the nitpickers get out their pitchforks: The offset is an unsigned 64-bit value, so they will wrap around once 2^64 items have gone through. If you do the math, you'll figure out you need to let a flow graph run for a long time until that happens).
Most blocks, however, work on relative sample indices (e.g., if you have a loop of the form for (int i = 0; i < noutput_items; i++), i would be a relative sample index, because you don't necessarily care about the absolute sample position). If you know how many samples have been consumed or produced before you start this loop, you can easily convert relative sample indices into absolute ones by using the nitems_read(port_num) and nitems_written(port_num) methods (note for experts and those who don't want to make difficult to debug mistakes: Calling the consume() and produce() functions will change these values).
In the following example, we'll stream valid QPSK symbols and zeros in an alternating fashion. See how the stream tags are added onto the items:
(Make picture)
A downstream block can now make use of these tags. To do so, we need the get_tags_in_range() call, which reads tags within a given range of absolute offsets. To read a tag from one of the first hundred input items, this would be a valid call:
std::vector tags;
get_tags_in_range(
    tags, // Tags will be saved here
    0, // Port 0
    nitems_read(0), // Start of range
    nitems_read(0) + 100, // End of range
    pmt::mp("my_tag_key") // Optional: Only find tags with key "my_tag_key"
);
The tags will all be saved into the vector tags. Any tag that is connected to the first 100 items will be placed into this vector, although not in any specific order. The optional fifth argument lets us filter for tags with a specific key, in case we're only looking for a single type of tag.
There is a shortcut to this call, called get_tags_in_window, which searches for tags on relative indices. The following code would find the same tags as before:
std::vector tags;
get_tags_in_window( // Note the different method name
    tags, // Tags will be saved here
    0, // Port 0
    0, // Start of range (relative to nitems_read(0))
    100, // End of relative range
    pmt::mp("my_tag_key") // Optional: Only find tags with key "my_tag_key"
);
Tag propagation
We now know how to add tags to streams, and how to read them. But what happens to tags after they were read? And what happens to tags that aren't used? After all, there are many blocks that don't care about tags at all.
The answer is: It depends on the tag propagation policy of a block what happens to tags that enter it.
There are three policies to choose from:
- TPP_ALL_TO_ALL: Any tag that enters on any port is propagated automatically to all output ports (this is the default setting)
- TPP_ONE_TO_ONE: Tags entering on port N are propagated to output port N. This only works for blocks with the same number of in- and output ports.
- TPP_DONT: Tags entering the block are not automatically propagated. Only tags created within this block (using
add_item_tag()) appear on the output streams.
We generally set the tag propagation policy in the block's constructor using @set_tag_propagation_policy
When the tag propagation policy is set to TPP_ALL_TO_ALL or TPP_ONE_TO_ONE, the GNU Radio scheduler uses any information available to figure out which output item corresponds to which input item. The block may read them and add new tags, but existing tags are automatically moved downstream in a manner deemed appropriate.
As an example, consider an interpolating block. See the following flow graph:
As you can tell, we produce tags on every 10th sample, and then pass them through a block that repeats every sample 100 times. Tags do not get repeated with the standard tag propagation policies (after all, they're not tag manipulation policies), so the scheduler takes care that every tag is put on the output item that corresponds to the input item it was on before. Here, the scheduler makes an educated guess and puts the tag on the first of 100 items.
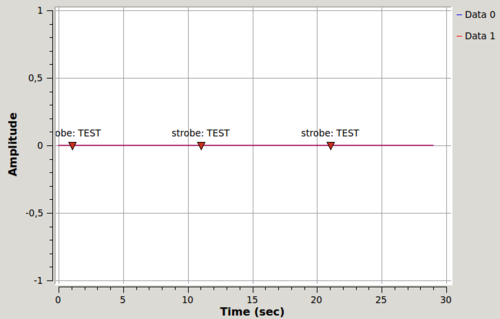
Note: We can't use one QT GUI Time Sink for both signals here, because they are running at a different rate. Note the time difference on the x-axis!
On decimating blocks, the behavior is similar. Consider this very simple flow graph, and the position of the samples:
We can see that no tags are destroyed, and tags are indeed spaced at one-tenth of the original spacing of 100 items. Of course, the actual item that was passed through the block might be destroyed, or modified (think of a decimating FIR filter).
In fact, this works with any rate-changing block. Note that there are cases where the relation of tag positions of in- and output are ambiguous, the GNU Radio scheduler will then try and get as close as possible.
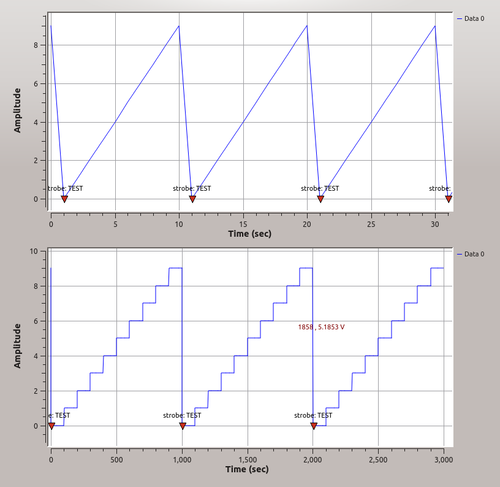
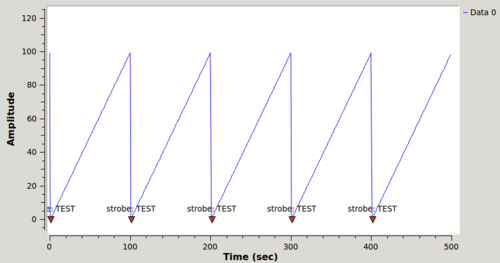
Here's another interesting example: Consider this flow graph, which has a delay block, and the position of the tags after it:
Before the delay block, tags were positioned at the beginning of the ramp. After the delay, they're still in the same position! Would we inspect the source code of the delay block, we'd find that there is absolutely no tag handling code. Instead, the block declares a delay to the scheduler, which then propagates tags with this delay.
Using these mechanisms, we can let GNU Radio handle tag propagation for a large set of cases. For specialized or corner cases, there is no option than to set the tag propagation policy to TPP_DONT and manually propagate tags (actually, there's another way: Say we want most tags to propagate normally, but a select few should be treated differently. We can use remove_item_tag() (DEPRECATED. Will be removed in 3.8.) to remove these tags from the input; they will then not be propagated any more even if the tag propagation policy is set to something other than TPP_DONT. But that's more advanced use and will not be elaborated on here).
Use case: FIR filters
(Note: this section requires knowledge of digital signal processing, you can skip to the next section if you don't understand some of the expressions).
Assume we have a block that is actually an FIR filter. We want to let GNU Radio handle the tag propagation. How do we configure the block?
Now, an FIR filter has one input and one output. So, it doesn't matter if we set the propagation policy to TPP_ALL_TO_ALL or TPP_ONE_TO_ONE, and we can leave it as the default. The items going in and those coming out are different, so how do we match input to output? Since we want to preserve the timing of the tag position, we need to use the filter's group delay as a delay for tags (which for this symmetric FIR filter is (N-1)/2, where N is the number of filter taps). Finally, we might be interpolating, decimating or both (say, for sample rate changes) and we need to tell the scheduler about this as well.
Message Passing
The message passing interface works completely differently than the stream tags. Messages are pure PMTs and they have no offset (this would not make any sense anyway, as they are not connected to an item, which in turn has an offset) and no keys (although we can create key/value pairs by making the PMT a pair or a dictionary). Another difference is that we have a different type of port for messages, which can't be sent to regular streaming ports. We call these new types of ports message ports, as opposed to the kind we've used so far, which we shall call streaming ports if we need to be explicit.
Messages usually aren't used for samples, but rather for packets or data that makes sense to be moved about in a packetized fashion. Of course, there are many cases where both message passing and streaming interfaces can be used, and it's up to us to choose which we prefer.
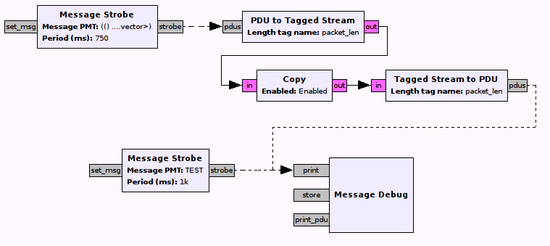
Here's a simple example of a flow graph using both streaming and messages:
There are several interesting things to point out. First, there are two source blocks, which both output items at regular intervals, one every 1000 and one every 750 milliseconds. Dotted lines denote connected message ports, as opposed to solid lines, which denote connected streaming ports. In the top half of the flow graph, we can see that it is, in fact, possible to switch between message passing and streaming ports, but only if the type of the PMTs matches the type of the streaming ports (in this example, the pink color of the streaming ports denotes bytes, which means the PMT should be a u8vector if we want to stream the same data we sent as PMT).
Another interesting fact is that we can connect more than one message output port to a single message input port, which is not possible with streaming ports. This is due to the asynchronous nature of messages: The receiving block will process all messages whenever it has a chance to do so, and not necessarily in any specific order. Receiving messages from multiple blocks simply means that there might be more messages to process.
What happens to a message once it was posted to a block? This depends on the actual block implementation, but there are two possibilities:
1) A message handler is called, which processes the message immediately.
2) The message is written to a FIFO buffer, and the block can make use of it whenever it likes, usually in the work function.
For a block that has both message ports and streaming ports, any of these two options is OK, depending on the application. However, we strongly discourage the processing of messages inside of a work function and instead recommend the use of message handlers. Using messages in the work function encourages us to block in work waiting for a message to arrive. This is bad behavior for a work function, which should never block. If a block depends upon a message to operate, use the message handler concept to receive the message, which may then be used to inform the block's actions when the work function is called. Only on specially, well-identified occasions should we use method 2 above in a block.
With a message passing interface, we can write blocks that don't have streaming ports, and then the work function becomes useless, since it's a function that is designed to work on streaming items. In fact, blocks that don't have streaming ports usually don't even have a work function.
PDUs
In the previous flow graph, we have a block called PDU to Tagged Stream. A PDU (protocol data unit) in GNU Radio has a special PMT type, it is a pair of a dictionary (on CAR) and a uniform vector type. So, this would yield a valid PDU, with no metadata and 10 zeros as stream data:
pdu = pmt.cons(pmt.make_dict(), pmt.make_u8vector(10, 0))
The key/value pairs in the dictionary are then interpreted as key/value pairs of stream tags.
Adding Message Passing to the Code
Unlike streaming ports, message ports are not defined in the I/O signature, but are declared with the message_port_register_* functions. Message ports also have identifiers instead of port numbers; those identifiers are also PMTs. To add in- or output ports for messages to a block, the constructor must be amended by lines like these:
// Put this into the constructor to create message ports
message_port_register_in(pmt::mp("in_port_name"));
message_port_register_out(pmt::mp("out_port_name"));
To set up a function as the message handler for an input message port that is called every time we receive a message, we add line like this:
// Put this into the constructor after the input port definition:
set_msg_handler(
    pmt::mp("in_port_name"), // This is the port identifier
    boost::bind(&block_class_name::msg_handler_method, this, _1)  // [FIXME class name] Bind the class method
);
We use Boost's bind technique to tell GNU Radio about the function we want to call for messages on this input port. If you don't know boost::bind, don't worry, the syntax is always the same: The first argument is a pointer to the method that is called, the second is this so the method is called from the correct class and the third argument is _1, which means the function takes one argument, which is the message PMT.
All message handlers, like the function "msg_handler_method" used above, have the same function prototype and are members of the block's implementation class:
void msg_handler_method(pmt::pmt_t msg);
In a Python block, these lines would look like this:
# Put this into the constructor to create message ports
self.message_port_register_in(pmt.intern("in_port_name"))
self.message_port_register_out(pmt.intern("out_port_name"))
self.set_msg_handler(pmt.intern("in_port_name"), self.msg_handler_method) # No bind necessary, we can pass the function directly
Message inputs and outputs can be connected similarly to streaming ports only using msg_connect instead of connect:
tb = gr.top_block()
# Send the string "message" once every 1000 ms
src = blocks.message_strobe(pmt.to_pmt("message"), 1000)
dbg = blocks.message_debug()
tb.msg_connect(src, "pdus", dbg, "print")
Note the msg_connect() call instead of the connect() function we use for streaming ports.
Example: Chat Application
Let's build an application that uses message passing. A chat program is an ideal use case, since it waits for the user to type a message, and then sends it. Because of that, no Throttle block is needed.
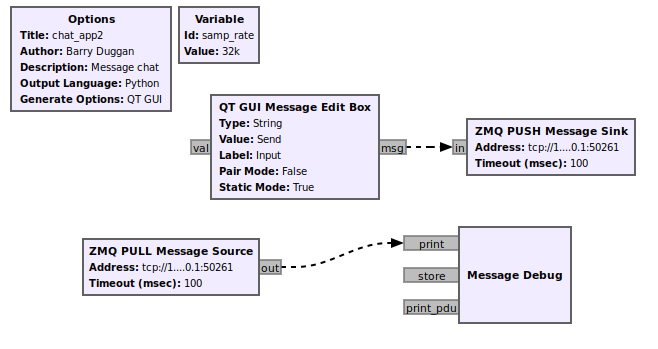
Create the following flowgraph and save it as 'chat_app2.grc':
The ZMQ Message blocks have an Address of 'tcp://127.0.0.1:50261'. Typing in the QT GUI Message Edit Box will send the text once the Enter key is pressed. Output is on the terminal screen where gnuradio-companion was started.
If you want to talk to another user (instead of just yourself), you can create an additional flowgraph with a different name such as 'chat_app3.grc'. Then change the ZMQ port numbers as follows:
- chat_app2
- ZMQ PUSH Sink: tcp://127.0.0.1:50261
- ZMQ PULL Source: tcp://127.0.0.1:50262
- chat_app3
- ZMQ PUSH Sink: tcp://127.0.0.1:50262
- ZMQ PULL Source: tcp://127.0.0.1:50261
When using GRC, doing a Generate and/or Run creates a Python file with the same name as the .grc file. You can execute the Python file without running GRC again.
For testing this system we will use two processes, so we will need two terminal windows.
Terminal 1:
- since you just finished building the chat_app3 flowgraph, you can just do a Run.
Terminal 2: Open another terminal window.
- change to whatever directory you used to generate the flowgraph for chat_app2.
- execute the following command:
python3 -u chat_app2.py
Typing in the Message Edit Box for chat_app2 should be displayed on the Terminal 1 screen (chat_app3) and vice versa.
To terminate each of the processes cleanly, click on the 'X' in the upper corner of the GUI rather than using Control-C.

