ATSC: Difference between revisions
(→Setting up SMPlayer: reflect that the UDP sink block is now included with the core blocks and say to use a UDP vs. TCP stream, as suggested on the internet) |
Jesternofool (talk | contribs) (On transmit side, added how to create a TS file using ffmpeg. On the receive side, added VLC and Celluloid viewers, configuration for each, and adjusted configuration for SMPlayer.) |
||
| Line 11: | Line 11: | ||
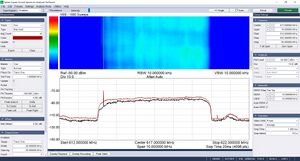
[[File:ATSC-Ver3-Ch25-02.png|thumb|ATSC 3.0 spectrum and spectrogram. Gnu Radio's ATSC blocks cannot currently transmit nor receive these signals.]] | [[File:ATSC-Ver3-Ch25-02.png|thumb|ATSC 3.0 spectrum and spectrogram. Gnu Radio's ATSC blocks cannot currently transmit nor receive these signals.]] | ||
These blocks do not currently work with ATSC 3.0. ATSC 3.0 is based on orthogonal frequency division multiplexing (OFDM) of multiple quadrature amplitude modulated (QAM) signals, as opposed to ATSC 1.0's use of 8VSB, as discussed above. | These blocks do not currently work with ATSC 3.0 ("Nextgen TV"). ATSC 3.0 is based on orthogonal frequency division multiplexing (OFDM) of multiple quadrature amplitude modulated (QAM) signals, as opposed to ATSC 1.0's use of 8VSB, as discussed above. | ||
== | == ATSC Transmission == | ||
Transmitting ATSC with Gnu Radio requires an appropriate MPEG2 transport stream. Here's how to create one in Linux: | |||
# If you do not have 'ffmpeg' installed, install it with '''sudo apt install ffmpeg'''. | |||
# Navigate to the folder containing your video file, such as a .MP4, .mkv, or other file. | |||
# Type the following command: '''ffmpeg -i inputFile.mp4 -c:v mpeg2video -b:v 3000k -acodec ac3 -b:a 768k -ar 48k -ac 2 -muxrate 19392658 -f mpegts outputFile.ts''', where '''inputFile.mp4''' is the file you wish to convert to the MPEG2 transport stream, and '''outputFile.ts''' is the transport stream file (TS) that you will use in Gnu Radio to create the ATSC signal. | |||
# In the transmission flowgraph shown below, use the '''outputFile.ts''' in the [[File Source]] block. | |||
This is the example ATSC transmitter. | |||
[[File:File atsc tx 2.jpg|700px]] | |||
A ready-made file can also be found [https://github.com/gnuradio/gnuradio/blob/master/gr-dtv/examples/file_atsc_tx.grc here]. Use the TS file you created above in the [[File Source]]. You can transmit this signal by removing the [[Throttle]] block and adding an SDR sink to the output of the FFT filter. | |||
== ATSC Reception == | |||
The simplest ATSC receiver uses the ''ATSC Receive Pipeline'' block. It has two parameters, the sample rate going into it and an oversampling ratio, a.k.a. the samples per symbol. The default is 1.5 but people have used 1.1 as well (someone please explain this). | |||
This is the example ATSC receiver which can be found [https://github.com/gnuradio/gnuradio/blob/master/gr-dtv/examples/file_atsc_rx.grc here]. Feel free to change the File Source type to complex (and remove the converter block) if that's the format of your IQ data. You can also replace the File Source and converter with an SDR source block. | |||
[[File:atsc-rx.png|700px]] | |||
== Setting up a Player == | |||
Here are three viewer programs you can use to view the transport stream (TS) output of Gnu Radio's ATSC receive blocks. | |||
* VLC: To install, open a terminal and type: '''sudo apt install vlc''' | |||
* SMPlayer: To install, open a terminal and type: '''sudo apt install smplayer''' | |||
* Celluloid: To install, open a terminal and type: '''sudo apt install celluloid''' | |||
To configure each player, perform the following: | |||
=== SMPlayer === | |||
To play the stream, select Open > URL > use the address '''udp://@:<port number>''', where the <port number> is the port value in the [[[UDP Sink]]] in the transmitter. Click ''OK'' to begin streaming. Ex: The [[UDP Sink]] is set to a port number of 2000. The address to use would be '''udp://@:2000'''. | |||
If there are problems, try the following: | |||
# Options -> Preferences | |||
# Under the performance sidebar item check the boxes: | # Under the performance sidebar item check the boxes: | ||
#* allow frame drop | #* allow frame drop | ||
#* allow hard frame drop | #* allow hard frame drop | ||
# Under the cache tab, uncheck 'auto', and set cache for streams to 8096 | # Under the cache tab, uncheck 'auto', and set cache for streams to 8096 | ||
=== VLC === | |||
To play the stream, select Media > Open Network Stream > use the address '''udp://@:<port number>''', where the <port number> is the port value in the [[[UDP Sink]]] in the transmitter. Click ''Play'' to begin streaming. Ex: The [[UDP Sink]] is set to a port number of 2000. The address to use would be '''udp://@:2000'''. | |||
=== Celluloid === | |||
[[ | To play the stream, click on the '''+''' symbol > Open Location > use the address '''udp://@:<port number>''', where the <port number> is the port value in the [[[UDP Sink]]] in the transmitter. Click ''Open'' to begin streaming. Ex: The [[UDP Sink]] is set to a port number of 2000. The address to use would be '''udp://@:2000'''. | ||
Revision as of 02:13, 14 June 2025
This page represents the documentation for all of the ATSC blocks, simply because they are intended to be used together, and most of the blocks have no parameters.
GNU Radio's ATSC (Advanced Television Systems Committee) module contains everything needed to transmit or a receive an ATSC 1.0 signal. ATSC 1.0 uses "8VSB" meaning 8-level vestigial sideband modulation. Each symbol includes two bits from the MPEG transport stream, which are then trellis modulated to produce a third bit. The 6 MHz channel used for broadcast ATSC 1.0 carries a symbol rate of 10.76 megabaud, a gross bit rate of 32 Mbit/s, and a net bit rate of 19.39 Mbit/s of usable data.
Note that on the receive side, ATSC Receive Pipeline is a hier block defined here.
ATSC 1.0 vs ATSC 3.0
These blocks do not currently work with ATSC 3.0 ("Nextgen TV"). ATSC 3.0 is based on orthogonal frequency division multiplexing (OFDM) of multiple quadrature amplitude modulated (QAM) signals, as opposed to ATSC 1.0's use of 8VSB, as discussed above.
ATSC Transmission
Transmitting ATSC with Gnu Radio requires an appropriate MPEG2 transport stream. Here's how to create one in Linux:
- If you do not have 'ffmpeg' installed, install it with sudo apt install ffmpeg.
- Navigate to the folder containing your video file, such as a .MP4, .mkv, or other file.
- Type the following command: ffmpeg -i inputFile.mp4 -c:v mpeg2video -b:v 3000k -acodec ac3 -b:a 768k -ar 48k -ac 2 -muxrate 19392658 -f mpegts outputFile.ts, where inputFile.mp4 is the file you wish to convert to the MPEG2 transport stream, and outputFile.ts is the transport stream file (TS) that you will use in Gnu Radio to create the ATSC signal.
- In the transmission flowgraph shown below, use the outputFile.ts in the File Source block.
This is the example ATSC transmitter.
A ready-made file can also be found here. Use the TS file you created above in the File Source. You can transmit this signal by removing the Throttle block and adding an SDR sink to the output of the FFT filter.
ATSC Reception
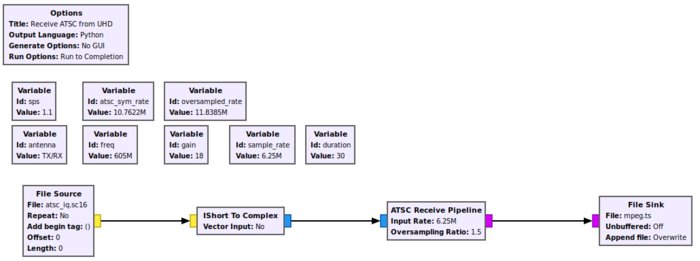
The simplest ATSC receiver uses the ATSC Receive Pipeline block. It has two parameters, the sample rate going into it and an oversampling ratio, a.k.a. the samples per symbol. The default is 1.5 but people have used 1.1 as well (someone please explain this).
This is the example ATSC receiver which can be found here. Feel free to change the File Source type to complex (and remove the converter block) if that's the format of your IQ data. You can also replace the File Source and converter with an SDR source block.
Setting up a Player
Here are three viewer programs you can use to view the transport stream (TS) output of Gnu Radio's ATSC receive blocks.
- VLC: To install, open a terminal and type: sudo apt install vlc
- SMPlayer: To install, open a terminal and type: sudo apt install smplayer
- Celluloid: To install, open a terminal and type: sudo apt install celluloid
To configure each player, perform the following:
SMPlayer
To play the stream, select Open > URL > use the address udp://@:<port number>, where the <port number> is the port value in the [[[UDP Sink]]] in the transmitter. Click OK to begin streaming. Ex: The UDP Sink is set to a port number of 2000. The address to use would be udp://@:2000.
If there are problems, try the following:
- Options -> Preferences
- Under the performance sidebar item check the boxes:
- allow frame drop
- allow hard frame drop
- Under the cache tab, uncheck 'auto', and set cache for streams to 8096
VLC
To play the stream, select Media > Open Network Stream > use the address udp://@:<port number>, where the <port number> is the port value in the [[[UDP Sink]]] in the transmitter. Click Play to begin streaming. Ex: The UDP Sink is set to a port number of 2000. The address to use would be udp://@:2000.
Celluloid
To play the stream, click on the + symbol > Open Location > use the address udp://@:<port number>, where the <port number> is the port value in the [[[UDP Sink]]] in the transmitter. Click Open to begin streaming. Ex: The UDP Sink is set to a port number of 2000. The address to use would be udp://@:2000.


