TutorialsRemoteGUI
NOTE: This tutorial has been deprecated in GR 3.8.
Accessing GRC on a Remote Machine
This tutorial will show you how to use nxfree 3.5, a remote desktop server/client solution from nomachine. There are many such tools available, but I have found nxfree to be the most reliable and fluid when viewing remote dynamic graphs like the FFT GUI windows, scopes, etc. It also runs over SSH, so it's secure. There is a new version 4 of nx from nomachine that is no longer free, so this tutorial only covers version 3.5
There are other free software packages that use the same or similar protocol, but I do not have much experience with them:
- FreeNX: https://mail.kde.org/mailman/listinfo/freenx-knx/
- NeatX: http://code.google.com/p/neatx/
- X2Go: http://wiki.x2go.org/doku.php
- 2X: http://www.2x.com/terminalserver/downloadlinks/
- Xpra: http://xpra.org/
These instructions cover use on Ubuntu 12.04 and 14.04 It will no doubt work with other distributions and versions, but my experience is limited to the two mentioned.
Download version 3.5 of the Client, Node and Server packages. Install each, in order on both your remote machine and your local machine:
sudo dkpg -i nxclient_3.5.0-7_x86_64.deb
sudo dkpg -i nxnode_3.5.0-9_x86_64.deb
sudo dkpg -i nxserver_3.5.0-11_x86_64.deb
The next steps, connecting to the remote machine, assumes:
- that you have SSH access to the remote machine.
- that the remote machine has a desktop installed
- Ubuntu 12.04:
sudo apt-get install ubuntu-desktop - Ubuntu 14.04 doesn't support the necessary 2D desktop, so you have to install something else. For this tutorial, we'll use MATE:
- Ubuntu 12.04:
sudo apt-add-repository ppa:ubuntu-mate-dev/ppa
sudo apt-add-repository ppa:ubuntu-mate-dev/trusty-mate
sudo apt-get update && sudo apt-get upgrade
sudo apt-get install --no-install-recommends ubuntu-mate-core ubuntu-mate-desktop
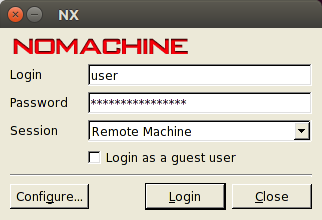
On the local machine, start the NX Client application.

- The Login field takes the remote SSH user name.
- Password is the remote SSH user's password
- Name the Session something familiar to easily reconnect in the future.
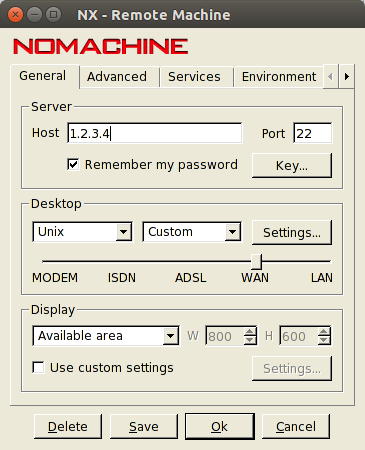
Click on the Configure button and a new dialog box will pop up.

- Host and Port are the IP address and port of the remote SSH host.
- Under the Desktop group, Select "Unix" and "Custom"
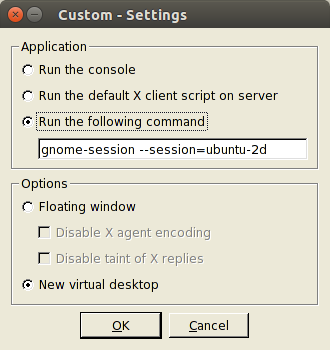
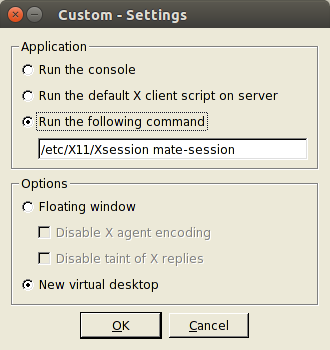
Click the Settings Button. Another dialog box appears to enter custom gui session options.
- Select "Run the following command" and enter:
gnome-session --session=ubuntu-2d
if the remote host is running Ubuntu 12.04/etc/X11/Xsession mate-session
if the remote host is running Ubuntu 14.04
- Select "New virtual desktop" under Options
Close the dialog boxes by clicking OK on each to return to the main Client application. Click Login.
After a few moments, the client should connect to the remote machine and bring up the new virtual desktop. Now you can start GRC as you normally would with any desktop machine. UHD applications with graphical interfaces work fine too.
When you close the connection, you have the option to Terminate the running session or leave it available to be resumed in the future. I generally keep it running, but if you run into any problems, terminate any running sessions before continuing.

