File transfer using Packet and BPSK: Difference between revisions
(add filename on pkt_xmt command line) |
|||
| (15 intermediate revisions by the same user not shown) | |||
| Line 1: | Line 1: | ||
<!-- File_transfer_using_Packet_and_BPSK.mediawiki --> | <!-- File_transfer_using_Packet_and_BPSK.mediawiki --> | ||
<b> | <p><b>This is a Proof of Concept design.</b></p> | ||
<p><b>Please leave comments in the Discussion tab above, or on the GNU Radio General Chat channel.</b> See [[Chat]].</p> | |||
<p><b>NOTE: This tutorial is to illustrate methods of using packet data and BPSK modulation to transfer a file from one computer to another. However, it does not contain any Forward Error Correction, flow control, or any other methods one would expect from something like TCP/IP.</b></p> | |||
This package consists of a packet transmitter, a channel simulation, and a packet receiver. It has been developed and tested with GNU Radio version 3.10.9.1. For Over The Air testing, a Transmit / Receive SDR module is used in place of the channel simulation. | |||
<!-- Table of Contents follows here --> | |||
<br> | <br> | ||
| Line 14: | Line 15: | ||
<b>It is imperative that all of the prerequisites are studied before starting this one.</b> | <b>It is imperative that all of the prerequisites are studied before starting this one.</b> | ||
* [[ | * [[QPSK_Mod_and_Demod|QPSK Mod and Demod]] | ||
* [[Simulation_example:_BPSK_Demodulation|Simulation_example: BPSK Demodulation]] | * [[Simulation_example:_BPSK_Demodulation|Simulation_example: BPSK Demodulation]] | ||
* [[Packet_Communications|Packet Communications]] | * [[Packet_Communications|Packet Communications]] | ||
== Note == | |||
A presentation of this tutorial was made at GRCon23: [https://www.youtube.com/watch?v=UpiaL1Hr6-s File transfer using Packet and BPSK]. | |||
== Download the gr-control software == | == Download the gr-control software == | ||
| Line 27: | Line 32: | ||
4. Clone the repository: | 4. Clone the repository: | ||
git clone https://github.com/duggabe/gr-control.git | git clone https://github.com/duggabe/gr-control.git | ||
5. Change to the gr-control directory: | |||
cd ~/gr-control | |||
6. Version tags are shown on the [https://github.com/duggabe/gr-control/tags Tags] page. If you want a version other than the latest, do the following: | |||
git checkout vX.X.X.X # enter the desired version | |||
== Operation == | == Operation == | ||
<br> | <br> | ||
<b>NOTE: The order of starting the tasks is important!</b> | <b> * * NOTE: The order of starting the tasks is important! * *</b> | ||
=== Sending Non-text Files === | === Sending Non-text Files === | ||
| Line 38: | Line 47: | ||
=== Receiving the File === | === Receiving the File === | ||
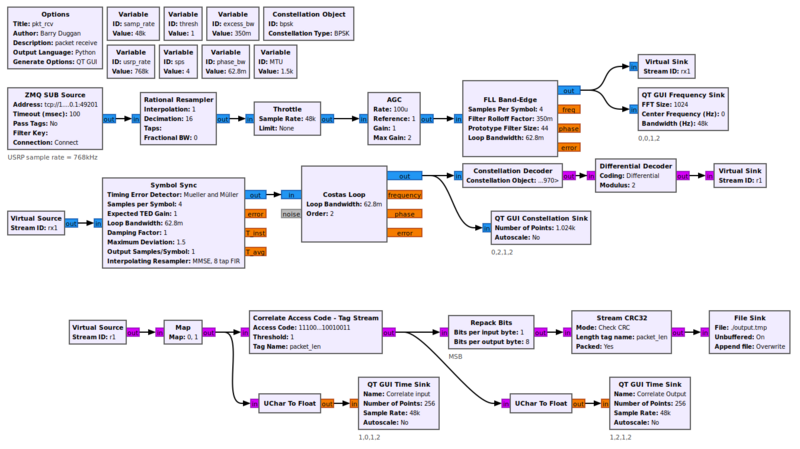
<code>pkt_rcv.py</code> receives the BPSK signal and presents it | <code>pkt_rcv.py</code> receives the BPSK signal and presents it to the [[Correlate_Access_Code_-_Tag_Stream|Correlate Access Code - Tag Stream]]. That block detects the Access Code and passes the payload to the [[Stream_CRC32]] to check for a valid CRC. If the CRC is good, the data is sent to the [[File_Sink]]. | ||
[[File:Pkt_rcv_file_fg.png|800px]] | [[File:Pkt_rcv_file_fg.png|800px]] | ||
| Line 47: | Line 56: | ||
3. Execute the packet receiver. | 3. Execute the packet receiver. | ||
python3 -u pkt_rcv.py | python3 -u pkt_rcv.py | ||
4. A new window will open (titled "pkt_rcv") showing a [[QT_GUI_Constellation_Sink]] | 4. A new window will open (titled "pkt_rcv") showing a [[QT_GUI_Frequency_Sink]], a [[QT_GUI_Constellation_Sink]], and two [[QT_GUI_Time_Sink]]s. | ||
=== Simulating Channel Impairments === | === Simulating Channel Impairments === | ||
| Line 68: | Line 77: | ||
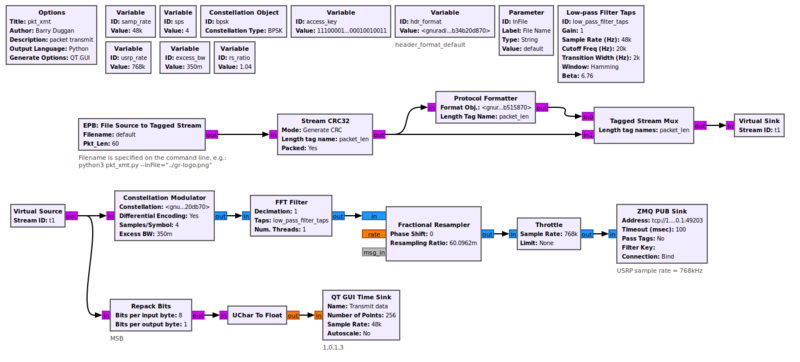
The 'EPB: File Source to Tagged Stream' block is an Embedded Python Block which takes the place of a [[File_Source]] block, a [[Stream_to_Tagged_Stream]] block, and parts of a [[Burst_Shaper]] block. The Python block performs the following functions: | The 'EPB: File Source to Tagged Stream' block is an Embedded Python Block which takes the place of a [[File_Source]] block, a [[Stream_to_Tagged_Stream]] block, and parts of a [[Burst_Shaper]] block. The Python block performs the following functions: | ||
* Send a preamble to allow the receiver to synchronize. | * Send a preamble to allow the receiver to synchronize. | ||
* | * Read the file in "Pkt_Len" chunks. | ||
* Convert the data to Base64, which produces 4 bytes of output for every 3 bytes of input. | |||
* Send each Base64 chunk with revised "packet_len" tags. | |||
* Send a post-file filler to assure that any buffers have been flushed. | * Send a post-file filler to assure that any buffers have been flushed. | ||
The content of the Embedded Python Block is shown here: [https://github.com/duggabe/gr-control/blob/main/Transmitters/pkt_xmt_epy_block_0.py pkt_xmt_epy_block_0.py] | The content of the Embedded Python Block is shown here: [https://github.com/duggabe/gr-control/blob/main/Transmitters/pkt_xmt_epy_block_0.py pkt_xmt_epy_block_0.py] | ||
The preamble is composed of the '%' character, followed by 50 capital 'U's, followed by a ']'. It is repeated | The preamble is composed of the '%' character, followed by 50 capital 'U's, followed by a ']'. It is repeated 64 times to allow the receiver to synchronize. The post-file filler is sent 16 times. | ||
1. Open another terminal window.<br> | 1. Open another terminal window.<br> | ||
| Line 81: | Line 92: | ||
python3 pkt_xmt.py --InFile="../gr-logo.png" | python3 pkt_xmt.py --InFile="../gr-logo.png" | ||
4. A new window will open (titled "pkt_xmt") showing a [[QT_GUI_Time_Sink]].<br> | 4. A new window will open (titled "pkt_xmt") showing a [[QT_GUI_Time_Sink]].<br> | ||
5. The file transmission will begin. The average throughput is | 5. The file transmission will begin. The average throughput is 2,000 bytes per second.<br> | ||
6. The Time Sink display in the transmitter will show data bits with a 'packet_len' tag.<br> | 6. The Time Sink display in the transmitter will show data bits with a 'packet_len' tag.<br> | ||
7. The Time Sink displays in the receiver will show data bits with a 'packet_len' tag.<br> | 7. The Time Sink displays in the receiver will show data bits with a 'packet_len' tag.<br> | ||
| Line 94: | Line 105: | ||
=== Stripping the Preamble and Filler === | === Stripping the Preamble and Filler === | ||
The received file will be stored in "~/gr-control/Receivers/output.tmp". That file will contain up to | The received file will be stored in "~/gr-control/Receivers/output.tmp". That file will contain up to 64 preamble packets, followed by the transmitted file with Base64 encoding, followed by filler packets. | ||
A Python program has been written to strip those preamble and filler packets: | A Python program has been written to strip those preamble and filler packets and decode the Base64 text: | ||
1. Use the terminal window with the gr-control/Receivers folder. | 1. Use the terminal window with the gr-control/Receivers folder. | ||
| Line 102: | Line 113: | ||
3. Execute the <code>strip_preamble.py</code> program. The last parameter (file name) can be whatever you wish as the output. Use the appropriate file extension! | 3. Execute the <code>strip_preamble.py</code> program. The last parameter (file name) can be whatever you wish as the output. Use the appropriate file extension! | ||
python3 strip_preamble.py output.tmp output.png | python3 strip_preamble.py output.tmp output.png | ||
=== Combined File Receive and Stripping the Preamble === | |||
Version v2.1.4.0 contains an alternate packet receive program named <code>pkt_rcv_strip</code> which integrates <code>pkt_rcv</code> and <code>strip_preamble.py</code>. | |||
Using <code>pkt_rcv_strip</code> in step [[File_transfer_using_Packet_and_BPSK#Receiving_the_File|5.2 Receiving_the_File]] will decode the file into `output.tmp` and display the received filename. | |||
<p><b>Although this design works in theory, it does not work very well in practice. It is only to illustrate a concept.</b></p> | |||
<br> | |||
[[File:Pkt_rcv_strip_fg.png|800px]] | |||
== Over The Air Testing == | |||
Limited testing has been done using two computers with B200 mini and Pluto SDRs. Observations from these tests are: | |||
* Frequency differences between the two SDRs leads to the need to adjust the receiver tuning to get a good signal. | |||
* Using an ISM band can introduce a lot of noise. | |||
* Without Forward Error Correction, some packets get dropped due to checksum errors. | |||
* Since there is no flow control, large files can cause data overruns and dropped packets. | |||
Latest revision as of 02:10, 31 July 2024
This is a Proof of Concept design.
Please leave comments in the Discussion tab above, or on the GNU Radio General Chat channel. See Chat.
NOTE: This tutorial is to illustrate methods of using packet data and BPSK modulation to transfer a file from one computer to another. However, it does not contain any Forward Error Correction, flow control, or any other methods one would expect from something like TCP/IP.
This package consists of a packet transmitter, a channel simulation, and a packet receiver. It has been developed and tested with GNU Radio version 3.10.9.1. For Over The Air testing, a Transmit / Receive SDR module is used in place of the channel simulation.
Prerequisites
It is imperative that all of the prerequisites are studied before starting this one.
Note
A presentation of this tutorial was made at GRCon23: File transfer using Packet and BPSK.
Download the gr-control software
1. Open a terminal window.
2. Change to the home directory.
cd ~/
3. If you don't have 'git', enter
sudo apt install git
4. Clone the repository:
git clone https://github.com/duggabe/gr-control.git
5. Change to the gr-control directory:
cd ~/gr-control
6. Version tags are shown on the Tags page. If you want a version other than the latest, do the following:
git checkout vX.X.X.X # enter the desired version
Operation
* * NOTE: The order of starting the tasks is important! * *
Sending Non-text Files
Any text, binary, and other non-text files (such as PDF or PNG) can be sent. The file "~/gr-control/gr-logo.png" has been provided for testing. It is the GNU Radio logo.
Receiving the File
pkt_rcv.py receives the BPSK signal and presents it to the Correlate Access Code - Tag Stream. That block detects the Access Code and passes the payload to the Stream_CRC32 to check for a valid CRC. If the CRC is good, the data is sent to the File_Sink.
1. Open a new terminal window.
2. Go to the gr-control/Receivers folder.
cd ~/gr-control/Receivers
3. Execute the packet receiver.
python3 -u pkt_rcv.py
4. A new window will open (titled "pkt_rcv") showing a QT_GUI_Frequency_Sink, a QT_GUI_Constellation_Sink, and two QT_GUI_Time_Sinks.
Simulating Channel Impairments
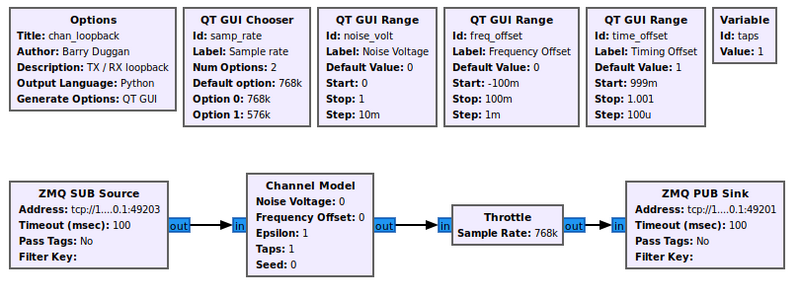
There are two flowgraphs included to allow loopback testing of a transmitter and a receiver without using SDR hardware. Either operates **in place of** the `xmt_rcv_switch` program. The `chan_loopback` is for the digital modes such as BPSK packet. It allows introduction of noise, frequency offset, and timing offset.
1. Open another terminal window.
2. Go to the gr-control folder.
cd ~/gr-control
3. Execute the loopback program.
python3 -u chan_loopback.py
4. A new window will open (titled "chan_loopback") showing a chooser for the Sample rate. For the version 3.9 and 3.10 programs, select 768kHz. There are three sliders to introduce impairments, but for initial testing, leave them all as loaded.
Transmitting the File
The 'EPB: File Source to Tagged Stream' block is an Embedded Python Block which takes the place of a File_Source block, a Stream_to_Tagged_Stream block, and parts of a Burst_Shaper block. The Python block performs the following functions:
- Send a preamble to allow the receiver to synchronize.
- Read the file in "Pkt_Len" chunks.
- Convert the data to Base64, which produces 4 bytes of output for every 3 bytes of input.
- Send each Base64 chunk with revised "packet_len" tags.
- Send a post-file filler to assure that any buffers have been flushed.
The content of the Embedded Python Block is shown here: pkt_xmt_epy_block_0.py
The preamble is composed of the '%' character, followed by 50 capital 'U's, followed by a ']'. It is repeated 64 times to allow the receiver to synchronize. The post-file filler is sent 16 times.
1. Open another terminal window.
2. Go to the gr-control/Transmitters folder.
cd ~/gr-control/Transmitters
3. Execute the packet transmitter with the desired filename, for example:
python3 pkt_xmt.py --InFile="../gr-logo.png"
4. A new window will open (titled "pkt_xmt") showing a QT_GUI_Time_Sink.
5. The file transmission will begin. The average throughput is 2,000 bytes per second.
6. The Time Sink display in the transmitter will show data bits with a 'packet_len' tag.
7. The Time Sink displays in the receiver will show data bits with a 'packet_len' tag.
8. When the file is complete, the transmit terminal will show "End of file".
Shutdown
1. Close the "pkt_xmt" window by clicking the 'X' in the upper right corner.
2. Close the "chan_loopback" window by clicking the 'X' in the upper right corner.
3. Close the "pkt_rcv" window by clicking the 'X' in the upper right corner.
Stripping the Preamble and Filler
The received file will be stored in "~/gr-control/Receivers/output.tmp". That file will contain up to 64 preamble packets, followed by the transmitted file with Base64 encoding, followed by filler packets.
A Python program has been written to strip those preamble and filler packets and decode the Base64 text:
1. Use the terminal window with the gr-control/Receivers folder.
cd ~/gr-control/Receivers
3. Execute the strip_preamble.py program. The last parameter (file name) can be whatever you wish as the output. Use the appropriate file extension!
python3 strip_preamble.py output.tmp output.png
Combined File Receive and Stripping the Preamble
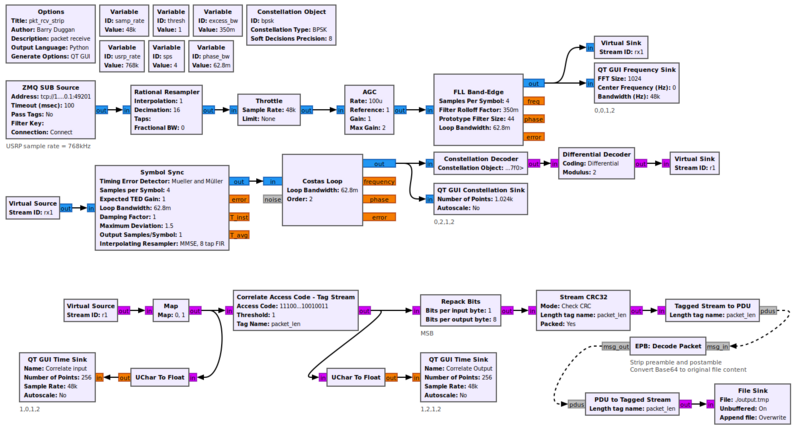
Version v2.1.4.0 contains an alternate packet receive program named pkt_rcv_strip which integrates pkt_rcv and strip_preamble.py.
Using pkt_rcv_strip in step 5.2 Receiving_the_File will decode the file into `output.tmp` and display the received filename.
Although this design works in theory, it does not work very well in practice. It is only to illustrate a concept.
Over The Air Testing
Limited testing has been done using two computers with B200 mini and Pluto SDRs. Observations from these tests are:
- Frequency differences between the two SDRs leads to the need to adjust the receiver tuning to get a good signal.
- Using an ISM band can introduce a lot of noise.
- Without Forward Error Correction, some packets get dropped due to checksum errors.
- Since there is no flow control, large files can cause data overruns and dropped packets.


