Audio Source: Difference between revisions
(Created page with "Category:Block Docs Acts as a microphone input. See Audio Sink for a block that outputs to a speaker. Not all sampling rates will be supported by your hardware. T...") |
m (change sink to source) |
||
| (16 intermediate revisions by 8 users not shown) | |||
| Line 1: | Line 1: | ||
[[Category:Block Docs]] | [[Category:Block Docs]] | ||
Not all sampling rates will be supported by your hardware. The audio source can have multiple outputs depending upon your hardware | Acts as a microphone input. See [[Audio Sink]] for a block that outputs to an audio device such as a speaker. | ||
Not all sampling rates will be supported by your hardware. The audio source can have multiple outputs depending upon your hardware. | |||
== Parameters == | == Parameters == | ||
=== Sample Rate === | |||
: | |||
To set the Audio sampling rate, click the drop-down menu to see popular rates. Note: not all sampling rates will be supported by your hardware. For typical applications, this should be set to 48kHz. | |||
=== Device Name === | |||
Leave the device name blank to choose the default audio device. | |||
To select a particular input device, a name (<code>[string]</code>) or index number (<code>[int]</code>) can be specified. | |||
The exact name or index number depends on the Operating System and the audio system in use (see below). | |||
=== OK to Block === | |||
On by default, which should be used when this source is not throttled by any other block. | |||
=== Num Outputs === | |||
The audio source can have multiple outputs depending upon your hardware. For example, set the outputs to 2 for stereo or 1 for mono. | |||
== Operating System == | |||
==== OSX ==== | |||
For OSX, Audio Source will return only zeros unless the GNU Radio binary is launched from an application that has been granted permission to use the microphone. For example, if you are launching GNU Radio Companion from the iTerm command line, go to System Preferences -> Security & Privacy -> Privacy -> Microphone and check the box for "iTerm2". | |||
Once the application has permission, leaving the 'Device Name' blank will connect to the current default audio input device. To see or change the current device, go into the System Preferences, click on "Sound", and then the "Input" tab. | |||
The listings under "Name" contain the exact device names currently available; if a new audio source is attached to the computer then a new name will appear -- for example "Line In" for some Macs. Since most such device names contain spaces, make sure to put quotes around the name argument, for example: | |||
spectrum_inversion.py -I "MacBook Pro Microphone" | |||
==== Linux ==== | |||
On Linux, the device is selected via ALSA, typical choices include: | |||
* <code>default</code> (selected if left empty) | |||
:This will use the default device. Note that in most desktop systems this is actually managed by PipeWire or PulseAudio, to check this, you can execute <code>arecord -L | grep -A1 ^default</code>. | |||
* <code>hw:0,0</code> | |||
:This will select the hardware card 0, device 0. To check the list of available cards/devices, issue the command <code>arecord -l</code> (note that <code>-l</code> is lower case here). | |||
* <code>plughw:0,0</code> | |||
:This is the same as <code>hw:0,0</code> but enables software processing, which allows e.g. using a sample rate not natively supported. | |||
* <code>pipewire</code> (to explicitly use PipeWire) | |||
* <code>pulse</code> (to explicitly use PulseAudio) | |||
For ALSA users with audio trouble, follow this procedure: | |||
* from a terminal window enter <code>arecord -L</code> | |||
* find the entry such as: | |||
<pre> | |||
hw:CARD=Device,DEV=0 | |||
USB Audio Device, USB Audio | |||
Direct hardware device without any conversions | |||
</pre> | |||
: from the list which matches your device. | |||
* use the first line of that entry (e.g. "hw:CARD=Device,DEV=0") as the device name (without the quotes). | |||
* For issues or debugging, see [[ALSAPulseAudio]]. | |||
==== Windows ==== | |||
On Windows, go into the Settings (<code>Windows Key + I</code>), cllck on "System", click on "Sound", and then the "Input" tab. The listings under "Name" contain the exact device names currently available; if a new audio source is attached to the computer then a new name will appear. Since most of the device names contain spaces, make sure to put quotes around the name argument, for example: | |||
"Microphone (Realtek High Definition Audio)" | |||
* '''portaudio''' | |||
: When this backend module is in use (see <kbd>gr-audio.conf</kbd>), the names given to audio devices are adopted from Windows. | |||
: An alternate method to see the names of input devices is to use the Multimedia System Control Panel. | |||
: Type the <code>Windows Key</code>, then type <kbd>mmsys.cpl</kbd>, and hit <code>Enter</code>. The input devices are found in the <kbd>Recording</kbd> tab. | |||
: To see the index numbers of input devices, ensure the <code>python-sounddevice</code> package is installed in the <kbd>radioconda</kbd> environment, | |||
: after which the command <code>python -m sounddevice</code> will produce a complete list. | |||
* '''windows''' | |||
: When this backend module is in use, the names and index numbers are as assigned by Windows. | |||
: Windows PowerShell must be configured in advance just once to list the names and index numbers. | |||
: Start PowerShell using <code>Run as Administrator</code> and issue the command <code>Install-Module -Name AudioDeviceCmdlets</code>. | |||
: After that, run PowerShell normally and the cmdlet <code>get-audiodevice -list</code> will produce the list. | |||
== Example Flowgraphs == | |||
=== Audio Source to RTTY decoder === | |||
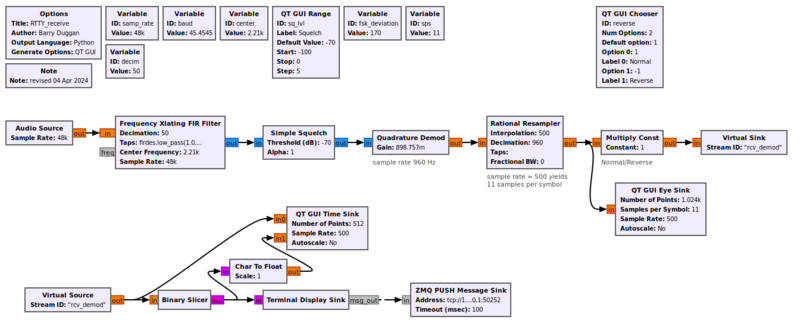
This flowgraph shows the Audio Source block feeding a radioteletype (RTTY) decoder. | |||
[[File:RTTY_rcv.png|800px]] | |||
=== Sound detector and notifier === | |||
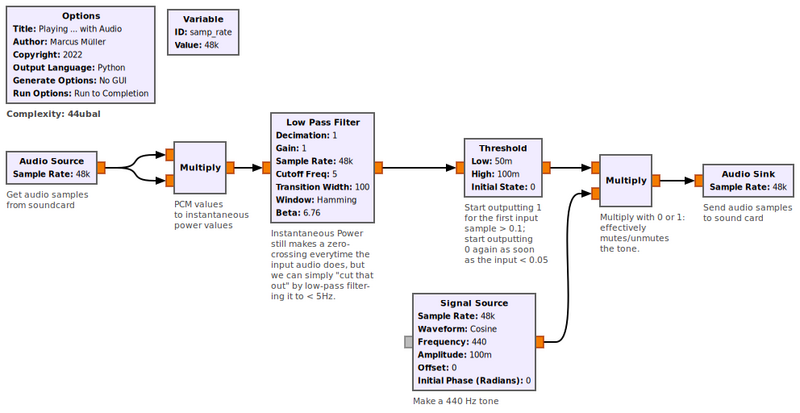
This flowgraph takes audio from the audio source, squares it, to get something proportional to the instantaneous power, then low-pass filters it to approximate an averaged-out power, applies a [[Threshold]] to it. The latter starts outputting 1s as soon as the smoothed power crosses 10% of the maximum power, and turns back to generating 0s when it falls below 5%. | |||
The resulting stream of 1s and 0s is multiplied with a 440 Hz tone and then fed into an [[Audio_Sink|Audio Sink]], allowing the user to hear a tone for as long as there's enough sound at the input. | |||
[[File:Audio_passthrough.png|800px]] | |||
: | |||
[[File:Audio_passthrough.grc|Original Flow Graph]] | |||
: | |||
Latest revision as of 17:32, 29 March 2025
Acts as a microphone input. See Audio Sink for a block that outputs to an audio device such as a speaker.
Not all sampling rates will be supported by your hardware. The audio source can have multiple outputs depending upon your hardware.
Parameters
Sample Rate
To set the Audio sampling rate, click the drop-down menu to see popular rates. Note: not all sampling rates will be supported by your hardware. For typical applications, this should be set to 48kHz.
Device Name
Leave the device name blank to choose the default audio device.
To select a particular input device, a name ([string]) or index number ([int]) can be specified.
The exact name or index number depends on the Operating System and the audio system in use (see below).
OK to Block
On by default, which should be used when this source is not throttled by any other block.
Num Outputs
The audio source can have multiple outputs depending upon your hardware. For example, set the outputs to 2 for stereo or 1 for mono.
Operating System
OSX
For OSX, Audio Source will return only zeros unless the GNU Radio binary is launched from an application that has been granted permission to use the microphone. For example, if you are launching GNU Radio Companion from the iTerm command line, go to System Preferences -> Security & Privacy -> Privacy -> Microphone and check the box for "iTerm2".
Once the application has permission, leaving the 'Device Name' blank will connect to the current default audio input device. To see or change the current device, go into the System Preferences, click on "Sound", and then the "Input" tab.
The listings under "Name" contain the exact device names currently available; if a new audio source is attached to the computer then a new name will appear -- for example "Line In" for some Macs. Since most such device names contain spaces, make sure to put quotes around the name argument, for example:
spectrum_inversion.py -I "MacBook Pro Microphone"
Linux
On Linux, the device is selected via ALSA, typical choices include:
default(selected if left empty)
- This will use the default device. Note that in most desktop systems this is actually managed by PipeWire or PulseAudio, to check this, you can execute
arecord -L | grep -A1 ^default.
hw:0,0
- This will select the hardware card 0, device 0. To check the list of available cards/devices, issue the command
arecord -l(note that-lis lower case here).
plughw:0,0
- This is the same as
hw:0,0but enables software processing, which allows e.g. using a sample rate not natively supported.
pipewire(to explicitly use PipeWire)pulse(to explicitly use PulseAudio)
For ALSA users with audio trouble, follow this procedure:
- from a terminal window enter
arecord -L
- find the entry such as:
   hw:CARD=Device,DEV=0
       USB Audio Device, USB Audio
       Direct hardware device without any conversions
- from the list which matches your device.
- use the first line of that entry (e.g. "hw:CARD=Device,DEV=0") as the device name (without the quotes).
- For issues or debugging, see ALSAPulseAudio.
Windows
On Windows, go into the Settings (Windows Key + I), cllck on "System", click on "Sound", and then the "Input" tab. The listings under "Name" contain the exact device names currently available; if a new audio source is attached to the computer then a new name will appear. Since most of the device names contain spaces, make sure to put quotes around the name argument, for example:
"Microphone (Realtek High Definition Audio)"
- portaudio
- When this backend module is in use (see gr-audio.conf), the names given to audio devices are adopted from Windows.
- An alternate method to see the names of input devices is to use the Multimedia System Control Panel.
- Type the
Windows Key, then type mmsys.cpl, and hitEnter. The input devices are found in the Recording tab.
- To see the index numbers of input devices, ensure the
python-sounddevicepackage is installed in the radioconda environment, - after which the command
python -m sounddevicewill produce a complete list.
- windows
- When this backend module is in use, the names and index numbers are as assigned by Windows.
- Windows PowerShell must be configured in advance just once to list the names and index numbers.
- Start PowerShell using
Run as Administratorand issue the commandInstall-Module -Name AudioDeviceCmdlets.
- After that, run PowerShell normally and the cmdlet
get-audiodevice -listwill produce the list.
Example Flowgraphs
Audio Source to RTTY decoder
This flowgraph shows the Audio Source block feeding a radioteletype (RTTY) decoder.
Sound detector and notifier
This flowgraph takes audio from the audio source, squares it, to get something proportional to the instantaneous power, then low-pass filters it to approximate an averaged-out power, applies a Threshold to it. The latter starts outputting 1s as soon as the smoothed power crosses 10% of the maximum power, and turns back to generating 0s when it falls below 5%.
The resulting stream of 1s and 0s is multiplied with a 440 Hz tone and then fed into an Audio Sink, allowing the user to hear a tone for as long as there's enough sound at the input.

