Guided Tutorial Hardware Considerations
This page is my working space while editing Wiki pages.
Introduction
One of the great strengths of GNU Radio is how easy it is to move from simulation to real-world operation. In this tutorial, we will build on what you have learned so far and create a complete FM radio receiver that you can use to listen to your local FM radio stations. Along the way, we will discuss a number of considerations that come into play when working with real-world radio hardware.
Prerequisites
- Our Suggested Reading list
- Tutorials:
What Will I Need?
If you don't have an actual radio to work with, this tutorial is still useful. You can simply use a recording from an actual radio, with nothing done to the data. We have provided a recording, which you can find in the gr-tutorials repository. You can use this in your flowgraph to simulate hardware passing you samples.
This tutorial will be most useful, though, if you have a piece of radio hardware that you can use with GNU Radio. There is a large and growing number of vendors that provide hardware with GNU Radio drivers, and they span from very cheap $20 receivers to very high-performance tens-of-thousands-of-dollars sort of systems. This tutorial is possible if you have a radio that can only receive, assuming it can tune to the FM bands. Most countries allot between ~87 MHz and ~108 MHz to FM broadcast radio, with some slight variations on the floor and ceiling of the range.
Using UHD Blocks
The author is using an Ettus Research USRP B200, which uses the USRP Hardware Driver (UHD). Thus, the hardware sources & sinks used in this tutorial will be gr-uhd blocks.
If you are using a different piece of hardware, you should use the blocks suggested by your hardware vendor. Another set of popular HW blocks, for example, is gr-osmosdr.
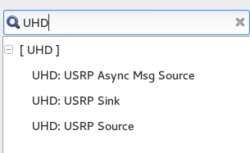
In order to use UHD blocks, you must have UHD installed. There are a number of ways to install UHD, which you can read about here. If you built GNU Radio from source, you should have seen gr-uhd in the list of components being built in the CMake output. If GNU Radio successfully found your UHD installation, you should see a group of UHD blocks in the GNU Radio Companion:
Building an FM Radio Receiver
In this section, we will build a working FM radio receiver that you can use to listen to your local FM broadcast stations. This content is based on the tutorial slide series prepared by Balint Seeber, available here: files.ettus.com/tutorials
Creating a Software Radio Spectrum Analyzer
One of the more basic (but also incredibly useful) things you can do in GNU Radio with a receiver is simply plot a real-time FFT of what your receiver sees. It's a software radio spectrum analyzer. This is also a great first step because it will verify that your hardware is working correctly, and we can use it to identify broadcast stations in your area that we will tune to later on.
Create a new flowgraph. Drop a 'UHD: USRP Source' and 'QT GUI Sink' into the canvas. In the previous section, we used static variables for frequency and gain. Here, let's make them changeable on-the-fly. Find the 'QT GUI Range', and add two of them to your flowgraph. Open each of them, and fill out the following fields as appropriate for your hardware. Mine are filled out, below, to match the capabilities of the USRP B200:
QT GUI Range 1:
- ID: freq
- Label: freq
- Default Value: 1e9
- Start: 70e6
- Stop: 6e9
- Step: 10e6
QT GUI Range 2:
- ID: gain
- Label: gain
- Default Value: 0
- Start: 0
- Stop: 74
- Step: 1
Change your 'samp_rate' variable block value to something interesting. I set mine to 32 MSps. Now, open up the properties for the 'UHD: USRP Source'. Just as we used our variable blocks in the previous section for our radio parameters, we will do the same here. Use the 'ID's from the 'range blocks', above, to set the 'UHD Source' parameters:
- Samp Rate (Sps): samp_rate
- Ch0: Center Freq (Hz): freq
- Ch0: Gain (dB): gain
- Ch0: Antenna: "TX/RX"
- Ch0: Bandwidth (Hz): samp_rate
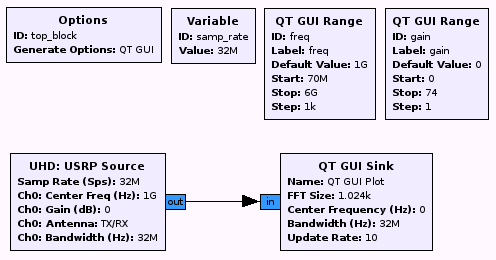
When you are done, your flowgraph should look something like this:
You can also download this flowgraph if you want the reference file.
You should be all set!
Using Your Software Radio Spectrum Analyzer
Go ahead and run your flowgraph. You should see your received spectrum in real-time. Play with the sliders and values, and you should see everything update in real-time, as well. The default GNU Radio QT FFT sink has a number of useful features, such as averaging and peak-hold. Take some time to get familiar with them, now.
Building a Broadcast FM Receiver
Now that you have a basic receiver application running with a real-time display of your received data, let's build a useful application! Leave your current flowgraph in place. We will simply add more functionality into the flowgraph rather than replacing what is already there.
First, as you might have guessed, we will need to add a few more blocks to the flowgraph. Locate and add the following blocks:
- 1x Rational Resampler
- 1x WBFM Receiver
- 1x Audio Sink
- 2x Variable
Our flow of data will be the USRP Source -> Rational Resampler -> WBFM Receiver --> Audio Sink. Go ahead and connect the blocks together in that order. GNU Radio will likely highlight a lot of fields in red, indicating errors. We will now go through and configure the parameters, which will resolve these.
First, let's set-up those two new variable blocks you added. Create the following two variables with them:
Variable:
- ID: audio_interp
- Value: 4
Variable:
- ID: audio_rate
- Value: 48e3
Let's also go back and tune our sample rate variable, which we had previously. Change that variable to 250e3 (250 kHz).
Variable: samp_rate
- ID: samp_rate
- Value: 250e3
Now, let's configure your other three new blocks.
Audio Sink
This block is fairly straight-forward. It takes a stream of samples and plays them through your speakers. This block is installed with the gr-audio library, which is part of the core GNU Radio distribution. There are a few common / default rates that sound cards use - one of the most common is 48 kHz, which is what we will use, here (hence your configuration of the 'audio_rate' variable, above).
Open up the parameters of the Audio Sink. Make the following changes:
- Sample Rate: audio_rate
- OK to Block: "No"
Now, we just need to turn the samples from your hardware into something that you can play through your speakers! Let's go two blocks back up the chain, next.
Rational Resampler
The USRP Source is streaming at a rate of 'samp_rate', which we just set to 250e3. The Audio Sink is configured for a sample (consumption) rate of 'audio rate', which is 48e3. But, we have a problem: our source sample rate isn't an integer multiple of the audio rate: 250000 / 48000 = 5.208. To fix this problem, we will 'resample' the stream. Think of resampling here as impedance-matching. We have to convert from the rate of the input stream to the rate of the output stream.
The rational resampler block allows you to adjust the rate of a data stream. It does this by interpolating or decimating to achieve a desired sample rate. Open up the properties of this block, and let's tune the parameters.
Set the 'Type' to 'Complex->Complex', thus telling the block to use complex taps. Now we need to tune the actual rates. There is some intelligence built into this block - if we give it the different non-divisable sample rates, the code will calculate the GCD and make it all 'just work' for us. We know the incoming rate is 250 kSps, so let's enter that into 'Decimation'. But, this parameter must be an integer, and our 'samp_rate' is a float. Thus, we need to use the Python function 'int()' to convert it.
Now we need to set the 'Interpolation' rate. There is a 'gotcha' here, because the WBFM block further down our chain will actually perform an additional decimation-by-four, so we need to actually tell this block to output a rate four times what we want. We know what we actually want is 'audio_rate', so use your 'audio_interp' variable to set the actual rate.
At this point, you should have made these settings:
- Type: Complex->Complex (Complex Taps)
- Interpolation: audio_rate * audio_interp
- Decimation: int(samp_rate)
By leaving the 'Taps' parameter blank, we tell the block that we want it to compute the taps automatically. The 'Fractional BW' parameter affects the shape of the low-pass filter that is generated when no filter taps are supplied. By leaving this set to zero, we will just use a reasonable default.
Note: Depending on the accuracy of the clock references in your hardware, you may need to tune the Interpolation field, above. This is one of the many hardware impairments that you may need to deal with. When I first ran this flowgraph, I heard a lot of noise. I then tuned that Interpolation rate, and it cleaned up. My final numbers were:
- Interpolation: int(1.05 * (audio_rate * audio_interp))
- Decimation: int(samp_rate)
Now, let's configure our last block!
WBFM Receiver
At this point, configuring our last block is pretty simple. Open up the block's parameters. There are only two parameters to set: the rate of incoming samples, and the decimation rate. Well, we know both of these. We just configured the output rate of the rational resampler, and we know that rate divided-by-four equals our 'audio_rate'. Thus, you want:
- Quadrature Rate: audio_rate * audio_interp
- Audio Decimation: audio_interp
A Working Software Radio Broadcast FM Receiver
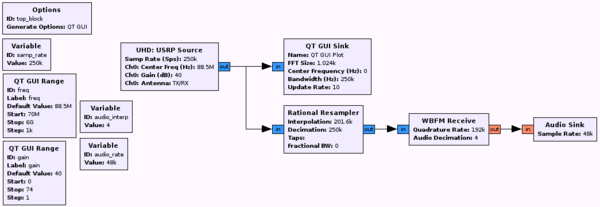
And that should be it! You should now no longer see any red in your flowgraph, and you should be able to build your flowgraph without errors. The final result should look like this:
You can also download this flowgraph, for reference.
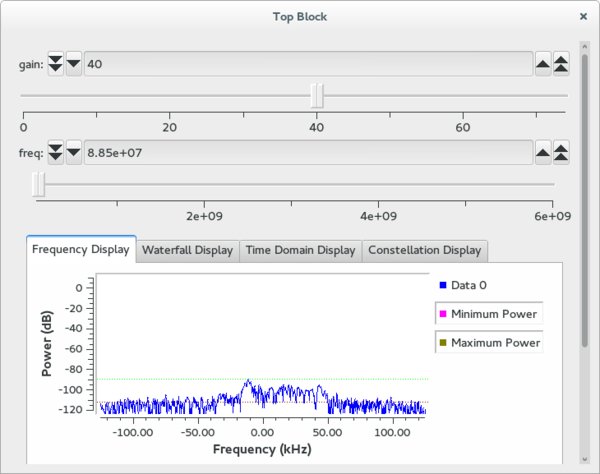
Executing your flowgraph should bring up a GUI that looks something like what you see below. Changing the frequency and tuning to a local broadcast FM station should play the demodulated radio through your computer speakers.


