Simulation example: AM transmitter and receiver
The first section of this tutorial explains how an Amplitude Modulated (AM) signal can be created. Rather than using any real hardware for transmission, the signal is sent via a socket to the second section of the tutorial which explains how to demodulate the received signal. The only actual hardware involved is the computer's microphone input and speaker output. In the case of a Raspberry Pi computer, which has no microphone input, an alternative is presented.
This tutorial can be performed with either GNU Radio (GR) version 3.7 or 3.8 (and later). The Graphical User Interface gnuradio-companion (GRC) is used to create a flowgraph for each section.
Prerequisites
AM transmitter
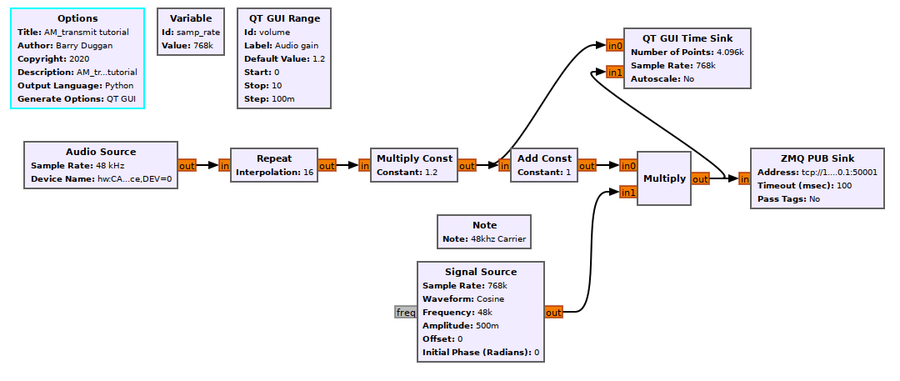
Using gnuradio-companion (GRC) and the following Block descriptions, build this flowgraph of the transmitter section:
Block descriptions
- The Options block identifies the filename for the flowgraph, a title, author, etc.
- id: AM_transmit
- Click on File -> Save As Use the file name 'AM_transmit'. the extension '.grc' is added automatically
- The microphone input is defined by an Audio Source block. The parameters are:
- Sample rate: set to 48khz (use the pull-down)
- Device name: for most microphone jacks built into the computer, the Device name can be left blank; for other cases, see Audio_Source#Device_Name
- For the remainder of the flowgraph, a sample_rate of 768khz is used. This value was chosen to give the 48khz carrier frequency 16 samples per cycle (48000 x 16 = 768000).
- Variable block
- id: samp_rate
- value: 768000
- Variable block
- To boost the 48khz sample rate of the audio input to the 768khz sample rate, a Repeat block with an Interpolation value of 16 is used.
- The QT GUI Range block defines an Audio gain (volume) control
- id: volume
- default value: 1.2
- start: 0
- stop: 10.0
- step: 0.1
- Widget: choose whatever you like
- The value of the volume control is used as a multiplier in the Multiply Const block.
- Constant: volume
- To create an AM signal, the carrier signal is multiplied by the audio signal plus one. The constant 1 creates the carrier when no audio is present.
- Add Const block
- Constant: 1.0
- Add Const block
- The carrier signal (in this example is 48khz) is generated by the Signal Source block.
- Note: there is no correlation between the audio sample rate and the carrier signal frequency.
- Sample Rate: samp_rate
- Frequency: 48000
- Amplitude: 0.5
- The QT GUI Time Sink gives a visual representation of the transmitted signal.
- Number of Points: 4096
- Sample Rate: samp_rate
- Number of Inputs: 2
- For a real radio transmitter, the output of the Multiply block would be fed to band-pass filters and then to Radio Frequency (RF) hardware. For this tutorial, we are sending the transmit signal to a ZMQ PUB Sink data socket connected to the receiver section.
- Address: tcp://127.0.0.1:50001
Note for Raspberry Pi
Since a Raspberry Pi has no audio input jack, there are two alternatives:
- use a USB audio dongle as is shown in the flowgraph.
- replace the Audio Source block with a Signal Source block (frequency: 600) and a Throttle block.
Test transmitter section
To test the transmitter, generate and run the flowgraph. Speaking into the microphone should show a change in the pattern on the QT GUI Time Sink. The level of modulation can be adjusted with the volume control.
AM receiver
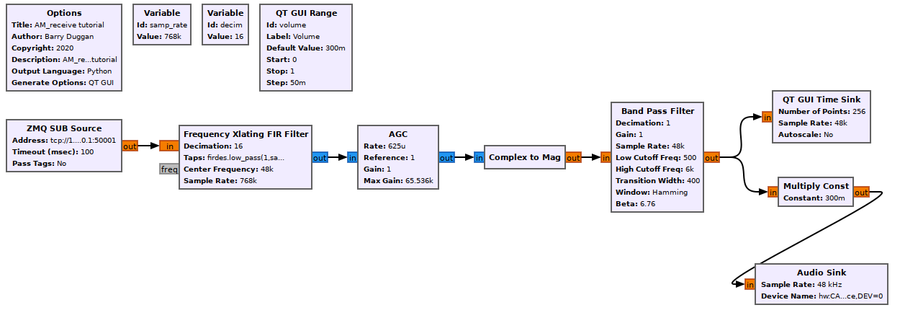
Using gnuradio-companion (GRC) and the following Block descriptions, build this separate flowgraph of the receiver section:
Block descriptions
- The Options block identifies the filename for the flowgraph, a title, author, etc.
- id: AM_receive
- Click on File -> Save As Use the file name 'AM_receive'. the extension '.grc' is added automatically
- The signal from the transmitter section is received by the ZMQ SUB Source. It is a 48khz carrier with a sample rate of 768khz.
- Address: tcp://127.0.0.1:50001
- A Variable block defines the sample rate.
- id: samp_rate
- value: 768000
- Another Variable block defines the decimation factor. Since the Audio Sink (speaker) uses a sample rate of 48khz, we will reduce (decimate) the incoming sample rate by a factor of 16.
- id: decim
- value: 16
- The Frequency Xlating FIR Filter performs three functions: frequency translation, filtering, and decimation. See Frequency_Xlating_FIR_Filter for more detail.
- Type: Float->Complex (Real Taps)
- Decimation: decim
- Taps: firdes.low_pass(1,samp_rate,samp_rate/(2*decim), 2000)
- Center Frequency: 48000
- Sample Rate: samp_rate
- The Automatic Gain Control (AGC) block adjusts the input signal to the given reference level (1.0).
- The default settings should be used.
- The Complex to Mag block calculates the magnitude of the complex samples which produces the original modulation signal.
- The Band Pass Filter filters the signal between the low and high cutoff frequencies.
- FIR Type: Float->Float (Real Taps)(Decim)
- Decimation: 1
- Gain: 1
- Sample Rate: int(samp_rate/decim)
- Low Cutoff Freq: 500
- High Cutoff Freq: 6000
- Transition Width: 400
- The QT GUI Range block defines an Audio gain (volume) control
- id: volume
- default value: 0.3
- start: 0
- stop: 1.0
- step: 0.05
- Widget: choose whatever you like
- The value of the volume control is used as a multiplier in the Multiply Const block.
- Constant: volume
- The QT GUI Time Sink gives a visual representation of the received signal.
- Number of Points: 256
- Sample Rate: int(samp_rate/decim)
- Number of Inputs: 1
- The speaker output is defined by an Audio Sink block. The parameters are:
- Sample rate: set to 48khz (use the pull-down)
- Device name: for most speakers (or headphone jacks) built into the computer, the Device name can be left blank; for other cases, see Audio_Sink#Device_Name
Testing
When using GRC, doing a Generate and/or Run creates a Python file with the same name as the .grc file. You can execute the Python file without running GRC again.
For testing this system we will use two processes, so we will need two terminal windows.
Terminal 1:
- since you just finished building the AM_receive flowgraph, you can just do a Run. After a few seconds, a GUI window will open with the Volume control and the GUI Time Sink.
Terminal 2: Open another terminal window.
- change to whatever directory you used to generate the flowgraph for AM_transmit
- execute the following command:
python3 -u AM_transmit.py
- After a few seconds, a GUI window will open with the Volume control and the GUI Time Sink.
Speaking into the microphone should show a change in the pattern on both QT GUI Time Sinks. You should hear your voice from the speakers. The speaker volume can be adjusted with the receive volume control. The level of modulation can be adjusted with the transmit volume control. Note that increasing the transmit volume beyond 100% causes distortion.
To terminate each of the processes cleanly, click on the 'X' in the upper corner of the GUI rather than using Control-C.
What do to next
Now that you have a working system, you can experiment:
- change filter parameters
- replace the Audio Source block with a Signal Source block (frequency: 600) and a Throttle block (if you haven't already done that)
- change the carrier frequency - remember that you have to change Interpolation and Decimation factors too!
- use an AM Demod block instead of a Complex to Mag block. See AM_Demod for the details.
Note: Any time you make a change to a flowgraph, you must do a Generate to rebuild the Python file.

