Simulation example: FSK: Difference between revisions
No edit summary |
(add disclaimer) |
||
| (14 intermediate revisions by 2 users not shown) | |||
| Line 1: | Line 1: | ||
<!-- Simulation_example:_FSK.mediawiki --> | <!-- Simulation_example:_FSK.mediawiki --> | ||
GNU Radio (GR) is an excellent tool for simulating a radio system and experimenting with changing parameters. This tutorial presents a simple Frequency Shift Keying (FSK) transmitter and receiver. It can be performed with | GNU Radio (GR) is an excellent tool for simulating a radio system and experimenting with changing parameters. This tutorial presents a simple Frequency Shift Keying (FSK) transmitter and receiver. It can be performed with GR version 3.8 (and later). The Graphical User Interface gnuradio-companion (GRC) is used to create the flowgraph. The [[QT_GUI_Eye_Sink]] requires GR version 3.9 or later, but can be left out if using 3.8. No special hardware is required. | ||
== Prerequisites == | == Prerequisites == | ||
| Line 6: | Line 6: | ||
* [[Guided_Tutorial_GRC|'''Intro to GR usage: GRC and flowgraphs''']] | * [[Guided_Tutorial_GRC|'''Intro to GR usage: GRC and flowgraphs''']] | ||
* [[Sample_Rate_Tutorial|'''Understanding sample rate''']] | * [[Sample_Rate_Tutorial|'''Understanding sample rate''']] | ||
* [[FAQ#The_Community:_Where_you_get_help.2C_advice_and_code|'''Where to get help''']] | |||
== Simulating a transmitter and receiver == | == Simulating a transmitter and receiver == | ||
| Line 12: | Line 13: | ||
[[File:FSK_example_fg.png|1044px]] | [[File:FSK_example_fg.png|1044px]] | ||
This flowgraph can be found at [[Media:FSK_example.grc]] It was generated with version 3.10. | |||
=== Setting variables and parameters === | === Setting variables and parameters === | ||
| Line 25: | Line 28: | ||
The repeat factor is (int)(samp_rate*0.022) | The repeat factor is (int)(samp_rate*0.022) | ||
For this flowgraph, the standard RTTY (radioteletype) tones of | For this flowgraph, the standard RTTY (radioteletype) tones of 2295Hz (Mark=1) and 2125Hz (Space=0) are generated by the VCO. The calculations for this follow: | ||
* Choosing a full-scale frequency of 2500Hz (vco_max) for an input of +1, the VCO Sensitivity = (2 * math.pi * 2500 / 1) = 15708 Any frequency greater than 2295Hz could be used. 2500Hz is an arbitrary number. | |||
* Looking at the output of the Virtual Source "xmt_data", a Mark = +1.0 and a Space = 0.0 | |||
* vco_offset = space/vco_max => 0.85 | |||
* inp_amp = (mark/vco_max)-vco_offset => 0.068 | |||
* The Space frequency is created by ((0.0 * 0.068) + 0.85) which is (2125/2500) | |||
* The Mark frequency is created by ((1.0 * 0.068) + 0.85) which is (2295/2500). | |||
The [[Frequency_Xlating_FIR_Filter|Frequency Xlating FIR Filter]] taps parameter is 'firdes.low_pass(1.0,samp_rate,1000,400)'. Note that the desired signal has a deviation of 170Hz. so this filter rejects adjacent channel signals. | |||
=== Description of data flow === | === Description of data flow === | ||
| Line 39: | Line 47: | ||
Following the flowgraph signal path, the Random Source generates byte values from 0 to 255. The Unpack K Bits produces each bit of the input as a separate byte with the value in the least significant bit. Since there is no hardware involved, a Throttle block is used to limit the flow through the system. See [[Sample_Rate_Tutorial#When_there_is_no_hardware_block]]. | Following the flowgraph signal path, the Random Source generates byte values from 0 to 255. The Unpack K Bits produces each bit of the input as a separate byte with the value in the least significant bit. Since there is no hardware involved, a Throttle block is used to limit the flow through the system. See [[Sample_Rate_Tutorial#When_there_is_no_hardware_block]]. | ||
The Virtual Sink and Virtual Source blocks are used in place of a direct connection in order to produce a cleaner looking flowgraph. If you wish, you can | The Virtual Sink and Virtual Source blocks are used in place of a direct connection in order to produce a cleaner looking flowgraph. If you wish, you can make direct connections of the corresponding Stream IDs. | ||
==== Receiver ==== | ==== Receiver ==== | ||
| Line 47: | Line 53: | ||
The Frequency Xlating FIR Filter shifts the received signal to be centered around the Center Frequency - half way between the Mark and Space frequencies. | The Frequency Xlating FIR Filter shifts the received signal to be centered around the Center Frequency - half way between the Mark and Space frequencies. | ||
Although not really needed for this simple simulation without noise, | Although not really needed for this simple simulation without noise, the squelch will be needed for real-world reception of RTTY signals. | ||
The Quadrature Demod block produces a signal which is positive for input frequencies above zero and negative for frequencies below zero. When this signal is fed to a Binary Slicer, the output is a byte of 1 or 0. This is our received data (unpacked). | The [[Quadrature_Demod|Quadrature Demod]] block produces a signal which is positive for input frequencies above zero and negative for frequencies below zero. When this signal is fed to a Binary Slicer, the output is a byte of 1 or 0. This is our received data (unpacked). | ||
A [[QT_GUI_Eye_Sink|QT GUI Eye Sink]] has been added. It is used when tuning live signals to determine the correct center frequency. | |||
== Testing == | == Testing == | ||
How do we know that it's the original bit stream? To verify that, we'll compare it to the input bit stream, which we can do because this is a simulation and we have access to the transmitted data (Stream ID: "xmt_data"). Comparing these two directly | How do we know that it's the original bit stream? To verify that, we'll compare it to the input bit stream, which we can do because this is a simulation and we have access to the transmitted data (Stream ID: "xmt_data"). Comparing these two directly shows us that the received signal is some number of bits behind because the transmitter and receiver chain has many blocks and filters which delay the signal. To compensate, we have to delay the transmitted bits by the same amount using the [[Delay|Delay]] block. Then you can adjust the delay to find the correct value and see how the bits synchronize. Also you can subtract one signal from the other to see when they are synchronized because the output will be 0. Note that it takes a few seconds for the delay to adjust before it can be seen in the output. The correct delay is about 145. | ||
[[File:FSK_example_out.png|800px]] | [[File:FSK_example_out.png|800px]] | ||
== | <hr> | ||
For a complete RTTY terminal unit, see [https://github.com/duggabe/gr-RTTY-basics '''Basic radioteletype transmit and receive functions''']. | |||
== File transfer using Packet and AFSK == | |||
An example of using FSK to send packets to a remote receiver is presented below. Packet concepts are covered in [[Packet_Communications|Packet Communications]]. The point of the following is to show that FSK can be used to send any data content. | |||
<p><b>NOTE: This tutorial is to illustrate methods of using packet data and FSK modulation to transfer a file from one computer to another. However, it does not contain any Forward Error Correction, flow control, or any other methods one would expect from something like TCP/IP.</b></p> | |||
=== Download the gr-control software === | |||
1. Open a terminal window.<br> | |||
2. Change to the home directory. | |||
cd ~/ | |||
3. If you don't have 'git', enter | |||
sudo apt install git | |||
4. Clone the repository: | |||
git clone https://github.com/duggabe/gr-control.git | |||
=== Receiving the File === | |||
<b> * * NOTE: The order of starting the tasks is important! * *</b> | |||
The <code>pkt_fsk_rcv.py</code> flowgraph receives the AFSK signal using the same Frequency Xlating FIR Filter and Quadrature Demod blocks as shown above. If the Mark frequency is lower than the Space frequency, the 1s and 0s will be reversed. To correct this, a Multiply Constant block is used with the constant set by the QT GUI Chooser. | |||
The Symbol Sync block needs an input signal which is normalized to a value of 1. To accomplish this, an [[AGC]] block is used. The [[Symbol_Sync|Symbol Sync]] examines multiple samples of the data stream to find transitions in the data, using the Samples per Symbol value. Once the bit stream is fed to a Binary Slicer, the output is an unpacked byte of 1 or 0. | |||
To detect the beginning of a packet and to achieve byte alignment, a [[Correlate_Access_Code_-_Tag_Stream|Correlate Access Code - Tag Stream]] block detects the Access Code and passes the payload to the [[Stream_CRC32]] to check for a valid CRC. If the CRC is good, the data is sent to the [[File_Sink]]. | |||
[[File:Pkt_fsk_rcv_fg.png|800px]] | |||
<hr> | |||
1. Open a new terminal window.<br> | |||
2. Go to the gr-control/Receivers folder. | |||
cd ~/gr-control/Receivers | |||
3. Execute the packet receiver. | |||
python3 -u pkt_fsk_rcv.py | |||
4. A new window will open (titled "pkt_fsk_rcv") showing a 'reverse' chooser, a squelch level setting, and two [[QT_GUI_Time_Sink]]s. | |||
=== Transmitting the File === | |||
The 'EPB: File Source to Tagged Stream' block is an Embedded Python Block which takes the place of a [[File_Source]] block, a [[Stream_to_Tagged_Stream]] block, and parts of a [[Burst_Shaper]] block. The Python block performs the following functions: | |||
* Send a preamble to allow the receiver to synchronize. | |||
* Read the file in "Pkt_Len" chunks. | |||
* Convert the data to Base64, which produces 4 bytes of output for every 3 bytes of input. | |||
* Send each Base64 chunk with revised "packet_len" tags. | |||
* Send a post-file filler to assure that any buffers have been flushed. | |||
The content of the Embedded Python Block is shown here: [https://github.com/duggabe/gr-control/blob/main/Transmitters/pkt_fsk_xmt_epy_block_0.py pkt_fsk_xmt_epy_block_0.py] | |||
The preamble is composed of the '%' character, followed by 50 capital 'U's, followed by a ']'. It is repeated four times to allow the receiver to synchronize. The post-file filler is sent 10 times. | |||
[[File:Pkt_fsk_xmt_fg.png|800px]] | |||
<hr> | |||
1. Open another terminal window.<br> | |||
2. Go to the gr-control/Transmitters folder. | |||
cd ~/gr-control/Transmitters | |||
3. Execute the packet transmitter with the desired filename, for example: | |||
python3 pkt_fsk_xmt.py --InFile="../gr-logo.png" | |||
4. A new window will open (titled "pkt_fsk_xmt") showing a [[QT_GUI_Time_Sink]].<br> | |||
5. The file transmission will begin. The average throughput is 150 bytes per second.<br> | |||
6. The Time Sink display in the transmitter will show data bits with a 'packet_len' tag.<br> | |||
7. When the file is complete, the transmit terminal will show "End of file" followed by "End of transmission".<br> | |||
8. Wait until the "pkt_fsk_xmt" display has stopped sending the filler packets and the "pkt_fsk_rcv" display has become static. | |||
=== Shutdown === | |||
1. Close the "pkt_fsk_xmt" window by clicking the 'X' in the upper right corner.<br> | |||
2. Close the "pkt_fsk_rcv" window by clicking the 'X' in the upper right corner.<br> | |||
=== Stripping the Preamble and Filler === | |||
The received file will be stored in "~/gr-control/Receivers/output.tmp". That file will contain up to four preamble packets, followed by the transmitted file with Base64 encoding, followed by filler packets. | |||
A Python program has been written to strip those preamble and filler packets and decode the Base64 text: | |||
1. Use the terminal window with the gr-control/Receivers folder. | |||
cd ~/gr-control/Receivers | |||
3. Execute the <code>strip_preamble.py</code> program. The last parameter (file name) can be whatever you wish as the output. Use the appropriate file extension! | |||
python3 strip_preamble.py output.tmp output.png | |||
[[Category:Guided Tutorials]] | [[Category:Guided Tutorials]] | ||
Latest revision as of 00:59, 17 July 2024
GNU Radio (GR) is an excellent tool for simulating a radio system and experimenting with changing parameters. This tutorial presents a simple Frequency Shift Keying (FSK) transmitter and receiver. It can be performed with GR version 3.8 (and later). The Graphical User Interface gnuradio-companion (GRC) is used to create the flowgraph. The QT_GUI_Eye_Sink requires GR version 3.9 or later, but can be left out if using 3.8. No special hardware is required.
Prerequisites
Simulating a transmitter and receiver
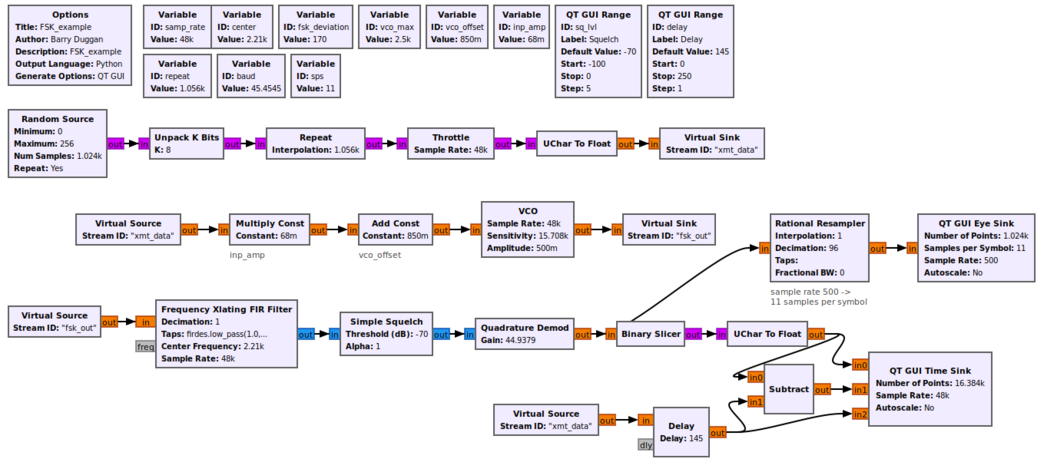
Using gnuradio-companion (GRC) and the following Block descriptions, build this flowgraph:
This flowgraph can be found at Media:FSK_example.grc It was generated with version 3.10.
Setting variables and parameters
Most of the parameters can be set from the screenshot of the flowgraph.
- The Options block identifies the filename for the flowgraph, a title, author, etc.
- id: FSK_example
- Click on File -> Save As Use the file name 'FSK_example'. the extension '.grc' is added automatically
For this tutorial I am using the baud rate for Baudot Radioteletype. It is defined as a bit time of 22 milliseconds, so the baud rate is set to 1/0.022 giving 45.4545
The repeat factor is (int)(samp_rate*0.022)
For this flowgraph, the standard RTTY (radioteletype) tones of 2295Hz (Mark=1) and 2125Hz (Space=0) are generated by the VCO. The calculations for this follow:
- Choosing a full-scale frequency of 2500Hz (vco_max) for an input of +1, the VCO Sensitivity = (2 * math.pi * 2500 / 1) = 15708 Any frequency greater than 2295Hz could be used. 2500Hz is an arbitrary number.
- Looking at the output of the Virtual Source "xmt_data", a Mark = +1.0 and a Space = 0.0
- vco_offset = space/vco_max => 0.85
- inp_amp = (mark/vco_max)-vco_offset => 0.068
- The Space frequency is created by ((0.0 * 0.068) + 0.85) which is (2125/2500)
- The Mark frequency is created by ((1.0 * 0.068) + 0.85) which is (2295/2500).
The Frequency Xlating FIR Filter taps parameter is 'firdes.low_pass(1.0,samp_rate,1000,400)'. Note that the desired signal has a deviation of 170Hz. so this filter rejects adjacent channel signals.
Description of data flow
For each of the GR blocks, you can find a detailed description in Block Docs.
Transmitter
Following the flowgraph signal path, the Random Source generates byte values from 0 to 255. The Unpack K Bits produces each bit of the input as a separate byte with the value in the least significant bit. Since there is no hardware involved, a Throttle block is used to limit the flow through the system. See Sample_Rate_Tutorial#When_there_is_no_hardware_block.
The Virtual Sink and Virtual Source blocks are used in place of a direct connection in order to produce a cleaner looking flowgraph. If you wish, you can make direct connections of the corresponding Stream IDs.
Receiver
The Frequency Xlating FIR Filter shifts the received signal to be centered around the Center Frequency - half way between the Mark and Space frequencies.
Although not really needed for this simple simulation without noise, the squelch will be needed for real-world reception of RTTY signals.
The Quadrature Demod block produces a signal which is positive for input frequencies above zero and negative for frequencies below zero. When this signal is fed to a Binary Slicer, the output is a byte of 1 or 0. This is our received data (unpacked).
A QT GUI Eye Sink has been added. It is used when tuning live signals to determine the correct center frequency.
Testing
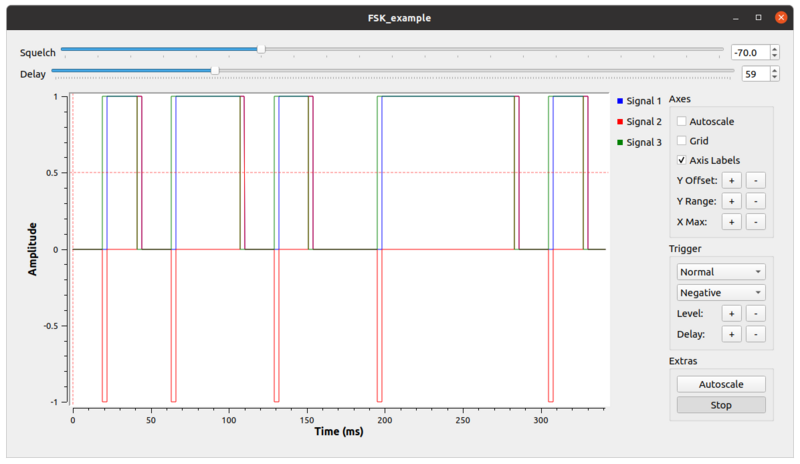
How do we know that it's the original bit stream? To verify that, we'll compare it to the input bit stream, which we can do because this is a simulation and we have access to the transmitted data (Stream ID: "xmt_data"). Comparing these two directly shows us that the received signal is some number of bits behind because the transmitter and receiver chain has many blocks and filters which delay the signal. To compensate, we have to delay the transmitted bits by the same amount using the Delay block. Then you can adjust the delay to find the correct value and see how the bits synchronize. Also you can subtract one signal from the other to see when they are synchronized because the output will be 0. Note that it takes a few seconds for the delay to adjust before it can be seen in the output. The correct delay is about 145.
For a complete RTTY terminal unit, see Basic radioteletype transmit and receive functions.
File transfer using Packet and AFSK
An example of using FSK to send packets to a remote receiver is presented below. Packet concepts are covered in Packet Communications. The point of the following is to show that FSK can be used to send any data content.
NOTE: This tutorial is to illustrate methods of using packet data and FSK modulation to transfer a file from one computer to another. However, it does not contain any Forward Error Correction, flow control, or any other methods one would expect from something like TCP/IP.
Download the gr-control software
1. Open a terminal window.
2. Change to the home directory.
cd ~/
3. If you don't have 'git', enter
sudo apt install git
4. Clone the repository:
git clone https://github.com/duggabe/gr-control.git
Receiving the File
* * NOTE: The order of starting the tasks is important! * *
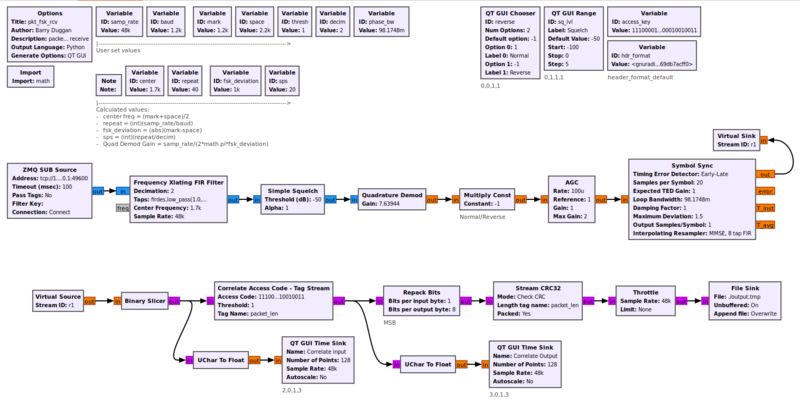
The pkt_fsk_rcv.py flowgraph receives the AFSK signal using the same Frequency Xlating FIR Filter and Quadrature Demod blocks as shown above. If the Mark frequency is lower than the Space frequency, the 1s and 0s will be reversed. To correct this, a Multiply Constant block is used with the constant set by the QT GUI Chooser.
The Symbol Sync block needs an input signal which is normalized to a value of 1. To accomplish this, an AGC block is used. The Symbol Sync examines multiple samples of the data stream to find transitions in the data, using the Samples per Symbol value. Once the bit stream is fed to a Binary Slicer, the output is an unpacked byte of 1 or 0.
To detect the beginning of a packet and to achieve byte alignment, a Correlate Access Code - Tag Stream block detects the Access Code and passes the payload to the Stream_CRC32 to check for a valid CRC. If the CRC is good, the data is sent to the File_Sink.
1. Open a new terminal window.
2. Go to the gr-control/Receivers folder.
cd ~/gr-control/Receivers
3. Execute the packet receiver.
python3 -u pkt_fsk_rcv.py
4. A new window will open (titled "pkt_fsk_rcv") showing a 'reverse' chooser, a squelch level setting, and two QT_GUI_Time_Sinks.
Transmitting the File
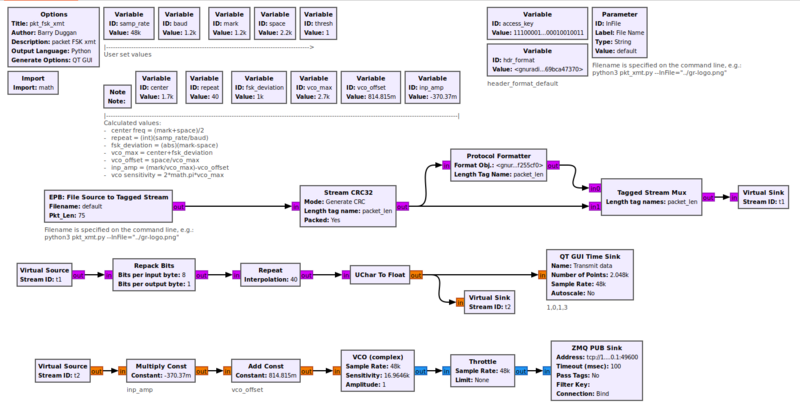
The 'EPB: File Source to Tagged Stream' block is an Embedded Python Block which takes the place of a File_Source block, a Stream_to_Tagged_Stream block, and parts of a Burst_Shaper block. The Python block performs the following functions:
- Send a preamble to allow the receiver to synchronize.
- Read the file in "Pkt_Len" chunks.
- Convert the data to Base64, which produces 4 bytes of output for every 3 bytes of input.
- Send each Base64 chunk with revised "packet_len" tags.
- Send a post-file filler to assure that any buffers have been flushed.
The content of the Embedded Python Block is shown here: pkt_fsk_xmt_epy_block_0.py
The preamble is composed of the '%' character, followed by 50 capital 'U's, followed by a ']'. It is repeated four times to allow the receiver to synchronize. The post-file filler is sent 10 times.
1. Open another terminal window.
2. Go to the gr-control/Transmitters folder.
cd ~/gr-control/Transmitters
3. Execute the packet transmitter with the desired filename, for example:
python3 pkt_fsk_xmt.py --InFile="../gr-logo.png"
4. A new window will open (titled "pkt_fsk_xmt") showing a QT_GUI_Time_Sink.
5. The file transmission will begin. The average throughput is 150 bytes per second.
6. The Time Sink display in the transmitter will show data bits with a 'packet_len' tag.
7. When the file is complete, the transmit terminal will show "End of file" followed by "End of transmission".
8. Wait until the "pkt_fsk_xmt" display has stopped sending the filler packets and the "pkt_fsk_rcv" display has become static.
Shutdown
1. Close the "pkt_fsk_xmt" window by clicking the 'X' in the upper right corner.
2. Close the "pkt_fsk_rcv" window by clicking the 'X' in the upper right corner.
Stripping the Preamble and Filler
The received file will be stored in "~/gr-control/Receivers/output.tmp". That file will contain up to four preamble packets, followed by the transmitted file with Base64 encoding, followed by filler packets.
A Python program has been written to strip those preamble and filler packets and decode the Base64 text:
1. Use the terminal window with the gr-control/Receivers folder.
cd ~/gr-control/Receivers
3. Execute the strip_preamble.py program. The last parameter (file name) can be whatever you wish as the output. Use the appropriate file extension!
python3 strip_preamble.py output.tmp output.png


