Hier Blocks and Parameters: Difference between revisions
Mattcarrick (talk | contribs) (Created page with "{{Template:TutorialNavigation}}") |
|||
| (85 intermediate revisions by 5 users not shown) | |||
| Line 1: | Line 1: | ||
{{Template: | <div style="float:right"> | ||
{{Template:BeginnerTutorials}} | |||
</div> | |||
This tutorial describes how to create a hierarchical block, or ''Hier block'', in GRC. | |||
The previous tutorial, [[Streams_and_Vectors|Streams and Vectors]], describes the differences between ''Streams'' and ''Vectors''. The next tutorial, [[Creating_Your_First_Block|Creating Your First Block]], describes how to use the ''Embedded Python Block'' to create a signal processing block in GNU Radio. | |||
== Creating the Initial Flowgraph == | |||
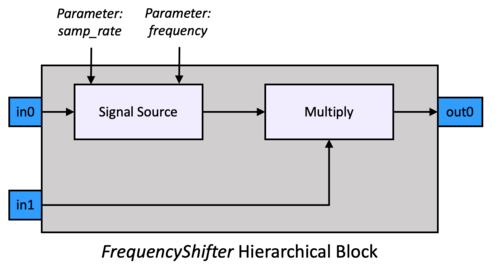
A ''hier block'' is used as a wrapper to simplify multiple GNU Radio blocks into a single block. The example ''hier block'' will be a frequency shifter block which multiplies a ''Signal Source'' against an input signal. | |||
[[File:FrequencyShifterBlock.png|500px]] | |||
The first step is creating the flowgraph. Drag and drop the following blocks into the workspace: | |||
# ''Signal Source'' | |||
# ''Multiply'' | |||
# ''Noise Source'' | |||
# ''Low Pass Filter'' | |||
# ''Throttle'' | |||
# ''QT GUI Frequency Sink'' | |||
# ''QT GUI Range'' | |||
Connect the blocks: | |||
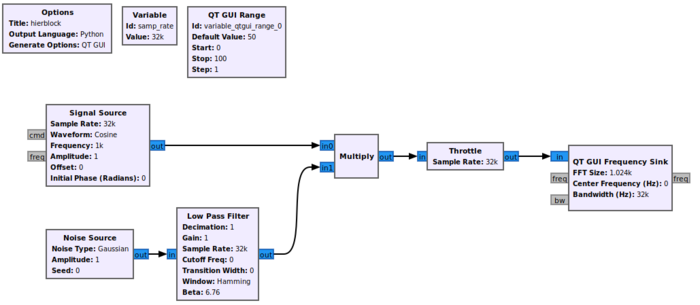
[[File:StartingFlowgraphHierBlock.png|700px]] | |||
Update the ''QT GUI Range'' properties: | |||
* Id: ''frequency'' | |||
* Default Value: ''0'' | |||
* Start: ''-samp_rate/2'' | |||
* Stop: ''samp_rate/2'' | |||
Update the ''Low Pass Filter'' properties: | |||
* Cutoff Freq (Hz): ''samp_rate/4'' | |||
* Transition Width (Hz): ''samp_rate/8'' | |||
== Create The Hier Block == | |||
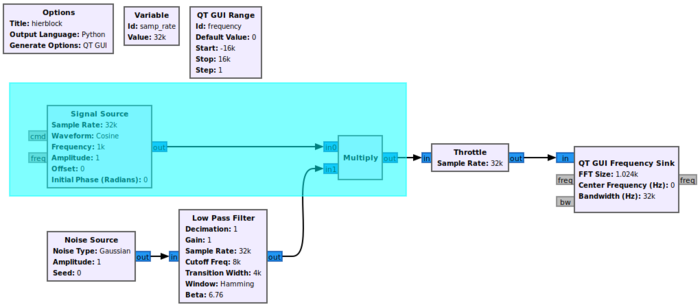
Click and drag in the workspace window to select the ''Signal Source'' and ''Multiply'' blocks including the connection between them: | |||
[[File:ClickAndDragSelect.png|700px]] | |||
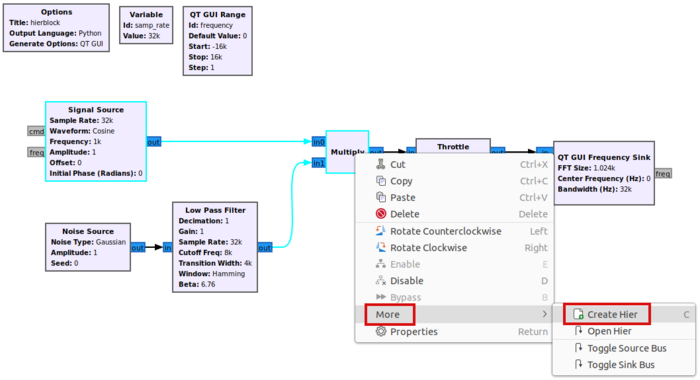
Right-click on one of the highlighted blocks and select ''More > Create Hier'': | |||
[[File:ClickCreateHier.png|700px]] | |||
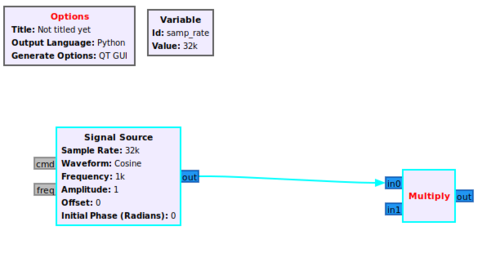
A flowgraph is created in a new GRC tab: | |||
[[File:NewHierBlock.png|500px]] | |||
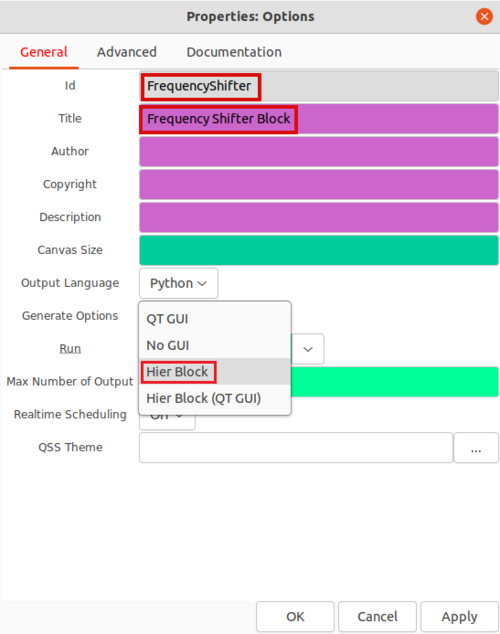
Double-click the ''Options'' block and edit the properties: | |||
* Id: ''FrequencyShifter'' | |||
* Title: ''Frequency Shifter Block'' | |||
* Generate Options: ''Hier Block'' | |||
[[File:OptionsSelectHierBlock.png|500px]] | |||
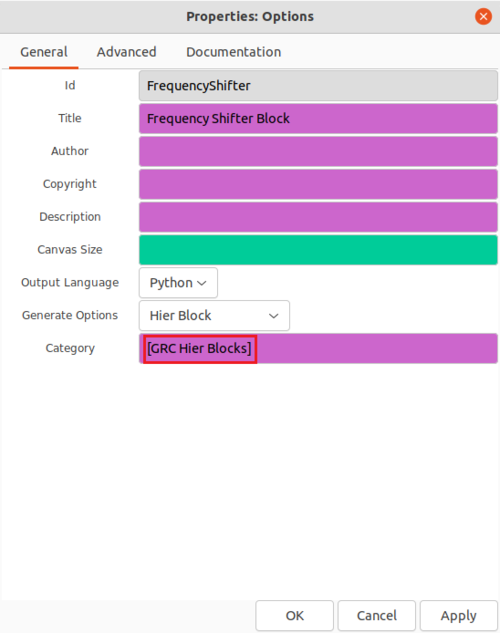
The remaining properties will then change, showing the ''Category'': | |||
[[File:ShowGRCHierBlocksCategory.png|500px]] | |||
The ''Category'' is where the block can be found in the block library on the right hand of GRC. The hier block will be located under ''GRC Hier Blocks'', instead of ''Core'' where the rest of the GNU Radio blocks are located. | |||
Save the flowgraph. | |||
== Variables vs Parameters == | |||
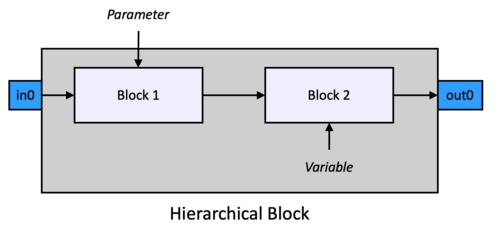
A ''variable'' is different than a ''parameter'' in GNU Radio. A ''parameter'' creates an interface for the ''hier block'' to accept a value from an external source, whereas a ''variable'' only exists internally to the ''hier block'': | |||
[[File:HierBlockParameterVariable.png|500px]] | |||
For example, the ''samp_rate'' variable can only be accessed from within the ''hier block'': | |||
[[File:HierBlockWithVariable.png|500px]] | |||
The ''samp_rate'' needs to be converted to a parameter so it can be updated from another block in the larger flowgraph. Delete the ''samp_rate'' variable and add a ''Parameter'' block into the GRC workspace: | |||
[[File:AddParameterToHierBlock.png|500px]] | |||
Edit the ''Parameter'' properties: | |||
* Id: ''samp_rate'' | |||
* Label: ''Sample Rate'' | |||
* Type: ''Float'' | |||
[[File:EditParameterProperties.png|500px]] | |||
Add a second ''Parameter'': | |||
* Id: ''frequency'' | |||
* Label: ''Frequency'' | |||
* Type: ''float'' | |||
[[File:EditFrequencyParameterProperties.png|500px]] | |||
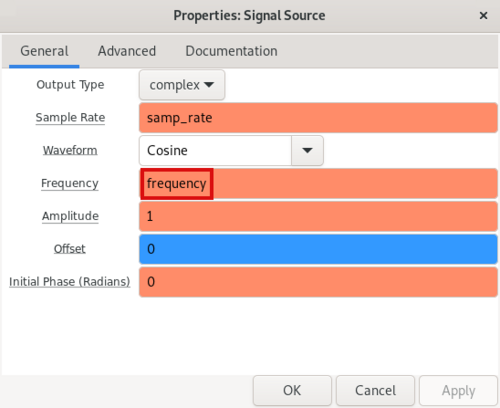
Add the ''frequency'' parameter to the Signal Source ''Frequency'' property: | |||
[[File:AddFrequencyToSignalSourceProperties.png|500px]] | |||
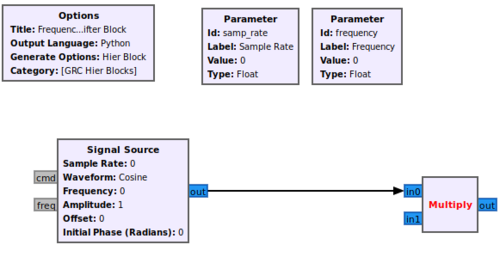
The flowgraph should look like: | |||
[[File:HierBlockSampRateFrequencyParameters.png|500px]] | |||
== Input and Output Ports == | |||
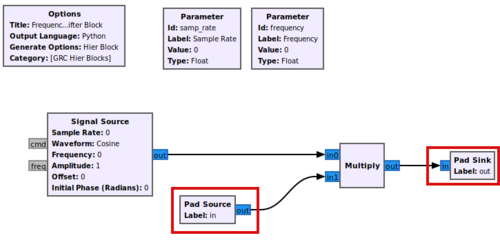
A ''pad'' is used to specify input and output ports on a hier block. Add a ''Pad Source'' and ''Pad Sink'' to the flowgraph to act as the ''in'' and ''out'' ports: | |||
[[File:AddPadSourcePadSink.png|500px]] | |||
== Generate the Hier Block Code == | |||
Click ''Generate the flow graph'' to create the ''hier block'' source code: | |||
[[File:ClickGenerateFlowgraph.png|250px]] | |||
A Python ''.py'' file and YAML ''.yml'' file will be created. For GNU Radio v3.8 the files will be created in your home directory: | |||
<pre>/home/$USER/.grc_gnuradio/</pre> | |||
[[File:HierBlockPyYml.png|500px]] | |||
For GNU Radio v3.10, the files will be created in the directory where the ''.grc'' file is saved. Please create the ''.grc_gnuradio'' directory and copy the ''.py'' and ''.yml'' files there: | |||
<pre>$ mkdir /home/$USER/.grc_gnuradio | |||
$ cp FrequencyShifter.block.yml /home/$USER/.grc_gnuradio/ | |||
$ cp FrequencyShifter.py /home/$USER/.grc_gnuradio/ </pre> | |||
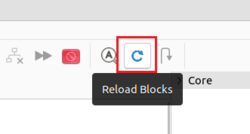
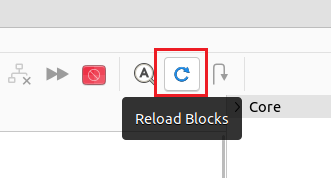
GRC needs to update the internal list of the blocks before the ''Frequency Shifter'' block can be used in a flowgraph. Click the ''Reload Blocks'' button: | |||
[[File:ClickReloadBlocks.png|250px]] | |||
There is a new category ''GRC Hier Blocks'' in the block library below ''Core'', and the ''Frequency Shifter Block'' can be used in flowgraphs: | |||
[[File:CoreCategoryOnly.png|300px]] | |||
[[File:GRCHierBlocksUpdated.png|300px]] | |||
== Using the Hier Block == | |||
The hier block can now be used in a flowgraph. Return the starting flowgraph and delete the ''Signal Source'' and ''Multiply'' blocks: | |||
[[File:DeleteSignalSourceMultiplyBlock.png|700px]] | |||
Add the ''Frequency Shifter Block'' to the workspace and connect it to the rest of the flowgraph: | |||
[[File:ConnectFrequencyShifterBlock.png|700px]] | |||
Edit the ''Frequency Shifter Block'' properties by adding the ''samp_rate'' and ''frequency'' variables: | |||
[[File:EditFrequencyShifterProperties.png|500px]] | |||
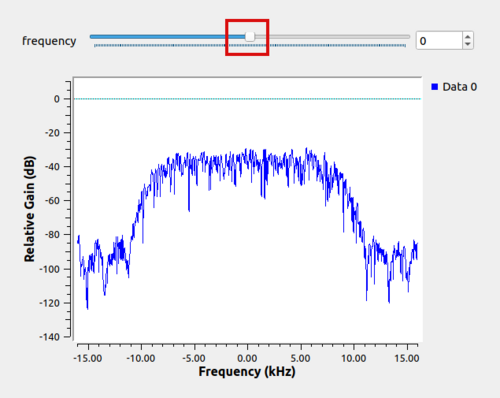
Running the flowgraph will bring up the ''QT GUI Frequency Sink'' window with the ''QT QUI Range'' slider: | |||
[[File:HierBlockFreqSink.png|500px]] | |||
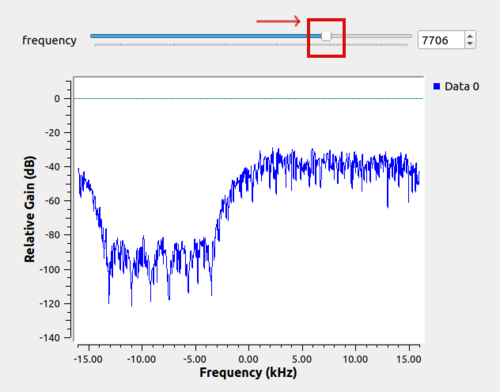
Dragging the ''frequency'' slider will pass the value through the ''Frequency Shifter Block'' parameter causing the signal's center frequency to be modified: | |||
[[File:HierBlockFrequencyShift.png|500px]] | |||
== Deleting a Hier Block == | |||
A hier block can be cleared from GRC memory by removing the files from <code>/home/$USER/.grc_gnuradio</code>. | |||
In a terminal, move to the <code>.grc_gnuradio</code> directory: | |||
<pre>cd /home/$USER/.grc_gnuradio</pre> | |||
Then remove the files. | |||
Warning! The <code>rm</code> command cannot be undone! | |||
For GNU Radio v3.8 the delete command is: | |||
<pre>rm FrequencyShifter.py FrequencyShifter.py.block.yml</pre> | |||
[[File:DeleteHierBlockCommand.png|700px]] | |||
For GNU Radio v3.10 the delete command is: | |||
<pre>rm FrequencyShifter.py FrequencyShifter.block.yml</pre> | |||
Click the ''Reload Blocks'' button to update GRC's memory of blocks, clearing it of the ''Frequency Shifter'' block: | |||
[[File:ClickReloadBlocks.png|350px]] | |||
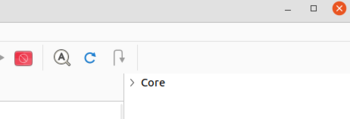
The ''GRC Hier Blocks'' category is deleted and only the ''Core'' blocks remain: | |||
[[File:CoreCategoryOnly.png|350px]] | |||
The next tutorial, [[Creating_Your_First_Block|Creating Your First Block]], describes how to use the ''Embedded Python Block'' to create a signal processing block in GNU Radio. | |||
Latest revision as of 16:08, 18 May 2023
| Beginner Tutorials
Introducing GNU Radio Flowgraph Fundamentals
Creating and Modifying Python Blocks DSP Blocks
SDR Hardware |
This tutorial describes how to create a hierarchical block, or Hier block, in GRC.
The previous tutorial, Streams and Vectors, describes the differences between Streams and Vectors. The next tutorial, Creating Your First Block, describes how to use the Embedded Python Block to create a signal processing block in GNU Radio.
Creating the Initial Flowgraph
A hier block is used as a wrapper to simplify multiple GNU Radio blocks into a single block. The example hier block will be a frequency shifter block which multiplies a Signal Source against an input signal.
The first step is creating the flowgraph. Drag and drop the following blocks into the workspace:
- Signal Source
- Multiply
- Noise Source
- Low Pass Filter
- Throttle
- QT GUI Frequency Sink
- QT GUI Range
Connect the blocks:
Update the QT GUI Range properties:
- Id: frequency
- Default Value: 0
- Start: -samp_rate/2
- Stop: samp_rate/2
Update the Low Pass Filter properties:
- Cutoff Freq (Hz): samp_rate/4
- Transition Width (Hz): samp_rate/8
Create The Hier Block
Click and drag in the workspace window to select the Signal Source and Multiply blocks including the connection between them:
Right-click on one of the highlighted blocks and select More > Create Hier:
A flowgraph is created in a new GRC tab:
Double-click the Options block and edit the properties:
- Id: FrequencyShifter
- Title: Frequency Shifter Block
- Generate Options: Hier Block
The remaining properties will then change, showing the Category:
The Category is where the block can be found in the block library on the right hand of GRC. The hier block will be located under GRC Hier Blocks, instead of Core where the rest of the GNU Radio blocks are located.
Save the flowgraph.
Variables vs Parameters
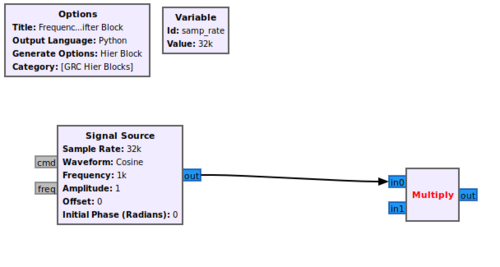
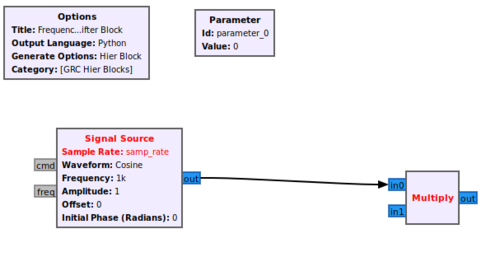
A variable is different than a parameter in GNU Radio. A parameter creates an interface for the hier block to accept a value from an external source, whereas a variable only exists internally to the hier block:
For example, the samp_rate variable can only be accessed from within the hier block:
The samp_rate needs to be converted to a parameter so it can be updated from another block in the larger flowgraph. Delete the samp_rate variable and add a Parameter block into the GRC workspace:
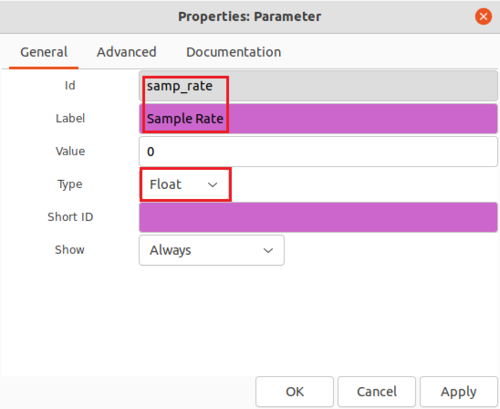
Edit the Parameter properties:
- Id: samp_rate
- Label: Sample Rate
- Type: Float
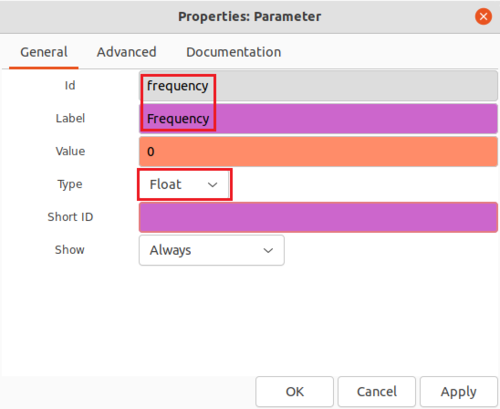
Add a second Parameter:
- Id: frequency
- Label: Frequency
- Type: float
Add the frequency parameter to the Signal Source Frequency property:
The flowgraph should look like:
Input and Output Ports
A pad is used to specify input and output ports on a hier block. Add a Pad Source and Pad Sink to the flowgraph to act as the in and out ports:
Generate the Hier Block Code
Click Generate the flow graph to create the hier block source code:
A Python .py file and YAML .yml file will be created. For GNU Radio v3.8 the files will be created in your home directory:
/home/$USER/.grc_gnuradio/
For GNU Radio v3.10, the files will be created in the directory where the .grc file is saved. Please create the .grc_gnuradio directory and copy the .py and .yml files there:
$ mkdir /home/$USER/.grc_gnuradio
$ cp FrequencyShifter.block.yml /home/$USER/.grc_gnuradio/
$ cp FrequencyShifter.py /home/$USER/.grc_gnuradio/
GRC needs to update the internal list of the blocks before the Frequency Shifter block can be used in a flowgraph. Click the Reload Blocks button:
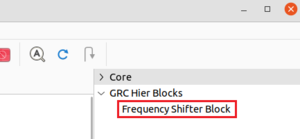
There is a new category GRC Hier Blocks in the block library below Core, and the Frequency Shifter Block can be used in flowgraphs:
Using the Hier Block
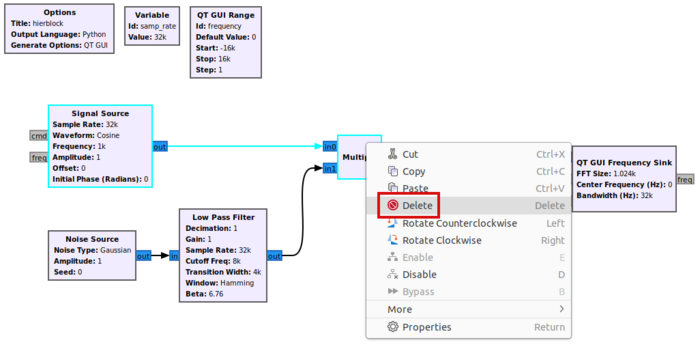
The hier block can now be used in a flowgraph. Return the starting flowgraph and delete the Signal Source and Multiply blocks:
Add the Frequency Shifter Block to the workspace and connect it to the rest of the flowgraph:
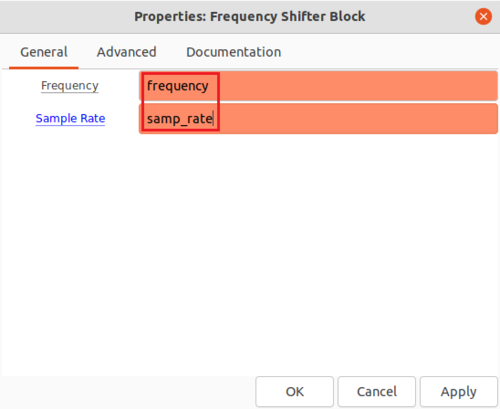
Edit the Frequency Shifter Block properties by adding the samp_rate and frequency variables:
Running the flowgraph will bring up the QT GUI Frequency Sink window with the QT QUI Range slider:
Dragging the frequency slider will pass the value through the Frequency Shifter Block parameter causing the signal's center frequency to be modified:
Deleting a Hier Block
A hier block can be cleared from GRC memory by removing the files from /home/$USER/.grc_gnuradio.
In a terminal, move to the .grc_gnuradio directory:
cd /home/$USER/.grc_gnuradio
Then remove the files.
Warning! The rm command cannot be undone!
For GNU Radio v3.8 the delete command is:
rm FrequencyShifter.py FrequencyShifter.py.block.yml
For GNU Radio v3.10 the delete command is:
rm FrequencyShifter.py FrequencyShifter.block.yml
Click the Reload Blocks button to update GRC's memory of blocks, clearing it of the Frequency Shifter block:
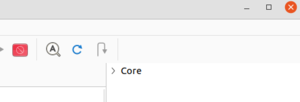
The GRC Hier Blocks category is deleted and only the Core blocks remain:
The next tutorial, Creating Your First Block, describes how to use the Embedded Python Block to create a signal processing block in GNU Radio.
